- 1. 运行代码
- 1.1 执行代码
- 1.2 调试
- 1.3 lambda
- 2. webapp-start-tomcat
- 2.1 分析 gradle
- 2.2 功能分析
- 2.3 下一个
- 3. webapp-init-tomcat
- 3.1 分析 gradle
- 3.2 功能分析
- 3.3 单元测试
- 3.4 开发小技巧
- 4. webapp-init
- 4.1 分析 gradle
- 4.2 分析功能
- 5. webapp-config
- 5.1 分析 gradle
- 5.2 分析功能
源码分析
①②③④⑤⑥⑦⑧⑨⑩⑪⑫⑬⑭⑮⑯⑰⑱⑲⑳✕✓✔✖
1. 运行代码
在【快速入门】中使用overlay来执行代码,官方网站不建议修改核心代码。但是为了学习,还是可以执行源码来看一看CAS是怎么运行的。
1.1 执行代码
首先:clone一份代码,然后直接运行tomcat工程下的bootrun就可以了
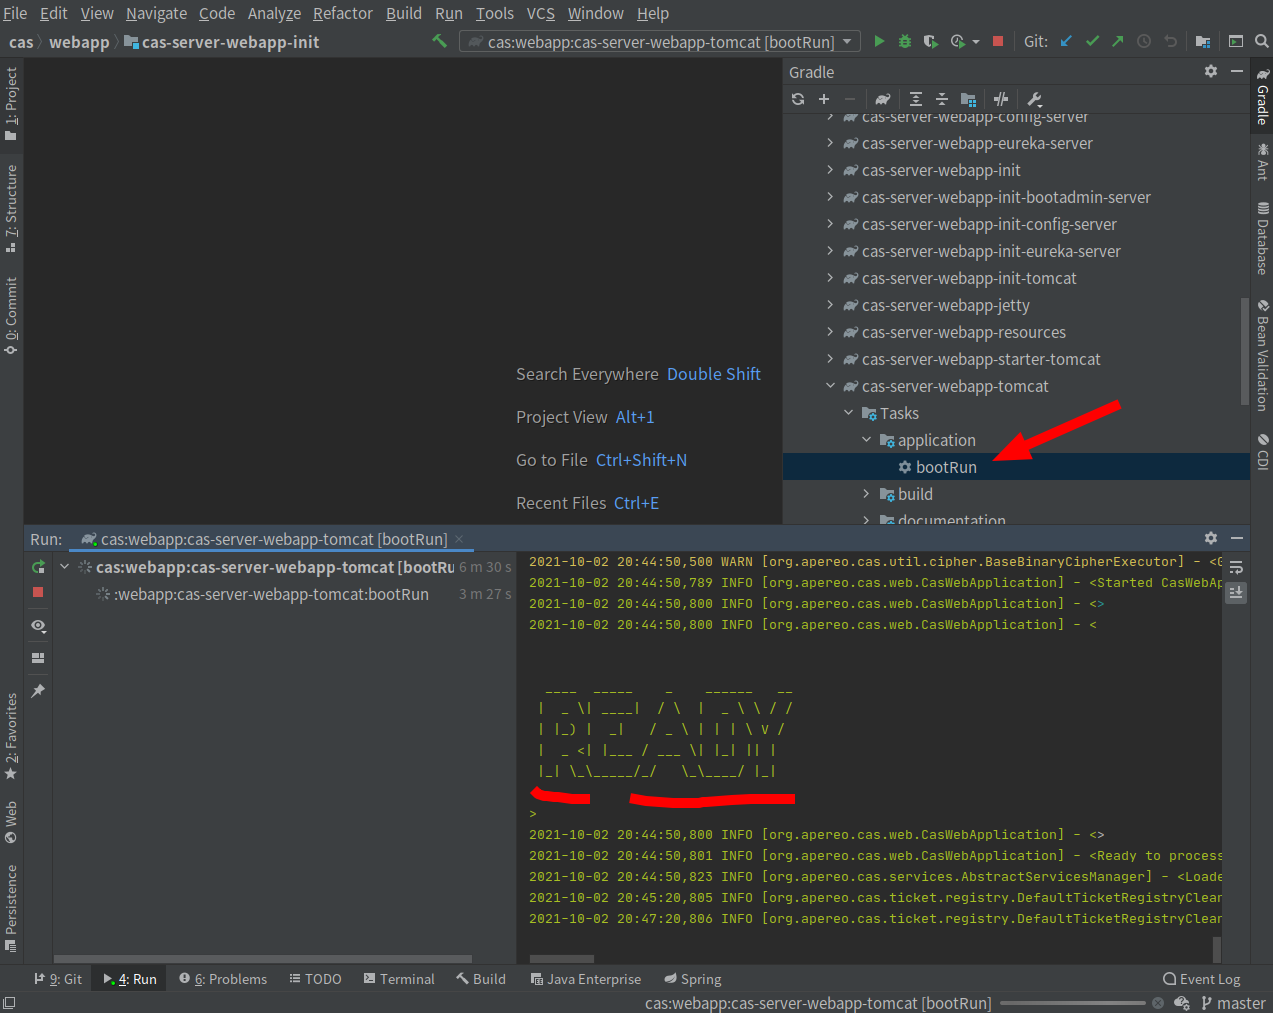
当然,也可以执行命令,来启动服务java -jar build/libs/cas-server-webapp-tomcat-6.5.0-SNAPSHOT.war
出现这个页面后,在浏览器中输入:https://localhost:8443/cas/login。 出现这个页面页面就可以了。
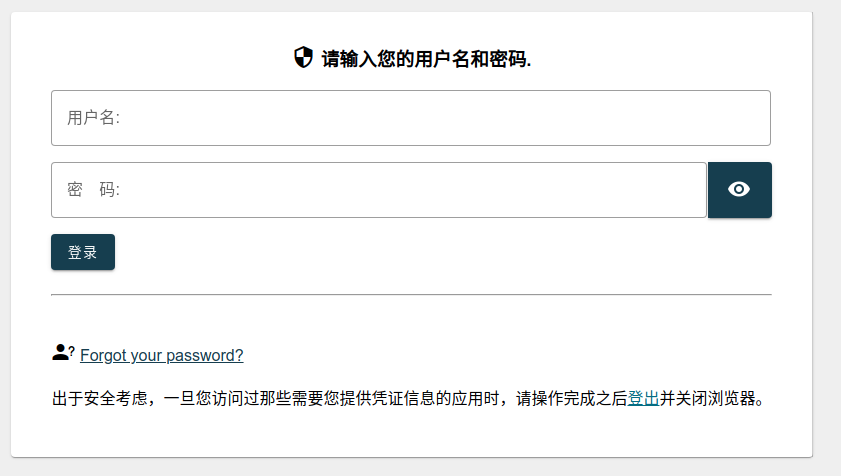
casuser Mellon
1.2 调试
如果要进行调试,可以参考远程调试的快速参考。
① 启动 War Debug 模式
有两个可以启动 tomcat 工程
在cas-server-webapp-starter-tomcat执行下面命令
java -jar -agentlib:jdwp=transport=dt_socket,server=y,suspend=n,address=*:5005 build/libs/cas-server-webapp-starter-tomcat-6.5.0-SNAPSHOT.jar
在cas-server-webapp-tomcat工程目录中执行下面命令,这个工程是一个 war 包:
java -jar -agentlib:jdwp=transport=dt_socket,server=y,suspend=n,address=*:5005 build/libs/cas-server-webapp-tomcat-6.5.0-SNAPSHOT.war
② 在 Idea 中启动调试
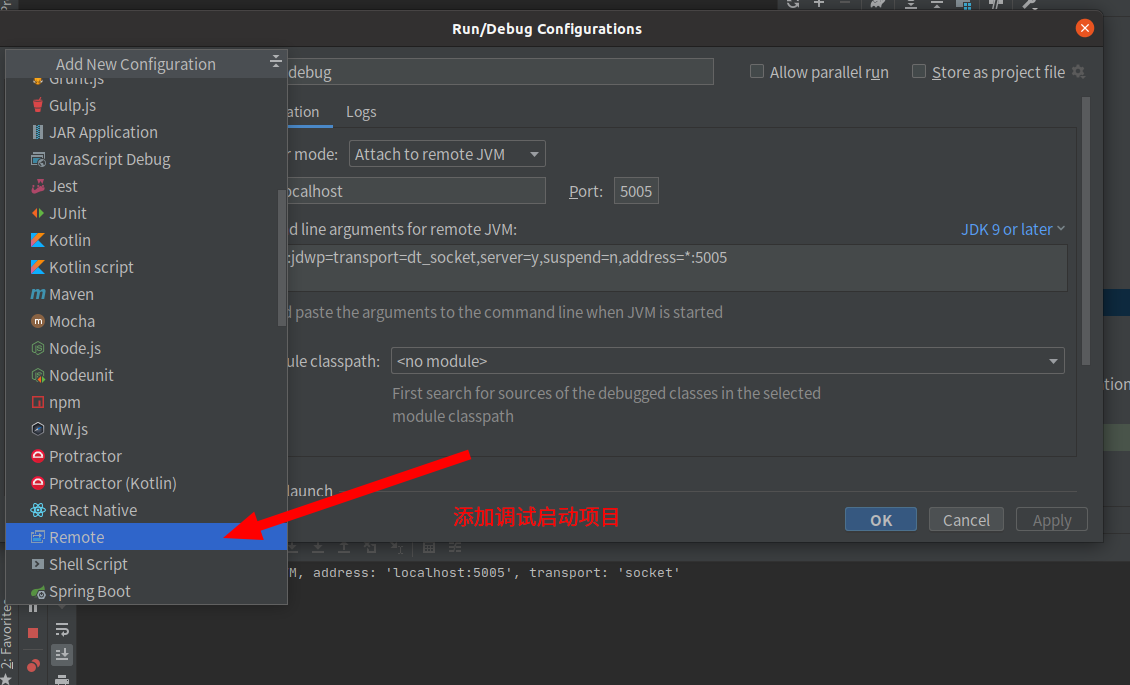
③ 设置断点
例如用ctrl+n打开类UsernamePasswordCredential, 然后设置断点看看。
1.3 lambda
在看CAS代码的过程中会遇到很多的 lambda 表达式,需要了解这些写法,才能更好的理解代码。
2. webapp-start-tomcat
源码阅读,从 Tomcat Start 工程开始。
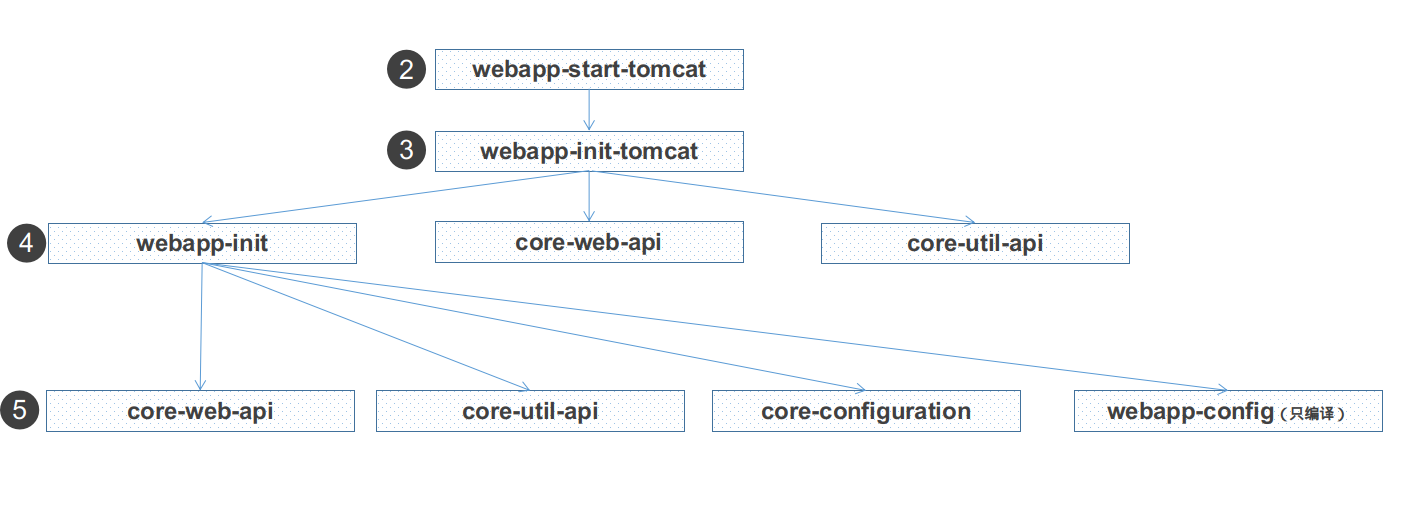
2.1 分析 gradle
① 主 gradle
从 gradle 中分析
ext {mainClassName = "org.apereo.cas.web.CasWebApplication"}description = "Apereo CAS Starter with Apache Tomcat"apply from: rootProject.file("gradle/springboot.gradle")apply from: rootProject.file("gradle/webapp-dependencies.gradle")dependencies {implementation project(":webapp:cas-server-webapp-init-tomcat")}
- 引用了两个函数库
gradle/springboot.gradle"gradle/webapp-dependencies.gradle
- 一个基础库
:webapp:cas-server-webapp-init-tomcat
感觉 gradle 的配置的确很灵活
② springboot.gradle
这是一个公共的函数类,用来进行 spring 的编译。主要功能如下:
加入公用的配置与模板文件
- 配置文件在
webapp:cas-server-webapp-resources/src/main/resources thymeleaf文件在/cas-server-support-thymeleaf/src/main/resources/themes文件在/cas-server-support-themes-collection/src/main/resources/
- 配置文件在
设置
mainClassName配置
bootRun,这里配置了 debug 的信息,但是需要由外部的参数传入。
③ webapp-dependencies.gradle
引入了程序中的依赖的内容,如果了解下面工程的用法,就对真个程序了解的差不多了。
implementation project(":core:cas-server-core")implementation project(":core:cas-server-core-audit")implementation project(":core:cas-server-core-authentication")implementation project(":core:cas-server-core-configuration")implementation project(":core:cas-server-core-cookie")implementation project(":core:cas-server-core-logout")implementation project(":core:cas-server-core-logging")implementation project(":core:cas-server-core-services")implementation project(":core:cas-server-core-tickets")implementation project(":core:cas-server-core-util")implementation project(":core:cas-server-core-validation")implementation project(":core:cas-server-core-web")implementation project(":core:cas-server-core-notifications")compileOnlyApi project(":support:cas-server-support-jpa-util")implementation project(":support:cas-server-support-actions")implementation project(":support:cas-server-support-person-directory")implementation project(":support:cas-server-support-themes")implementation project(":support:cas-server-support-validation")implementation project(":support:cas-server-support-thymeleaf")implementation project(":support:cas-server-support-pm-webflow")implementation project(":webapp:cas-server-webapp-config")implementation project(":webapp:cas-server-webapp-init")implementation project(":webapp:cas-server-webapp-resources")
2.2 功能分析
webapp-start-tomcat的功能很简单,就是在启动的时候,输出CAS的系统信息。
public class CasStarterBanner extends AbstractCasBanner {.....}
为了实现启动信息的输出,实际上是继承了 spring 的Banner接口
2.3 下一个
这个类就是简单的显示启动日子的输出,所以还要看下面的核心类。
webapp:cas-server-webapp-init-tomcat
3. webapp-init-tomcat
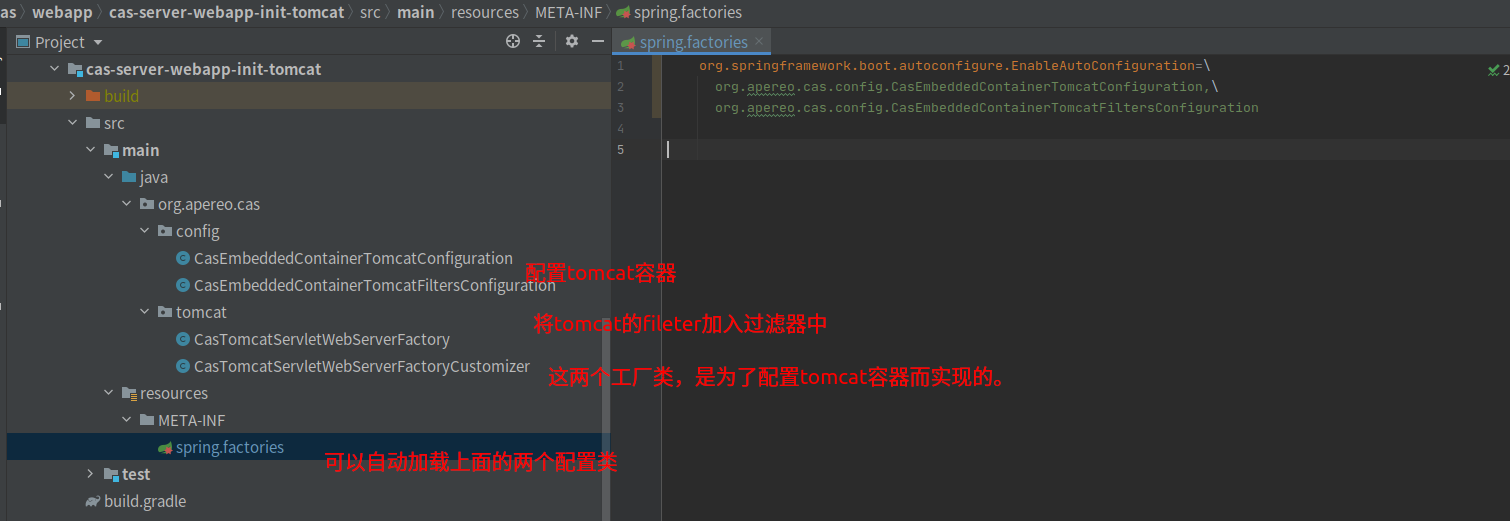
就是初始化 tomcat 容器,并加入了两个过滤器。
3.1 分析 gradle
这里主要引入了三个工程:
core-web-api: 核心包的 web apicore-util-api:核心包的一些工具webapp-init:与 web 容器无关的配置
description = "Apereo CAS Web Application via Apache Tomcat"dependencies {api libraries.springboottomcatimplementation project(":core:cas-server-core-web-api")implementation project(":core:cas-server-core-util-api")implementation project(":webapp:cas-server-webapp-init")}
3.2 功能分析
有两个配置文件
- CasEmbeddedContainerTomcatConfiguration:嵌入式 Tomcat 容器配置
- CasEmbeddedContainerTomcatFiltersConfiguration:Tomcat Filter 配置
3.2.1 配置 Tomcat 容器
① 主配置类
CasEmbeddedContainerTomcatConfiguration
// proxyBeanMethods = false 为了提高加载对的速度@Configuration(value = "casEmbeddedContainerTomcatConfiguration", proxyBeanMethods = false)//@EnableConfigurationProperties(CasConfigurationProperties.class)@ConditionalOnClass(value = {Tomcat.class, Http2Protocol.class})@AutoConfigureBefore(ServletWebServerFactoryAutoConfiguration.class)@AutoConfigureOrder(Ordered.HIGHEST_PRECEDENCE)public class CasEmbeddedContainerTomcatConfiguration {//导入了spring自身的服务器定义@Autowiredprivate ServerProperties serverProperties;@Autowiredprivate CasConfigurationProperties casProperties;//系统中没有这个类,就启用这个类@ConditionalOnMissingBean(name = "casServletWebServerFactory")@Beanpublic ConfigurableServletWebServerFactory casServletWebServerFactory() {return new CasTomcatServletWebServerFactory(casProperties, serverProperties);}@ConditionalOnMissingBean(name = "casTomcatEmbeddedServletContainerCustomizer")@Beanpublic ServletWebServerFactoryCustomizer casTomcatEmbeddedServletContainerCustomizer() {return new CasTomcatServletWebServerFactoryCustomizer(serverProperties, casProperties);}}
注解说明
@ConfigurationproxyBeanMethods = false为了提高加载对的速度- spring4.0 之二:@Configuration 的使用
@EnableConfigurationProperties- 使
@ConfigurationProperties也就是CasConfigurationProperties.class生效。 - 为了读取配置文件中的内容,如果对这部分感兴趣,可以看这篇文章关与 @EnableConfigurationProperties 注解
@ConfigurationProperties(value = "cas")
- 使
@ConditionalOnClass- 只有引用了
Tomcat.class, Http2Protocol.class这两个类,才加载这个类。
- 只有引用了
@AutoConfigureBefore- 在 Spring 自身的
ServletWebServerFactoryAutoConfiguration前进行配置
- 在 Spring 自身的
@AutoConfigureOrder- 定义加载的顺序,这里表示加载的顺序很高。
@ConditionalOnMissingBean如果系统没有这个类,就加载这个类@NestedConfigurationPropertySpring 中常用注解的应用
程序说明
初始化了两个类
CasTomcatServletWebServerFactory详细内容,见下一节- 返回一个
ConfigurableServletWebServerFactory类,具体是继承了TomcatServletWebServerFactory来实现的。 - 在这个类中,可以自定义 web 容器的端口号等内容,通过这个抽象类,今后可以替换 tomcat 或者其他的 web 容器了。
- 返回一个
CasTomcatServletWebServerFactoryCustomizer详细内容,见下一节
② 初始化 tomcatServer 工厂类
这里重点讲讲CasTomcatServletWebServerFactory中实现的功能。
- 设置端口
- 设置 Apr 协议,这个协议的 tomcat 运行速度最快
- 配置 Session 集群,这里有两个配置方案。
DeltaManagerBackupManager- 这里就有一个思考题,如果在
CAS中用Redis进行缓存。
③ 修改 web 容器配置
可以通过ServletWebServerFactoryCustomizer去修改我们的默认容器的配置,可以参考这个网址。
主要功能有:
configureAjp配置 tomcat 的 ajp 协议configureHttpconfigureHttpProxyconfigureBasicAuthn设置 tomcat basic 认证configureRewriteValve设置 tomcat 重写机制configureSSLValve设置 SSL 相关configureExtendedAccessLogValve设置日志finalizeConnectors设置 socket 相关
协议说明
HTTP协议:连接器监听8080端口,负责建立HTTP连接。在通过浏览器访问Tomcat服务器的Web应用时,使用的就是这个连接器。AJP协议:连接器监听8009端口,负责和其他的HTTP服务器建立连接。在把Tomcat与其他HTTP服务器集成时,就需要用到这个连接器。
tomcat 代理
给 tomcat 设置代理,这样凡是从tomcat中发出去的请求,都会通过这个代理服务器去访问。我们这里说的是http接口的代理。修改bin/catalina.sh ,增加一行设置,如下:JAVA_OPTS=”$JAVA_OPTS -Dhttp.proxyHost=10.98.10.237 -Dhttp.proxyPort=3128”ip和端口改成自己可用的代理服务器。
tomcat basic 认证
<security-constraint><web-resource-collection><web-resource-name>protected Resource</web-resource-name><url-pattern>/BasicVerify/*</url-pattern></web-resource-collection><auth-constraint><role-name>test100</role-name></auth-constraint></security-constraint><login-config><auth-method>BASIC</auth-method><realm-name>Default</realm-name></login-config>————————————————<tomcat-users><role rolename="test100"/><user username="test123" password="test123" roles="test100"/></tomcat-users>
Rewrite 机制
在你的webapp WEB-INF目录下创建rewrite.config的配置文件,比如说我们要将http://localhost:8080/ 映射到你的webapp 某个页面: http://localhost:8080/“yourwebname” /test.html, 我们可以这样配置RewriteRule ^/ /yourwebname/test.html [L]写机制配置完成,当你在浏览器中输入http://localhost:8080/, 就可以正常访问test.html页面了。
RewriteRule 语法规则可参考《浅析 Apache 中 RewriteRule 和 RewriteCond 规则参数的详细介绍》
AccessLogValve 是处理生成访问日志的,这里有一篇文章Tomcat 源码分析-AccessLogValve 类
3.2.2 配置 tomcat 的 Filter
注解说明:
@ConditionalOnProperty- 只有某个属性有的时候,才初始化
@ConditionalOnProperty(prefix = "cas.server.tomcat.csrf", name = "enabled", havingValue = "true")
@RefreshScope- 动态刷新
① 追加 tomcatCsrfPreventionFilter
使用了FilterRegistrationBean 把 tomcat 中的CsrfPreventionFilter加入了进来。
spring boot 过滤器 FilterRegistrationBean
② 追加了 tomcatRemoteAddressFilter
远程 IP 过滤 Filter,Tomcat 常用的过滤器
3.3 单元测试
如何对这个模块进行单元测试呢?
- 首先定义个 suite
- 其次对配置进行测试
- 然后对集群与工厂类进行测试
3.3.1 TestSuite
测试入口模块,把要测试的所有类一起测试。这个类很简单
注解说明
@Suite表示是一个集合的测试@SelectClasses下面要选择的测试类
3.3.2 测试 Filter 配置
@SpringBootTest测试的主类classes要测试的类properties特定的属性webEnvironment
@EnableConfigurationProperties启动配置文件@Tag用来做标签分类@Qualifier("tomcatRemoteAddressFilter")- 如果容器中有多个相同类型的 bean,则框架将抛出
NoUniqueBeanDefinitionException, 以提示有多个满足条件的 bean 进行自动装配。 - 这个经常与
Autowired匹配
- 如果容器中有多个相同类型的 bean,则框架将抛出
assertNotNull断言不为空
@SpringBootTest(classes = {RefreshAutoConfiguration.class,CasEmbeddedContainerTomcatConfiguration.class,CasEmbeddedContainerTomcatFiltersConfiguration.class},properties = {"server.port=8583","server.ssl.enabled=false","cas.server.tomcat.csrf.enabled=true","cas.server.tomcat.remote-addr.enabled=true"},webEnvironment = SpringBootTest.WebEnvironment.MOCK)@EnableConfigurationProperties({CasConfigurationProperties.class, ServerProperties.class})@Tag("WebApp")public class CasEmbeddedContainerTomcatFiltersConfigurationTests {@Autowired@Qualifier("tomcatCsrfPreventionFilter")private FilterRegistrationBean tomcatCsrfPreventionFilter;@Autowired@Qualifier("tomcatRemoteAddressFilter")private FilterRegistrationBean tomcatRemoteAddressFilter;@Testpublic void verifyOperation() {assertNotNull(tomcatCsrfPreventionFilter);assertNotNull(tomcatCsrfPreventionFilter.getFilter());assertNotNull(tomcatRemoteAddressFilter);assertNotNull(tomcatRemoteAddressFilter.getFilter());}}
3.4 开发小技巧
① lombok
在根目录下加入文件后,就不用在程序中写了
lombok.log.fieldName = LOGGERlombok.log.fieldIsStatic=truelombok.toString.doNotUseGetters=truelombok.equalsAndHashCode.doNotUseGetters=truelombok.addLombokGeneratedAnnotation = trueconfig.stopBubbling=true
在程序中就可以直接使用了。
LOGGER.debug("Enabling APR on connector port [{}]", c.getPort());
② gradle 配置
- 把一些公用的函数,专门放到 gradle 目录中
- 使用了属性
③ var 新特性
java 的高级版本中,使用了 var 的新特性。
④ 函数型编程
CAS自定义了一个工具类FunctionUtils,如果发现有证书文件,就调用某个执行函数。这里做了一个封装,当然也可以用IF ELSE来实现。
FunctionUtils.doIfNotNull(apr.getSslCaCertificateFile(),Unchecked.consumer(f -> handler.setSSLCACertificateFile(apr.getSslCaCertificateFile().getCanonicalPath())));
doIfNotNull的实现方式
/*** Do if not null.** @param <T> the type parameter* @param input the input* @param trueFunction the true function*/public static <T> void doIfNotNull(final T input,final Consumer<T> trueFunction) {try {if (input != null) {trueFunction.accept(input);}} catch (final Throwable e) {LoggingUtils.warn(LOGGER, e);}}
Unchecked.consumer:用来进行语法验证
⑤ 搜索例子代码
⑥ 根据属性文件加载类
例如下面根据属性文件,来加载类,并且是动态加载
@ConditionalOnProperty(prefix = "cas.server.tomcat.csrf", name = "enabled", havingValue = "true")@RefreshScope@Bean@ConditionalOnMissingBean(name = "tomcatCsrfPreventionFilter")public FilterRegistrationBean tomcatCsrfPreventionFilter() {val bean = new FilterRegistrationBean();bean.setFilter(new CsrfPreventionFilter());bean.setUrlPatterns(CollectionUtils.wrap("/*"));bean.setName("tomcatCsrfPreventionFilter");return bean;}
⑦ Spring Factories
Spring Boot 中有一种非常解耦的扩展机制:Spring Factories。这种扩展机制实际上是仿照 Java 中的 SPI 扩展机制来实现的。
在日常工作中,我们可能需要实现一些 SDK 或者 Spring Boot Starter 给被人使用时, 我们就可以使用 Factories 机制。Factories 机制可以让SDK 或者 Starter 的使用只需要很少或者不需要进行配置,只需要在服务中引入我们的 jar 包即可。
例如本工程中,就使用了这个机制
org.springframework.boot.autoconfigure.EnableAutoConfiguration=\org.apereo.cas.config.CasEmbeddedContainerTomcatConfiguration,\org.apereo.cas.config.CasEmbeddedContainerTomcatFiltersConfiguration
4. webapp-init
4.1 分析 gradle
description = "Apereo CAS Web Application Initializer"dependencies {implementation project(":core:cas-server-core-web-api")implementation project(":core:cas-server-core-util-api")implementation project(":core:cas-server-core-configuration")provided project(":webapp:cas-server-webapp-config")}
implementation 说明
implementation 指令:这个指令的特点就是,对于使用了该命令编译的依赖,对该项目有依赖的项目将无法访问到使用该命令编译的依赖中的任何程序,也就是将该依赖隐藏在内部,而不对外部公开。
implementation 的“访问隔离”只作用在编译期
implementation 的“访问隔离”只作用在编译期。什么意思呢?如果 lib C 依赖了 lib A 2.0 版本,lib B implementation 依赖了 lib A 1.0 版本:
那么编译期,libC 可访问 2.0 版本的 libA,libB 可访问 1.0 版本的 libA。但最终打到 apk 中的是 2.0 版本(通过依赖树可看到)。
在运行期,lib B 和 lib C 都可访问 libA 的 2.0 版本(因为 apk 的所有 dex 都会放到 classLoader 的 dexPathList 中)。
provided 说明
provided 只提供编译支持,但是不会写入 apk。比如我在编译的时候对某一个 jar 文件有依赖,但是最终打包 apk 文件时,我不想把这个 jar 文件放进去,可以用这个命令。
4.2 分析功能
这个类中有 Spring 的Application类,是整个应用的启动程序。
4.2.1 CasWebApplication
这个类的主要功能有:
- Main 函数
- 给日志传递参数
- 得到自定义 banner
- Run
- 设置 banner
- web 类型
- 日志输出模式
- 容器工厂
applicationStartup信息收集
- 监听
App启动完毕后,输出一个 READY 的信息。
MainApplication 用到下面三个类:
CasEmbeddedContainerUtils这个工具类,主要实现了下面三项内容:- 为了得到日志初始化
- Banner
ApplicationStartup
CasWebApplicationContext- 为什么要自定义一个
ApplicationContext不用默认的呢?- 因为要做一个
配置属性的校验:CasConfigurationPropertiesValidator - 还是使用了默认的
AnnotationConfigServletWebServerApplicationContext
- 因为要做一个
- 为什么要自定义一个
CasWebApplicationServletInitializer- 这个类没有用,只在测试过程中被引用了。
① 注解分析
@EnableDiscoveryClient- 能够让注册中心能够发现,扫描到改服务。Spring Cloud 的基本功能
@SpringBootApplication- SpringBootApplication 注解——史上最全最详细
exclude不包含某个配置proxyBeanMethods- 注解的意思是 proxyBeanMethods 配置类是用来指定@Bean 注解标注的方法是否使用代理,默认是 true 使用代理,直接从 IOC 容器之中取得对象;如果设置为 false,也就是不使用注解,每次调用@Bean 标注的方法获取到的对象和 IOC 容器中的都不一样,是一个新的对象,所以我们可以将此属性设置为 false 来提高性能;
@EnableConfigurationProperties- 让使用了
@ConfigurationProperties注解的类生效,并且将该类注入到IOC容器中,交由IOC容器进行管理
- 让使用了
@EnableAsync- 开启异步线程,使
@Async起作用。可以参考这个文章SpringBoot 项目中@Async、@EnableAsync 的配合使用
- 开启异步线程,使
@EnableAspectJAutoProxy- 开启
AOP proxyTargetClass:表明该类采用 CGLIB 代理还是使用 JDK 的动态代理
- 开启
@EnableTransactionManagementproxyTargetClass设置为 true 表示使用基于子类实现的代理(CGLIB),设置为 false 表示使用基于接口实现的代理,默认为 falseAdviceMode表示是使用哪种transactional advice,有PROXY及ASPECTJ两种,默认是AdviceMode.PROXY
@EnableScheduling- 启用定时任务
@NoArgsConstructor- 生成一个无参数的构造方法
@Slf4j:日志输出
@EnableDiscoveryClient@SpringBootApplication(exclude = DataSourceAutoConfiguration.class, proxyBeanMethods = false)@EnableConfigurationProperties(CasConfigurationProperties.class)@EnableAsync@EnableAspectJAutoProxy(proxyTargetClass = true)@EnableTransactionManagement(proxyTargetClass = true)@EnableScheduling@NoArgsConstructor@Slf4jpublic class CasWebApplication {/*** Main entry point of the CAS web application.** @param args the args*/public static void main(final String[] args) {CasEmbeddedContainerUtils.getLoggingInitialization().ifPresent(init -> init.setMainArguments(args));val banner = CasEmbeddedContainerUtils.getCasBannerInstance();new SpringApplicationBuilder(CasWebApplication.class).banner(banner).web(WebApplicationType.SERVLET).logStartupInfo(true)//.contextFactory(webApplicationType -> new CasWebApplicationContext())// 应用程序启动期间标记步骤,并收集有关执行上下文或其处理时间的数据。.applicationStartup(CasEmbeddedContainerUtils.getApplicationStartup()).run(args);}/*** Handle application ready event.** @param event the event*/@EventListenerpublic void handleApplicationReadyEvent(final ApplicationReadyEvent event) {AsciiArtUtils.printAsciiArtReady(LOGGER, StringUtils.EMPTY);LOGGER.info("Ready to process requests @ [{}]", DateTimeUtils.zonedDateTimeOf(Instant.ofEpochMilli(event.getTimestamp())));}}
② AOP 详解
上面的代码中@EnableAspectJAutoProxy(proxyTargetClass = true),强制开启了cglib,cglib是啥东东,有啥好处?
Spring 默认通过JDK动态代理实现,但是JDK只能是对接口才能做动态代理 。
③ SpringApplicationBuilder
这里讲解一下这个函数的高级定义。
SpringBoot 入门篇(三) SpringApplication
参考下面的网址:
- springboot-cglib 动态代理实现代码增强
- 使用到了
Enhancer与MethodInterceptor - SpringAOP 中的 JDK 和 CGLib 动态代理哪个效率更高.pdf
- 使用到了
5. webapp-config
5.1 分析 gradle
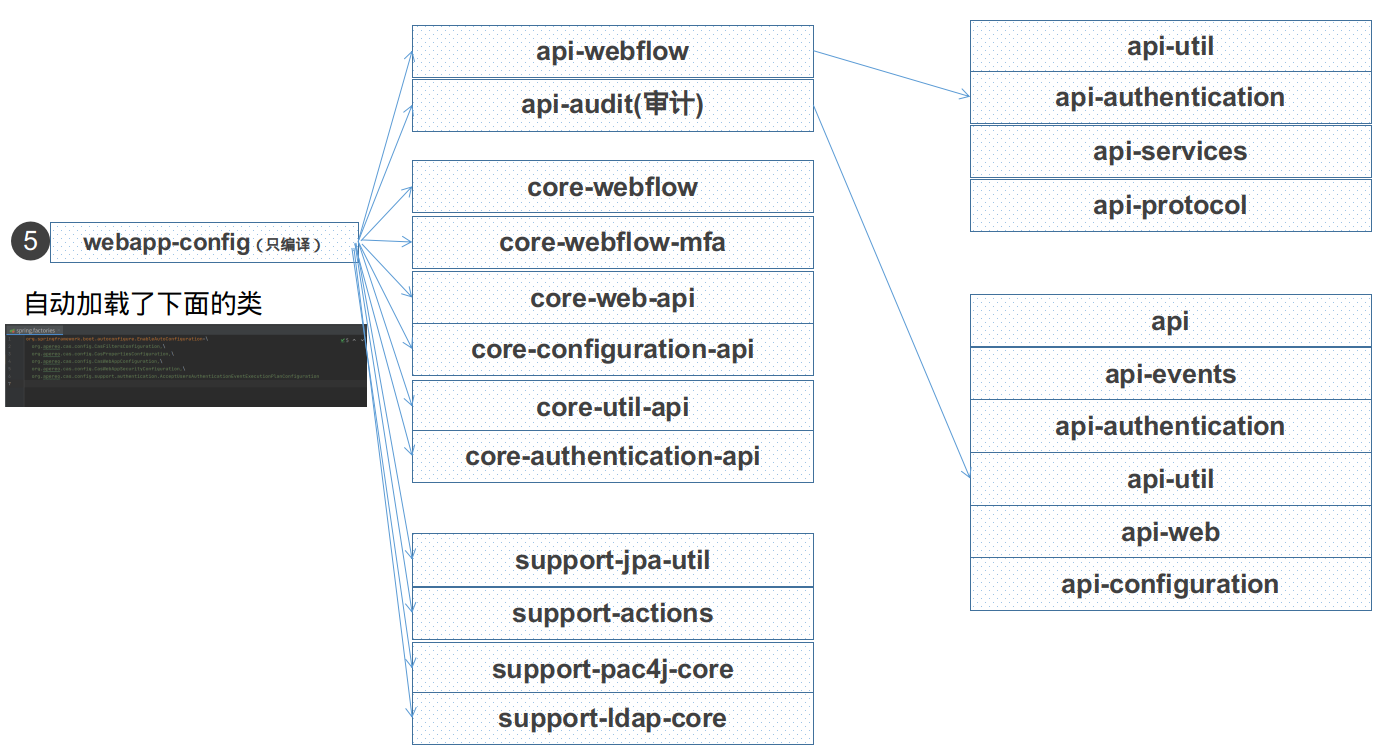
description = "Apereo CAS Web Application Configuration"dependencies {api project(":api:cas-server-core-api-webflow")api project(":api:cas-server-core-api-audit")implementation libraries.pac4jcoreimplementation libraries.springsecuritywebimplementation libraries.springsecurityconfigimplementation libraries.ldaptiveimplementation project(":core:cas-server-core-webflow")implementation project(":core:cas-server-core-webflow-mfa")implementation project(":core:cas-server-core-web-api")implementation project(":core:cas-server-core-configuration-api")implementation project(":core:cas-server-core-util-api")implementation project(":core:cas-server-core-authentication-api")compileOnlyApi project(":support:cas-server-support-jpa-util")implementation project(":support:cas-server-support-actions")implementation project(":support:cas-server-support-pac4j-core")implementation project(":support:cas-server-support-ldap-core")}
5.1.1 引入分类
api:使用该方式依赖的库将会参与编译和打包implementation:仅仅对当前的 Module 提供接口,也就是将该依赖隐藏在内部,而不对外部公开。librariesproject
compileOnlyApi参考文档
5.1.2 使用 libraries 包
在主 gradle 中,定义了这么多引用。
apply from: rootProject.file("gradle/dependencies.gradle")apply from: rootProject.file("gradle/dependencyUpdates.gradle")
其中dependencies.gradle 这么定义:
ext.libraries = [acme : [dependencies.create("org.shredzone.acme4j:acme4j-client:$acmeClientVersion") {exclude(group: "org.slf4j", module: "slf4j-api")exclude(group: "org.bitbucket.b_c", module: "jose4j")exclude(group: "org.bouncycastle", module: "bcpkix-jdk15on")exclude(group: "org.bouncycastle", module: "bcprov-jdk15on")},dependencies.create("org.shredzone.acme4j:acme4j-utils:$acmeClientVersion") {exclude(group: "org.slf4j", module: "slf4j-api")exclude(group: "org.bitbucket.b_c", module: "jose4j")exclude(group: "org.bouncycastle", module: "bcpkix-jdk15on")exclude(group: "org.bouncycastle", module: "bcprov-jdk15on")}],
为什么这么定义呢?
- 重用
- 避免冲突,在详细定义中排除了一些定义
exclude
5.2 分析功能
5.2.1 CasFiltersConfiguration
通过CasFiltersConfiguration来配置过滤器,其中最重要的概念是:FilterRegistrationBean。
在读这段代码的时候,快速的回忆了一下以前我是怎么添加Filter,当时在webConfig中得到一个http,然后通过add来添加。那么CAS是怎么添加filter的?
① FilterRegistrationBean
可以参考这个文档:spring boot 过滤器 FilterRegistrationBean。
通过FilterRegistrationBean可以设置优先级与过滤的 URL
② ObjectProvider
ObjectProvider接口是ObjectFactory接口的扩展,专门为注入点设计的,可以让注入变得更加宽松和更具有可选项。Spring ObjectProvider 使用说明
那么什么时候使用ObjectProvider接口?
如果待注入参数的 Bean 为空或有多个时,便是ObjectProvider发挥作用的时候了。
- 如果注入实例为空时,使用
ObjectProvider则避免了强依赖导致的依赖对象不存在异常; - 如果有多个实例,
ObjectProvider的方法会根据 Bean 实现的 Ordered 接口或@Order 注解指定的先后顺序获取一个 Bean。从而了提供了一个更加宽松的依赖注入方式。
@Servicepublic class FooService {private final FooRepository repository;public FooService(ObjectProvider<FooRepository> repositoryProvider) {this.repository = repositoryProvider.getIfUnique();}}//或者这样也是一个不错的选择@Servicepublic class FooService {private final FooRepository repository;public FooService(ObjectProvider<FooRepository> repositoryProvider) {this.repository = repositoryProvider.orderedStream().findFirst().orElse(null);}}
③ 本次追加的过滤器
| 分类 | 过滤器名 | URL | 说明 |
|---|---|---|---|
| Spring | CharacterEncodingFilter | /* | 是 Spring 自带的可以解码的过滤器。本来通过 Spring 的配置文件就可以设置,这里通过了 CAS 的配置文件来设定的。 |
| CAS | AddResponseHeadersFilter | /* | 允许用户轻松地插入默认安全标头以帮助保护应用程序 |
| Spring | CorsFilter | /* | 只有属性文件配置了,才初始化这个类CorsConfigurationSource |
| CAS | RegisteredServiceResponseHeadersEnforcementFilter | /* | 一种筛选器扩展,用于查看已注册服务的属性,以确定是否应将标头注入响应中。 |
| CAS | RequestParameterPolicyEnforcementFilter | /* | 这是一个 JavaServlet 过滤器,它检查指定的请求参数是否包含指定的字符,以及它们是否是多值的,如果它们不符合配置的规则,则抛出异常。 |
| CAS | AuthenticationCredentialsThreadLocalBinderClearingFilter | /* | Servlet 筛选器,用于在请求/响应处理周期结束时清除当前凭据和身份验证的线程本地状态。 |
下面是一个例子代码
@Configurationpublic class SecurityCorsConfiguration {@Beanpublic FilterRegistrationBean corsFilter() {UrlBasedCorsConfigurationSource source = new UrlBasedCorsConfigurationSource();CorsConfiguration config = new CorsConfiguration();config.setAllowCredentials(true);config.addAllowedOrigin("http://localhost:4200");config.addAllowedHeader(CorsConfiguration.ALL);config.addAllowedMethod(CorsConfiguration.ALL);source.registerCorsConfiguration("/**", config);FilterRegistrationBean bean = new FilterRegistrationBean(new CorsFilter(source));bean.setOrder(Ordered.HIGHEST_PRECEDENCE);return bean;}}
5.2.2 CasWebAppConfiguration
这个类继承了WebMvcConfigurer
| 分类 | 类名 | 说明 |
|---|---|---|
| spring | WebMvcConfigurer | 重载了父类的 addInterceptors |
| spring | LocaleResolver | LocaleResolver 组件,本地化(国际化)解析器,提供国际化支持 |
| spring | SimpleUrlHandlerMapping | 看下面的详细描述,有可能是将所有的接口开关都关闭了。 |
| spring | Controller rootController | 这个函数实际上是返回了一个 ParameterizableViewController |
| spring | UrlFilenameViewController | 使用 UrlFilenameViewController 控制器: 使用该控制器与 ParameterizableViewController 控制器相比可以省去实视图名的配置,直接通过 url 解析,例如访问是的 login.do,那么视图名就是 login |
| spring | ParameterizableViewController | |
① WebMvcConfigurer
SpringBoot---WebMvcConfigurer 详解
WebMvcConfigurer 配置类其实是Spring内部的一种配置方式,采用JavaBean的形式来代替传统的xml配置文件形式进行针对框架个性化定制,可以自定义一些 Handler,Interceptor,ViewResolver,MessageConverter。基于 java-based 方式的 spring mvc 配置,需要创建一个配置类并实现**WebMvcConfigurer** 接口;
② SimpleUrlHandlerMapping
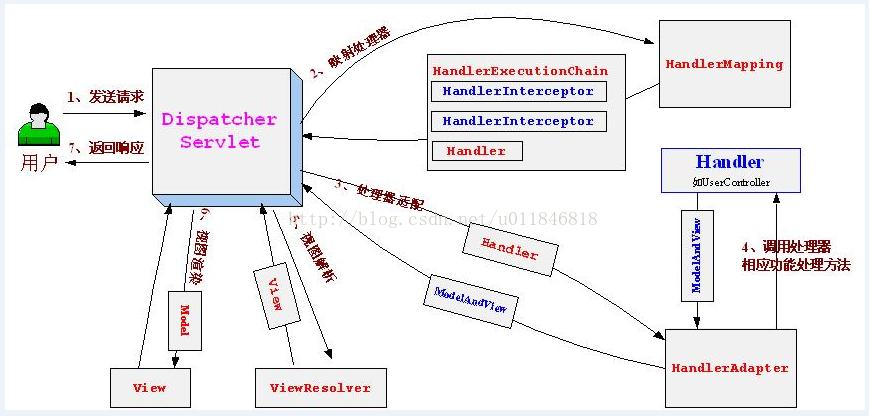
用来将 URL 映射到相应的 Controller 中
- SpringMVC 如何根据 url 获取到执行的方法
- Springmvc 借助 SimpleUrlHandlerMapping 实现接口开关功能
- SpringMVC 基础及使用
- Spring 框架(四)——SpringMVC
HandlerMapping 组件
SimpleUrlHandlerMapping:该处理器是根据请求 URL 来匹配 Bean 的 id 属性。
BeanNameUrlHandlerMapping:该处理器根据请求名来查找匹配的 Bean。
ControllerClassNameHandlerMapping:该处理器是根据请求名和 Controller 的类名进行匹配。请求名就是 Controller 类名,然后把 Controller 去掉的名字。例如:HelloController -> /hello*。
Handler 组件
UrlFilenameViewController:把请求名直接转换成视图名,并返回该视图。
ParameterizableViewController:该控制器总是返回一个预定义的视图。
ServletForwardingController:把请求转发给一个 Servlet 来处理。
MultiActionController:该处理器允许在一个 Controller 中处理多个请求。
Resolver 组件
InternalResourceViewResolver:把 JSP 解析成 View 对象。 PropertiesMethodNameResolver:根据指定的请求 URL 适配指定的方法。 InternalPathMethodNameResolver:根据请求的 URL 自动适配相应的方法。 StandardServletMultipartResolver:文件上传解析器
5.2.3 CasPropertiesConfiguration
将一些属性添加到环境中。小明学 SpringBoot 系列——上下文环境属性加载
① 系统启动时就运行
这个类继承了InitializingBean
InitializingBean接口为 bean 提供了初始化方法的方式,它只包括afterPropertiesSet方法,凡是继承该接口的类,在初始化 bean 的时候会执行该方法。
② 得到配置环境
ConfigurableEnvironment不仅提供了配置文件解析的数据,以及配置文件名称,还提供了 PropertySource 数据。其实配置文件的解析出来的数据,也是封装成了 PropertySource 放在 ConfigurableEnvironment 中。SpringBoot 源码(五): ConfigurableEnvironment
③ 添加环境变量
new PropertiesPropertySource 用来保存环境变量
5.2.4 CasWebAppSecurityConfiguration
① 开启安全
通过注解开启安全控制
@EnableGlobalMethodSecurity 注解详解
当我们想要开启 spring 方法级安全时,只需要在任何 @Configuration 实例上使用 @EnableGlobalMethodSecurity 注解就能达到此目的。同时这个注解为我们提供了 prePostEnabled 、securedEnabled 和 jsr250Enabled 三种不同的机制来实现同一种功能:
@Configuration("casWebAppSecurityConfiguration")@EnableConfigurationProperties(CasConfigurationProperties.class)@EnableGlobalMethodSecurity(prePostEnabled = true, securedEnabled = true, jsr250Enabled = true)public class CasWebAppSecurityConfiguration implements WebMvcConfigurer {
prePostEnabled :prePostEnabled = true 会解锁 @PreAuthorize 和 @PostAuthorize 两个注解。从名字就可以看出@PreAuthorize 注解会在方法执行前进行验证,而 @PostAuthorize 注解会在方法执行后进行验证。
public interface UserService {List<User> findAllUsers();@PostAuthorize ("returnObject.type == authentication.name")User findById(int id);// @PreAuthorize("hasRole('ADMIN')") 必须拥有 ROLE_ADMIN 角色。@PreAuthorize("hasRole('ROLE_ADMIN ')")void updateUser(User user);@PreAuthorize("hasRole('ADMIN') AND hasRole('DBA')")void deleteUser(int id);// @PreAuthorize("principal.username.startsWith('Felordcn')") 用户名开头为 Felordcn 的用户才能访问。// @PreAuthorize("#id.equals(principal.username)") 入参 id 必须同当前的用户名相同。// @PreAuthorize("#id < 10") 限制只能查询 id 小于 10 的用户}
Secured:@Secured 注解是用来定义业务方法的安全配置。在需要安全[角色/权限等]的方法上指定 @Secured,并且只有那些角色/权限的用户才可以调用该方法。 @Secured 缺点(限制)就是不支持 Spring EL 表达式。不够灵活。并且指定的角色必须以 ROLE开头,不可省略。该注解功能要简单的多,默认情况下只能基于角色(默认需要带前缀 ROLE)集合来进行访问控制决策。该注解的机制是只要其声明的角色集合(value)中包含当前用户持有的任一角色就可以访问。也就是 用户的角色集合和 @Secured 注解的角色集合要存在非空的交集。 不支持使用 SpEL 表达式进行决策。
@Secured({"ROLE_user"})void updateUser(User user);@Secured({"ROLE_admin", "ROLE_user1"})void updateUser();
jsr250E:启用 JSR-250 安全控制注解,这属于 JavaEE 的安全规范(现为 jakarta 项目)。一共有五个安全注解。如果你在 @EnableGlobalMethodSecurity 设置 jsr250Enabled 为 true ,就开启了 JavaEE 安全注解中的以下三个:
1.@DenyAll: 拒绝所有访问
2.@RolesAllowed({“USER”, “ADMIN”}): 该方法只要具有"USER", "ADMIN"任意一种权限就可以访问。这里可以省略前缀 ROLE_,实际的权限可能是 ROLE_ADMIN
3.@PermitAll: 允许所有访问
② 注入类变量
@Autowiredprivate ConfigurableApplicationContext applicationContext;@Autowiredprivate CasConfigurationProperties casProperties;@Autowiredprivate ObjectProvider<SecurityProperties> securityProperties;@Autowiredprivate ObjectProvider<PathMappedEndpoints> pathMappedEndpoints;
ConfigurableApplicationContext 是为了生成CasWebSecurityJdbcConfigurerAdapter
PathMappedEndpoints:路径映射端点的集合。
③ 注册 Bean
| 分类 | 类名 | 说明 |
|---|---|---|
| Cas | CasWebSecurityExpressionHandler | 继承了DefaultWebSecurityExpressionHandler |
| Cas | WebSecurityConfigurerAdapter | 返回CasWebSecurityConfigurerAdapter继承了WebSecurityConfigurerAdapter,这个在后边有单独的说明 |
| Cas | CasWebSecurityJdbcConfigurerAdapter | 返回CasWebSecurityJdbcConfigurerAdapter,这个类继承了WebSecurityConfigurerAdapter,这个在后边有单独的说明 |
| Spring | InitializingBean | 将 SecurityContext 的模式设置唯一的了,怎么被调用,还不知道呢 |
| Action | PopulateSpringSecurityContextAction | 继承了Spring的AbstractAction,使用了 webflow, |
CasWebSecurityExpressionHandler
集成了DefaultWebSecurityExpressionHandler
Spring Security Web : DefaultWebSecurityExpressionHandler 缺省 Web 安全表达式处理器
DefaultWebSecurityExpressionHandler对给定的认证token和请求上下文FilterInvocation创建一个评估上下文EvaluationContext。然后供SPEL求值使用。比如在WebExpressionVoter中它被这么应用 。
这里没有使用WebExpressionVoter而是使用了CasWebSecurityExpressionHandler
CAS实际上就是在 Spring 基础上,对处理hasIpAddress做了一点特殊处理。
InitializingBean
Lambda 表达式匿名类实现接口方法,这里用()->来实现InitializingBean,因为这个类中只有一个方法。
@Beanpublic InitializingBean securityContextHolderInitialization() {return () -> SecurityContextHolder.setStrategyName(SecurityContextHolder.MODE_GLOBAL);}
如何静态的、较为方便的获取当前系统已登录的用户的信息?这恐怕就要靠 Spring Security 框架的另外一个“著名”的组件类 SecurityContextHolder 了。
Spring 默认的是:ThreadLocalSecurityContextHolderStrategy,Cas 改成了GlobalSecurityContextHolderStrategy。 这样做会不会有危险,因为 Spring 说这种模式,意味着所有的用户会共享一个 SecurityContext,这种模式更适合富客户端,例如 Swing。其实就是只有一个登录用户。
史上最简单的 Spring Security 教程(四十一):SecurityContextHolder 及 SecurityContextHolderStrategy 详解
④ 重载父类函数
重载了父类的WebMvcConfigurer的addViewControllers. 为了添加admin的登录入口
@Overridepublic void addViewControllers(final ViewControllerRegistry registry) {registry.addViewController("/adminlogin").setViewName("admin/casAdminLoginView");registry.setOrder(Ordered.HIGHEST_PRECEDENCE);}
admin/casAdminLoginView: 为了登录到admin/actuator的 名称
5.2.5 CasWebSecurityConfigurerAdapter
① 定义类变量
| 分类 | 类型 | 说明 |
|---|---|---|
| CAS | CasConfigurationProperties | Cas 的配置参数 |
| Spring | SecurityProperties | SpringSecurity 的配置参数 |
| CAS | CasWebSecurityExpressionHandler | 对 Spring 的缺省 ExpressionHandler 做了点小修改,在这里为了引用。 |
| CAS | PathMappedEndpoints | 路径映射端点的集合 |
| CAS | EndpointLdapAuthenticationProvider | 继承了AuthenticationProvider,用来校验 token 是否正确。 |
| CAS | ENDPOINT_URL_ADMIN_FORM_LOGIN | /adminlogin |
② 重载 configure 函数
禁用了 Spring 的端点协议,允许 CAS 自己的配置去接手必要的端点保护。
@Overridepublic void configure(final WebSecurity web) {//输出被忽略的URL}@Overrideprotected void configure(final AuthenticationManagerBuilder auth) throws Exception {//如果启动了JASS,java自己的认证框架,那么就初始化configureJaasAuthenticationProvider//如果使用了LDAP框架,那么就初始化configureLdapAuthenticationProvider//如果没有被配置过,那么就执行父类的配置}@Overrideprotected void configure(final HttpSecurity http) throws Exception {http.csrf().disable() //关闭csrf防御.headers().disable() //关闭Spring向response中追加的header.logout().disable()//关闭logout//下面三行是为了进行https检测的.requiresChannel().requestMatchers(r -> r.getHeader("X-Forwarded-Proto") != null).requiresSecure();//换成自己的ExpressionInterceptUrlRegistryval requests = http.authorizeRequests().expressionHandler(casWebSecurityExpressionHandler);val endpoints = casProperties.getMonitor().getEndpoints().getEndpoint();endpoints.forEach(Unchecked.biConsumer((k, v) -> {val endpoint = EndpointRequest.to(k);v.getAccess().forEach(Unchecked.consumer(access -> configureEndpointAccess(http, requests, access, v, endpoint)));}));configureEndpointAccessToDenyUndefined(http, requests);configureEndpointAccessForStaticResources(requests);val beans = getApplicationContext().getBeansOfType(ProtocolEndpointWebSecurityConfigurer.class, false, true).values();beans.forEach(cfg -> cfg.configure(http));}
参考网址:
这个配置会强制在开发时也使用 HTTPS
http.requiresChannel().requiresSecure();
这可能会很麻烦,因为你必须使用自签名证书。所以:
.requiresChannel().requestMatchers(r -> r.getHeader("X-Forwarded-Proto") != null).requiresSecure();
下面用到了 Lambda 的一些代码:Unchecked.biConsumer。
主要的功能如下:
- 循环
endpoints,然后调用configureEndpointAccess设置每个 URL 的访问权限。 - 调用
configureEndpointAccessToDenyUndefined - 调用
configureEndpointAccessForStaticResources - 得到
ProtocolEndpointWebSecurityConfigurer并执行
处理 Unchecked 异常,老的做法很麻烦。
List<Integer> integers = Arrays.asList(3, 9, 7, 6, 10, 20);integers.forEach(i -> System.out.println(50 / i));//通常的做法是通过try…catch来处理异常,防止系统崩溃。List<Integer> integers = Arrays.asList(3, 9, 7, 0, 10, 20);integers.forEach(i -> {try {System.out.println(50 / i);} catch (ArithmeticException e) {System.err.println("Arithmetic Exception occured : " + e.getMessage());}});
使用 try…catch 后代码不再像以前一样简洁。我们可以通过写一个包装方法来进行处理。
static Consumer<Integer> lambdaWrapper(Consumer<Integer> consumer) {return i -> {try {consumer.accept(i);} catch (ArithmeticException e) {System.err.println("Arithmetic Exception occured : " + e.getMessage());}};}List<Integer> integers = Arrays.asList(3, 9, 7, 0, 10, 20);integers.forEach(lambdaWrapper(i -> System.out.println(50 / i)));
当然有现成的类可以使用,例如Unchecked.biConsumer
5.2.6 CasWebSecurityJdbcConfigurerAdapter
继承了WebSecurityConfigurerAdapter ,可以配置AuthenticationManagerBuilder与HttpSecurity与WebSecurity
这个类只是为了配置 JDBC,从代码上分析,是配置了Monitor监控用的 JDBC
WebSecurityConfigurerAdapter是干什么的呢?例如下面的代码:
@Configuration@EnableWebSecuritypublic class WebSecurityConfig extends WebSecurityConfigurerAdapter {@Overrideprotected void configure(AuthenticationManagerBuilder auth) throws Exception {auth.inMemoryAuthentication().withUser("admin").password("admin").roles("USER");}@Overrideprotected void configure(HttpSecurity http) throws Exception {http.authorizeRequests().antMatchers("/resources/**", "/signup", "/about").permitAll().antMatchers("/admin/**").hasRole("ADMIN").antMatchers("/db/**").access("hasRole('ADMIN') and hasRole('DBA')").anyRequest().authenticated().and().formLogin().usernameParameter("username").passwordParameter("password").failureForwardUrl("/login?error").loginPage("/login").permitAll().and().logout().logoutUrl("/logout").logoutSuccessUrl("/index").permitAll().and().httpBasic().disable();}