- 1. OAuth2 log in
- 1.1 配置登录页面
- 1.2 重定向端点
- 1.3 用户信息端点
- 2. OAuth2 Client
- 2.1 核心类与接口
- 2.2 支持的授权类型
- 2.3 OAuth2 Client 认证
- 2.4 OAuth2 Client 授权
- 3. OAuth2 Resource Server
- 3.1 JWT
- 3.2 不透明 Token
- 3.3 多租户
- 3.4 解析 Bearer Token
OAuth2
[TOC]
1. OAuth2 log in
Spring 默认提供的 Google 登录等,都用不了。只能实现自定义登录。
HttpSecurity.oauth2Login()提供了许多用于自定义 OAuth 2.0 登录的配置选项。主要配置选项被分组到它们的协议端点对应项中。
例如,oauth2Login().authorizationEndpoint()允许配置Authorization Endpoint,而oauth2Login().tokenEndpoint()允许配置Token Endpoint。
@EnableWebSecuritypublic class OAuth2LoginSecurityConfig extends WebSecurityConfigurerAdapter {@Overrideprotected void configure(HttpSecurity http) throws Exception {http.oauth2Login(oauth2 -> oauth2.clientRegistrationRepository(this.clientRegistrationRepository()).authorizedClientRepository(this.authorizedClientRepository()).authorizedClientService(this.authorizedClientService()).loginPage("/login").authorizationEndpoint(authorization -> authorization.baseUri(this.authorizationRequestBaseUri()).authorizationRequestRepository(this.authorizationRequestRepository()).authorizationRequestResolver(this.authorizationRequestResolver())).redirectionEndpoint(redirection -> redirection.baseUri(this.authorizationResponseBaseUri())).tokenEndpoint(token -> token.accessTokenResponseClient(this.accessTokenResponseClient())).userInfoEndpoint(userInfo -> userInfo.userAuthoritiesMapper(this.userAuthoritiesMapper()).userService(this.oauth2UserService()).oidcUserService(this.oidcUserService())));}}
1.1 配置登录页面
@EnableWebSecuritypublic class OAuth2LoginSecurityConfig extends WebSecurityConfigurerAdapter {@Overrideprotected void configure(HttpSecurity http) throws Exception {http.oauth2Login(oauth2 -> oauth2.loginPage("/login/oauth2")....authorizationEndpoint(authorization -> authorization.baseUri("/login/oauth2/authorization")...));}}
1.2 重定向端点
默认授权响应baseUri(重定向端点)是**/login/oauth2/code/***,在 中定义OAuth2LoginAuthenticationFilter.DEFAULT_FILTER_PROCESSES_URI。
如果您想自定义授权响应baseUri,请按照以下示例进行配置:
@EnableWebSecuritypublic class OAuth2LoginSecurityConfig extends WebSecurityConfigurerAdapter {@Overrideprotected void configure(HttpSecurity http) throws Exception {http.oauth2Login(oauth2 -> oauth2.redirectionEndpoint(redirection -> redirection.baseUri("/login/oauth2/callback/*")...));}}
1.3 用户信息端点
①②③④⑤⑥⑦⑧⑨⑩⑪⑫⑬⑭⑮⑯⑰⑱⑲⑳✕✓✔✖
① 映射用户权限
在用户成功通过 OAuth 2.0 Provider 进行身份验证后,OAuth2User.getAuthorities()(或OidcUser.getAuthorities())可能会映射到一组新的GrantedAuthority实例,OAuth2AuthenticationToken在完成身份验证时将提供给这些实例。
② OAuth 2.0 用户服务
2. OAuth2 Client
OAuth 2.0 客户端功能支持OAuth 2.0 授权框架中定义的客户端角色。
2.1 核心类与接口
2.1.1 ClientRegistration
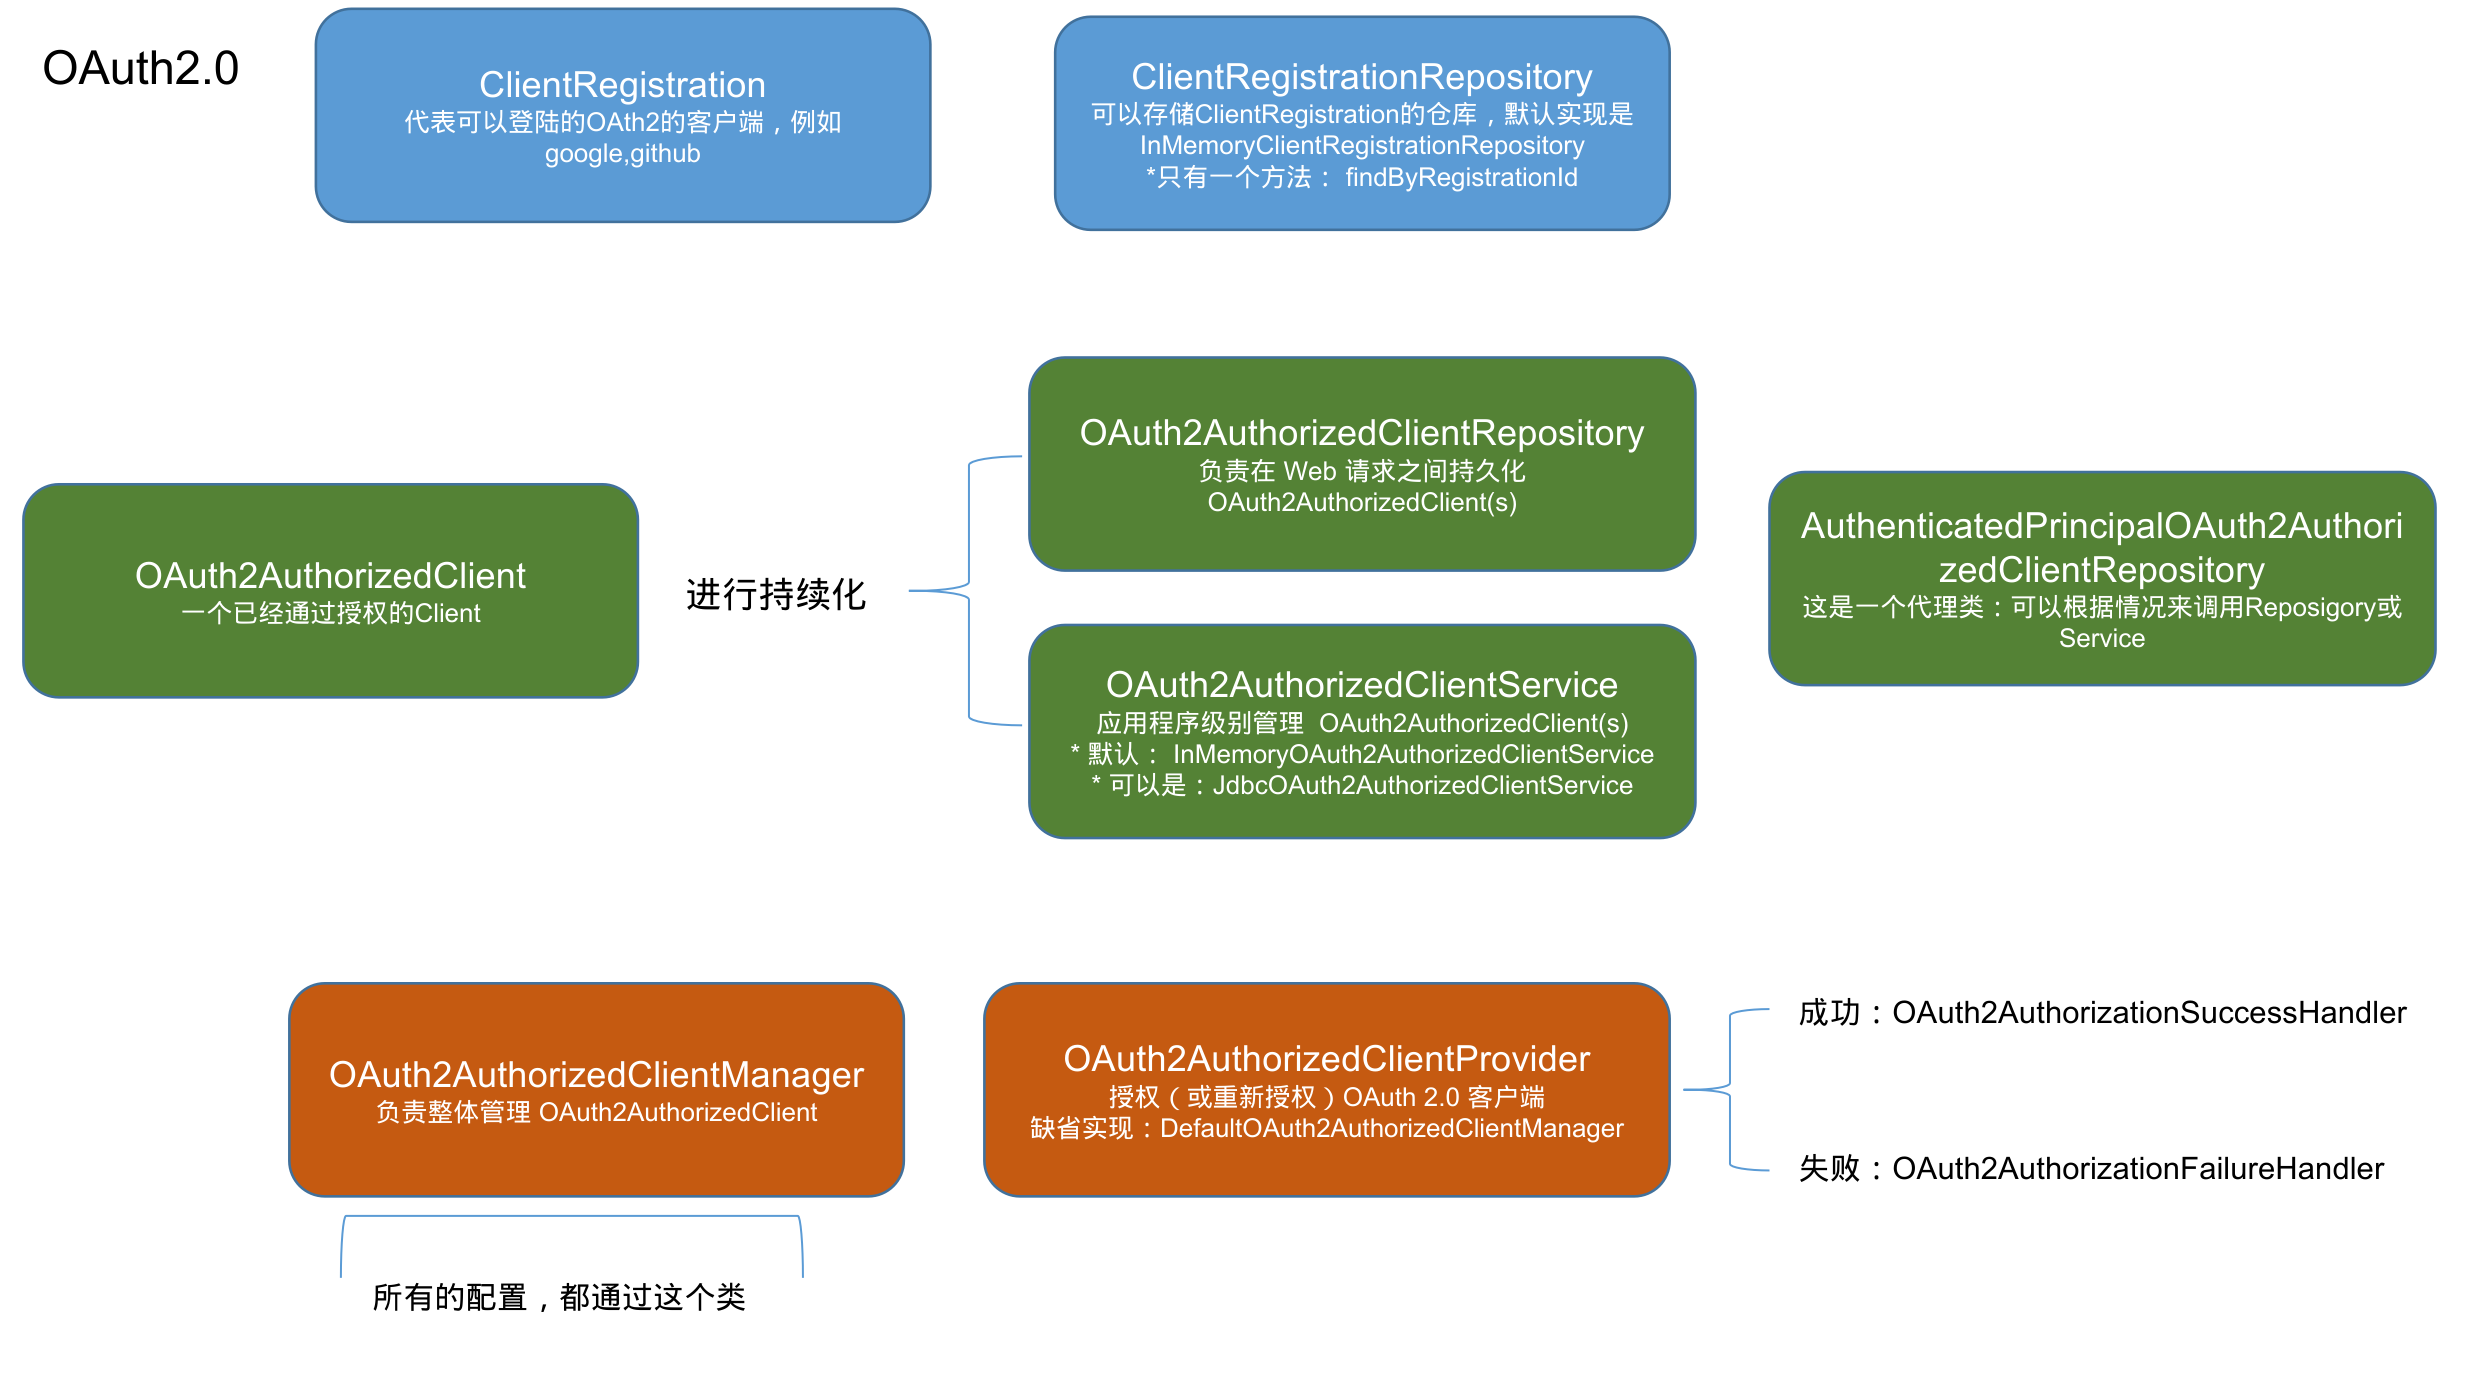
ClientRegistration表示有几个客户端可以进行登陆,例如微信、web 应用。下面时一个示例的代码
public final class ClientRegistration {private String registrationId;private String clientId;private String clientSecret;private ClientAuthenticationMethod clientAuthenticationMethod;private AuthorizationGrantType authorizationGrantType;private String redirectUri;private Set<String> scopes;private ProviderDetails providerDetails;private String clientName;public class ProviderDetails {private String authorizationUri;private String tokenUri;private UserInfoEndpoint userInfoEndpoint;private String jwkSetUri;private String issuerUri;private Map<String, Object> configurationMetadata;public class UserInfoEndpoint {private String uri;private AuthenticationMethod authenticationMethod;private String userNameAttributeName;}}}
ClientRegistrations 提供了以这种方式配置 ClientRegistration 的便捷方法,如以下示例所示:
ClientRegistration clientRegistration =ClientRegistrations.fromIssuerLocation("https://idp.example.com/issuer").build();
2.1.2 ClientRegistrationRepository
ClientRegistrationRepository 用作存储ClientRegistration 。ClientRegistrationRepository 的默认实现是 InMemoryClientRegistrationRepository。
下面的例子,可以发现注册的ClientRegistrationRepository
@Controllerpublic class OAuth2ClientController {@Autowiredprivate ClientRegistrationRepository clientRegistrationRepository;@GetMapping("/")public String index() {ClientRegistration oktaRegistration =this.clientRegistrationRepository.findByRegistrationId("okta");...return "index";}}
2.1.3 OAuth2AuthorizedClient
OAuth2AuthorizedClient 表示一个已经通过授权的 Client。当最终用户(资源所有者)已授权客户端访问其受保护的资源时,该客户端被视为已获得授权。
OAuth2AuthorizedClient 用于将 OAuth2AccessToken(和可选的 OAuth2RefreshToken)关联到 ClientRegistration(客户端)和resource owner,resource owner是授予授权的 Principal 最终用户。
public class OAuth2AuthorizedClient implements Serializable {private static final long serialVersionUID = SpringSecurityCoreVersion.SERIAL_VERSION_UID;private final ClientRegistration clientRegistration;private final String principalName;private final OAuth2AccessToken accessToken;private final OAuth2RefreshToken refreshToken;..............................}
2.1.4 OAuth2AuthorizedClientRepository / OAuth2AuthorizedClientService
OAuth2AuthorizedClientRepository 负责在 Web 请求之间持久化 OAuth2AuthorizedClient(s) 。而 OAuth2AuthorizedClientService 的主要作用是在应用程序级别管理 OAuth2AuthorizedClient(s) 。
从开发人员的角度来看,OAuth2AuthorizedClientRepository 或 OAuth2AuthorizedClientService 提供了查找与客户端关联的 OAuth2AccessToken 的能力,以便可以使用它来发起受保护的资源请求。
@Controllerpublic class OAuth2ClientController {@Autowiredprivate OAuth2AuthorizedClientService authorizedClientService;@GetMapping("/")public String index(Authentication authentication) {OAuth2AuthorizedClient authorizedClient =this.authorizedClientService.loadAuthorizedClient("okta", authentication.getName());OAuth2AccessToken accessToken = authorizedClient.getAccessToken();...return "index";}}
OAuth2AuthorizedClientService 的默认实现是 InMemoryOAuth2AuthorizedClientService,它将 OAuth2AuthorizedClient(s) 存储在内存中。或者,JDBC 实现 JdbcOAuth2AuthorizedClientService 可以配置为在数据库中持久化 OAuth2AuthorizedClient(s)。
CREATE TABLE oauth2_authorized_client (client_registration_id varchar(100) NOT NULL,principal_name varchar(200) NOT NULL,access_token_type varchar(100) NOT NULL,access_token_value blob NOT NULL,access_token_issued_at timestamp NOT NULL,access_token_expires_at timestamp NOT NULL,access_token_scopes varchar(1000) DEFAULT NULL,refresh_token_value blob DEFAULT NULL,refresh_token_issued_at timestamp DEFAULT NULL,created_at timestamp DEFAULT CURRENT_TIMESTAMP NOT NULL,PRIMARY KEY (client_registration_id, principal_name));
2.1.5 OAuth2AuthorizedClientManager / OAuth2AuthorizedClientProvider
① OAuth2AuthorizedClientManager
OAuth2AuthorizedClientManager 负责整体管理 OAuth2AuthorizedClient。主要的责任如下:
- 通过
OAuth2AuthorizedClientProvider授权(或重新授权)OAuth 2.0 客户端。 - 对
OAuth2AuthorizedClient进行持续化,通常使用了OAuth2AuthorizedClientService或OAuth2AuthorizedClientRepository. - 当 OAuth 2.0 客户端授权成功(或重新授权)时,调用
OAuth2AuthorizationSuccessHandler进行处理。 - 当 OAuth 2.0 客户端无法授权(或重新授权)时,调用
OAuth2AuthorizationFailureHandler进行处理。
@FunctionalInterfacepublic interface OAuth2AuthorizedClientManager {@NullableOAuth2AuthorizedClient authorize(OAuth2AuthorizeRequest authorizeRequest);}
OAuth2AuthorizedClientManager 缺省的实现类是 DefaultOAuth2AuthorizedClientManager, 它会关联一个支持多种认证类型的OAuth2AuthorizedClientProvider ,OAuth2AuthorizedClientProviderBuilder可用于配置和构建这种组合类。
② OAuth2AuthorizedClientProvider
@FunctionalInterfacepublic interface OAuth2AuthorizedClientProvider {@NullableOAuth2AuthorizedClient authorize(OAuth2AuthorizationContext context);}
这个类有很多的子类,来具体实现不同的认证方式
AuthorizationCodeOAuth2AuthorizedClientProviderClientCredentialsOAuth2AuthorizedClientProvider# 可以把多个授权方法组合在一起,通过OAuth2AuthorizedClientProviderBuilder配置三DelegatingOAuth2AuthorizedClientProviderJwtBearerOAuth2AuthorizedClientProviderPasswordOAuth2AuthorizedClientProviderRefreshTokenOAuth2AuthorizedClientProvider
③ 构建 authorizedClientManager
以下代码显示了如何配置和构建 OAuth2AuthorizedClientProvider 组合的示例,该组合的授权方式为: authorization_code, refresh_token, client_credentials 和 password
@Beanpublic OAuth2AuthorizedClientManager authorizedClientManager(ClientRegistrationRepository clientRegistrationRepository,OAuth2AuthorizedClientRepository authorizedClientRepository) {OAuth2AuthorizedClientProvider authorizedClientProvider =OAuth2AuthorizedClientProviderBuilder.builder().authorizationCode().refreshToken().clientCredentials().password().build();DefaultOAuth2AuthorizedClientManager authorizedClientManager =new DefaultOAuth2AuthorizedClientManager(clientRegistrationRepository, authorizedClientRepository);authorizedClientManager.setAuthorizedClientProvider(authorizedClientProvider);return authorizedClientManager;}
当授权尝试成功时,
DefaultOAuth2AuthorizedClientManager将委托给OAuth2AuthorizationSuccessHandler,它(默认情况下)通过OAuth2AuthorizedClientRepository保存OAuth2AuthorizedClient。在重新授权失败的情况下,例如。刷新令牌不再有效,之前保存的
OAuth2AuthorizedClient将通过RemoveAuthorizedClientOAuth2AuthorizationFailureHandler从OAuth2AuthorizedClientRepository中删除。可以通过
setAuthorizationSuccessHandler(OAuth2AuthorizationSuccessHandler)和setAuthorizationFailureHandler(OAuth2AuthorizationFailureHandler)自定义默认行为。DefaultOAuth2AuthorizedClientManager还与Function<OAuth2AuthorizeRequest , Map<String, Object>>类型的contextAttributesMapper相关联,它负责将OAuth2AuthorizeRequest中的属性映射到要关联到OAuth2AuthorizationContext的属性。当您需要为OAuth2AuthorizedClientProvider提供必需的属性时,这可能很有用,PasswordOAuth2AuthorizedClientProvider要求资源所有者的用户名和密码在OAuth2AuthorizationContext.getAttributes()中可用。
④ 利用 contextAttributesMapper
以下代码显示了 contextAttributesMapper 的示例:
@Beanpublic OAuth2AuthorizedClientManager authorizedClientManager(ClientRegistrationRepository clientRegistrationRepository,OAuth2AuthorizedClientRepository authorizedClientRepository) {OAuth2AuthorizedClientProvider authorizedClientProvider =OAuth2AuthorizedClientProviderBuilder.builder().password().refreshToken().build();DefaultOAuth2AuthorizedClientManager authorizedClientManager =new DefaultOAuth2AuthorizedClientManager(clientRegistrationRepository, authorizedClientRepository);authorizedClientManager.setAuthorizedClientProvider(authorizedClientProvider);// Assuming the `username` and `password` are supplied as `HttpServletRequest` parameters,// map the `HttpServletRequest` parameters to `OAuth2AuthorizationContext.getAttributes()`authorizedClientManager.setContextAttributesMapper(contextAttributesMapper());return authorizedClientManager;}private Function<OAuth2AuthorizeRequest, Map<String, Object>> contextAttributesMapper() {return authorizeRequest -> {Map<String, Object> contextAttributes = Collections.emptyMap();HttpServletRequest servletRequest = authorizeRequest.getAttribute(HttpServletRequest.class.getName());String username = servletRequest.getParameter(OAuth2ParameterNames.USERNAME);String password = servletRequest.getParameter(OAuth2ParameterNames.PASSWORD);if (StringUtils.hasText(username) && StringUtils.hasText(password)) {contextAttributes = new HashMap<>();// `PasswordOAuth2AuthorizedClientProvider` requires both attributescontextAttributes.put(OAuth2AuthorizationContext.USERNAME_ATTRIBUTE_NAME, username);contextAttributes.put(OAuth2AuthorizationContext.PASSWORD_ATTRIBUTE_NAME, password);}return contextAttributes;};}
⑤ AuthorizedClientServiceOAuth2AuthorizedClientManager
DefaultOAuth2AuthorizedClientManager 旨在用于 HttpServletRequest 的上下文中。在 HttpServletRequest 上下文之外操作时,请改用 AuthorizedClientServiceOAuth2AuthorizedClientManager。
有些后台运行的程序会使用到AuthorizedClientServiceOAuth2AuthorizedClientManager,例如常见的配置了 client_credentials 授权类型的 OAuth 2.0 客户端可以被视为一种后台运行的服务应用程序。client_credentials 在新的规范中已经不推荐了。
@Beanpublic OAuth2AuthorizedClientManager authorizedClientManager(ClientRegistrationRepository clientRegistrationRepository,OAuth2AuthorizedClientService authorizedClientService) {OAuth2AuthorizedClientProvider authorizedClientProvider =OAuth2AuthorizedClientProviderBuilder.builder().clientCredentials().build();AuthorizedClientServiceOAuth2AuthorizedClientManager authorizedClientManager =new AuthorizedClientServiceOAuth2AuthorizedClientManager(clientRegistrationRepository, authorizedClientService);authorizedClientManager.setAuthorizedClientProvider(authorizedClientProvider);return authorizedClientManager;}
2.2 支持的授权类型
重点推荐的类型,其他的在 OAuth2.1 中不推荐了:
- Authorization Code
- Refresh Token
- JWT Bearer
2.2.1 Authorization Code
最常用的一种形式
① 发起授权请求

OAuth2AuthorizationRequestRedirectFilter 使用 OAuth2AuthorizationRequestResolver 来解析 OAuth2AuthorizationRequest。通过将最终用户的用户代理(例如浏览器 URL)重定向到授权服务器的授权端点来启动Authorization Code授权流程。
OAuth2AuthorizationRequestResolver 的主要作用是从提供的 Web 请求中解析 OAuth2AuthorizationRequest。
默认实现 DefaultOAuth2AuthorizationRequestResolver 匹配(默认)路径 /oauth2/authorization/{registrationId}中提取registrationId并使用它关联的 ClientRegistration 构建 OAuth2AuthorizationRequest。
spring:security:oauth2:client:registration:okta:client-id: okta-client-idclient-secret: okta-client-secretauthorization-grant-type: authorization_coderedirect-uri: '{baseUrl}/authorized/okta'scope: read, writeprovider:okta:authorization-uri: https://dev-1234.oktapreview.com/oauth2/v1/authorizetoken-uri: https://dev-1234.oktapreview.com/oauth2/v1/token
输入http://127.0.0.1:8080/oauth2/authorization/okta后,会通过 OAuth2AuthorizationRequestRedirectFilter 发起授权请求重定向到 okta 服务器,并最终启动授权码授权流程。
② Public Client+PKCE
客户无法保密其证书,例如已安装的本机应用程序或 Web 基于浏览器的应用程序。
如果客户端是 Public Client,可以进行下面的设置。
spring:security:oauth2:client:registration:okta:client-id: okta-client-idclient-authentication-method: noneauthorization-grant-type: authorization_coderedirect-uri: "{baseUrl}/authorized/okta"...
Public Client使用 Proof Key for Code Exchange (PKCE),当满足以下条件时,将自动使用 PKCE:
client-secret被省略(或为空)client-authentication-method设置成 "none" (ClientAuthenticationMethod.NONE)
DefaultOAuth2AuthorizationRequestResolver 还支持使用 UriComponentsBuilder 的重定向 uri 的 URI 模板变量。
spring:security:oauth2:client:registration:okta:...redirect-uri: "{baseScheme}://{baseHost}{basePort}{basePath}/authorized/{registrationId}"...
备注:
{baseUrl}={baseScheme}://{baseHost}{basePort}{basePath}
当 OAuth 2.0 客户端在代理服务器后面运行时,使用 URI 模板变量配置重定向 uri 特别有用。这可确保在扩展重定向 uri 时使用X-Forwarded-*标头。
③ 自定义授权请求
以下示例显示如何使用 Consumer<OAuth2AuthorizationRequest.Builder> 配置 DefaultOAuth2AuthorizationRequestResolver,通过包含请求参数 prompt=consent 自定义 oauth2Login() 的授权请求。
@EnableWebSecuritypublic class OAuth2LoginSecurityConfig extends WebSecurityConfigurerAdapter {@Autowiredprivate ClientRegistrationRepository clientRegistrationRepository;@Overrideprotected void configure(HttpSecurity http) throws Exception {http.authorizeHttpRequests(authorize -> authorize.anyRequest().authenticated()).oauth2Login(oauth2 -> oauth2.authorizationEndpoint(authorization -> authorization.authorizationRequestResolver(authorizationRequestResolver(this.clientRegistrationRepository))));}private OAuth2AuthorizationRequestResolver authorizationRequestResolver(ClientRegistrationRepository clientRegistrationRepository) {DefaultOAuth2AuthorizationRequestResolver authorizationRequestResolver =new DefaultOAuth2AuthorizationRequestResolver(clientRegistrationRepository, "/oauth2/authorization");authorizationRequestResolver.setAuthorizationRequestCustomizer(authorizationRequestCustomizer());return authorizationRequestResolver;}private Consumer<OAuth2AuthorizationRequest.Builder> authorizationRequestCustomizer() {return customizer -> customizer.additionalParameters(params -> params.put("prompt", "consent"));}}
对于上面的例子,额外的请求参数对于特定的提供者总是相同的,它可以直接添加到 authorization-uri 属性中。
spring:security:oauth2:client:provider:okta:authorization-uri: https://dev-1234.oktapreview.com/oauth2/v1/authorize?prompt=consent
如果您的要求更高级,您可以通过简单地覆盖 OAuth2AuthorizationRequest.authorizationRequestUri 属性来完全控制构建授权请求 URI。
以下示例显示了前面示例中的 authorizationRequestCustomizer() 变体,而是覆盖 OAuth2AuthorizationRequest.authorizationRequestUri 属性。
private Consumer<OAuth2AuthorizationRequest.Builder> authorizationRequestCustomizer() {return customizer -> customizer.authorizationRequestUri(uriBuilder -> uriBuilder.queryParam("prompt", "consent").build());}
④ 存储 Authorization Request
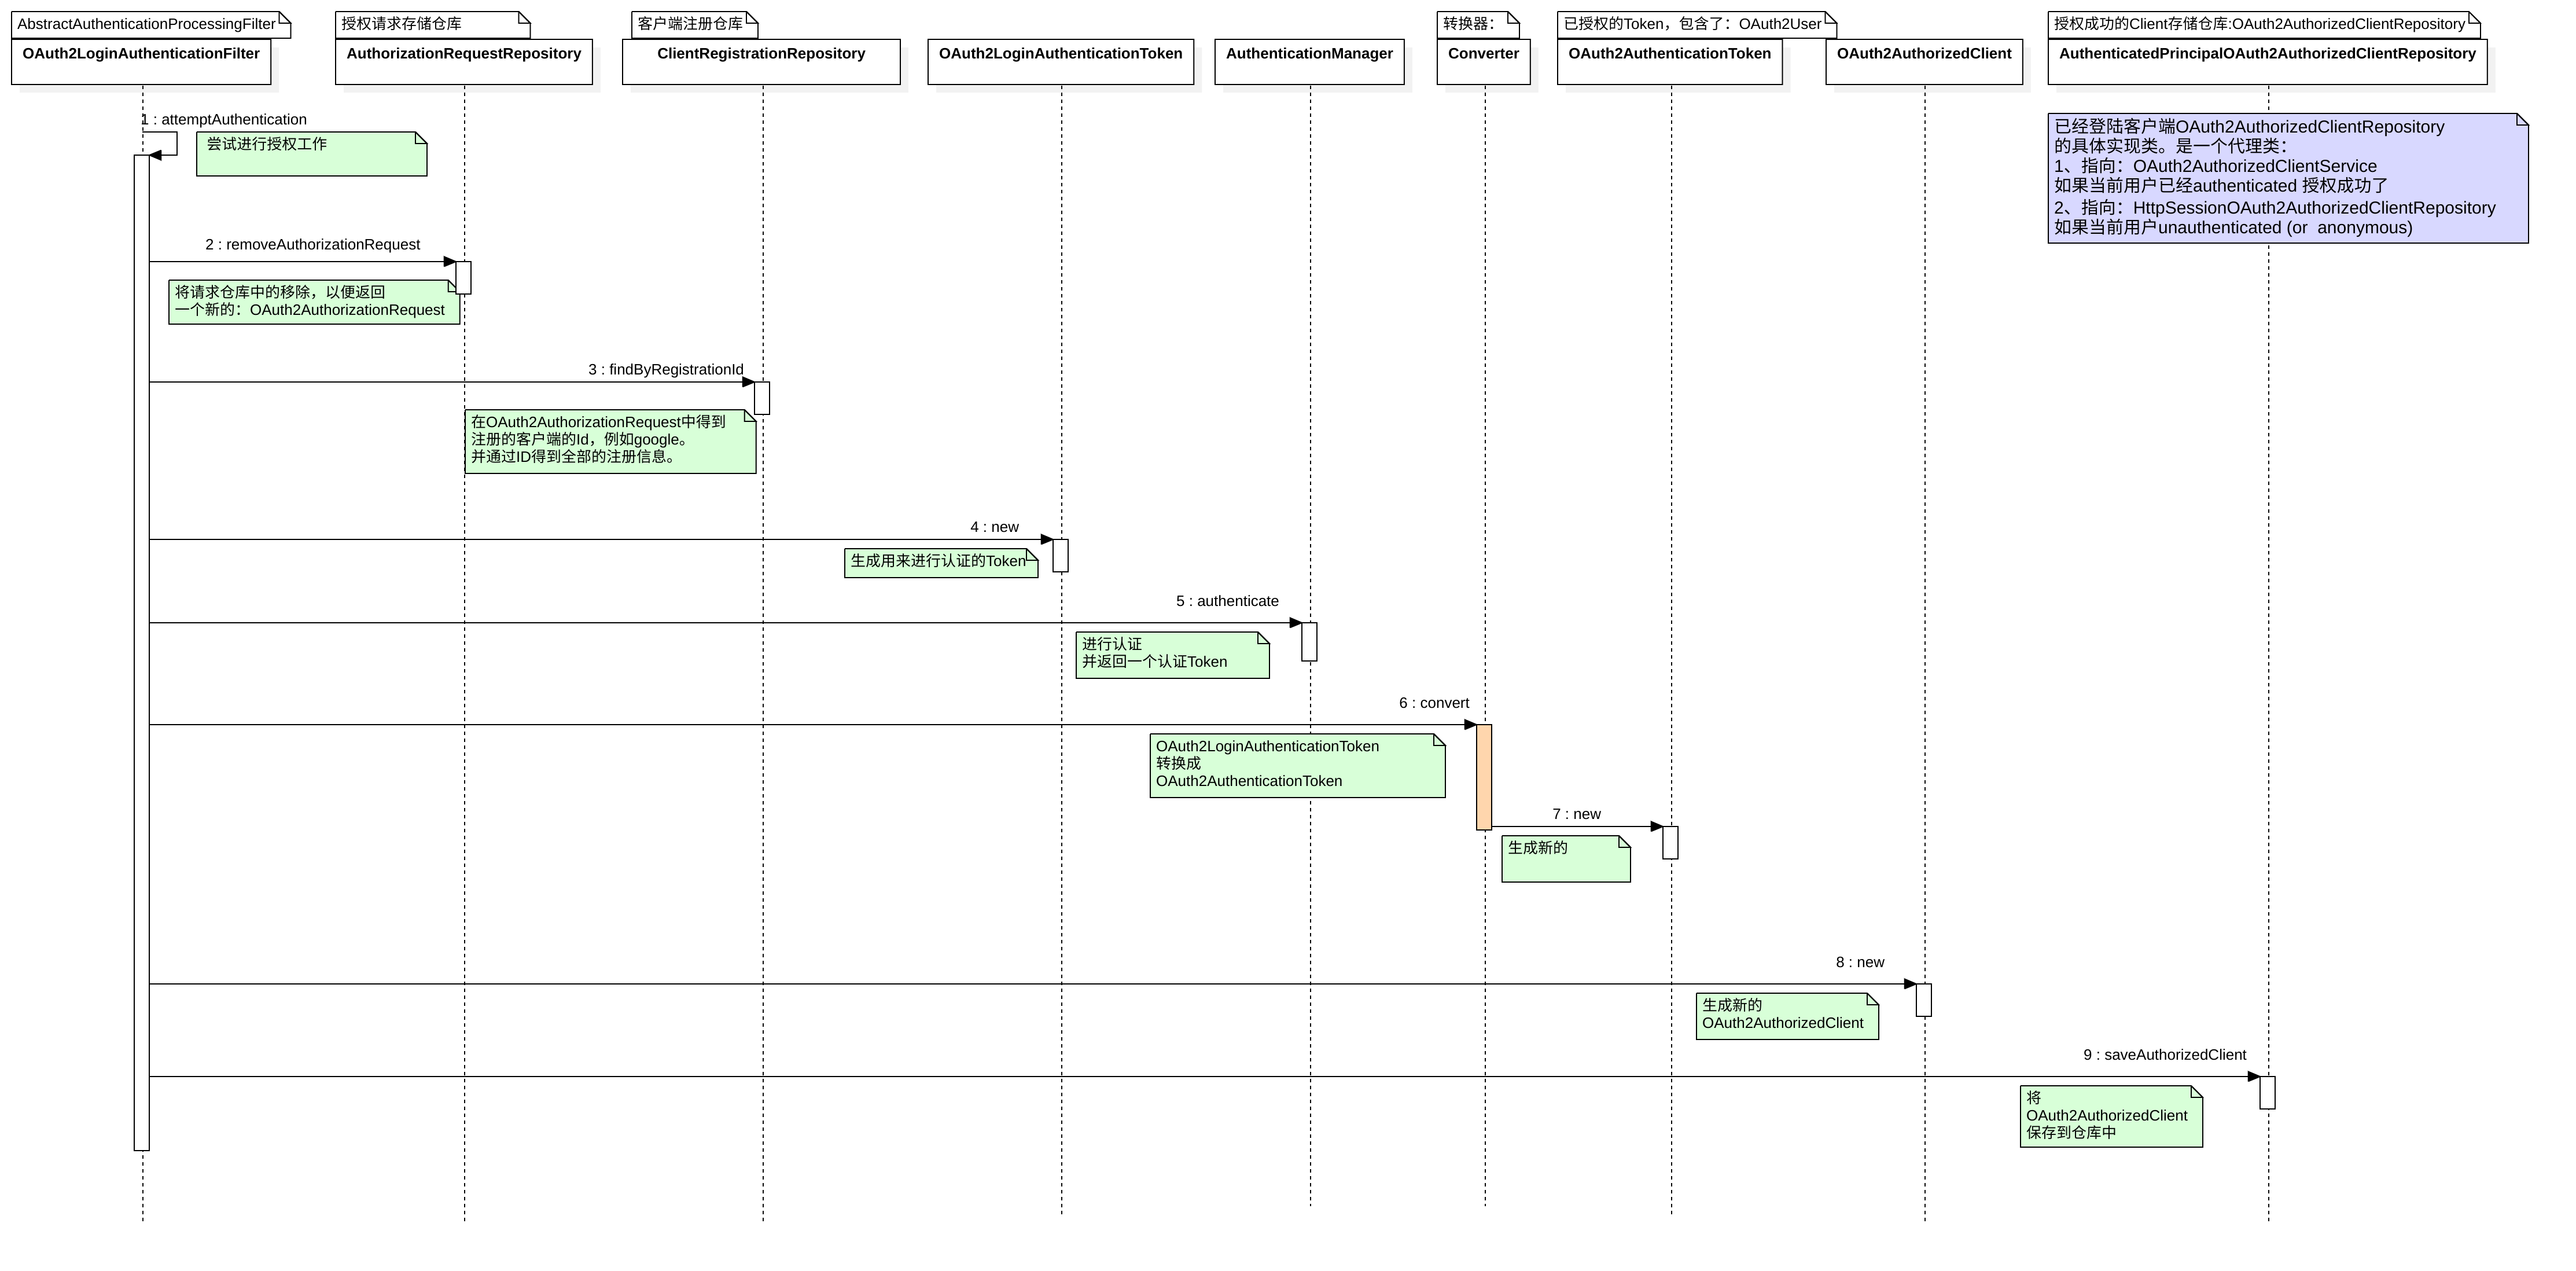
AuthorizationRequestRepository 负责 OAuth2AuthorizationRequest 从发起授权请求到接收到授权响应(the callback)的持久性。
AuthorizationRequestRepository 的默认实现是 HttpSessionOAuth2AuthorizationRequestRepository,它将 OAuth2AuthorizationRequest 存储在 HttpSession 中。
如果您有 AuthorizationRequestRepository 的自定义实现,则可以按照以下示例进行配置:
@EnableWebSecuritypublic class OAuth2ClientSecurityConfig extends WebSecurityConfigurerAdapter {@Overrideprotected void configure(HttpSecurity http) throws Exception {http.oauth2Client(oauth2 -> oauth2.authorizationCodeGrant(codeGrant -> codeGrant.authorizationRequestRepository(this.authorizationRequestRepository())...));}}
⑤ Access Token 请求
Authorization Code授权的 OAuth2AccessTokenResponseClient 的默认实现是 DefaultAuthorizationCodeTokenResponseClient,它使用 RestOperations 在授权服务器的令牌端点,通过authorization code交换access token。
DefaultAuthorizationCodeTokenResponseClient 非常灵活,因为它允许您自定义令牌请求的预处理和/或令牌响应的后处理。
OAuth2AccessTokenResponseClient 的具体实现类有:
# Authorization CodeDefaultAuthorizationCodeTokenResponseClient# Client CredentialsDefaultClientCredentialsTokenResponseClient# Jwt BearerDefaultJwtBearerTokenResponseClient# PasswordDefaultPasswordTokenResponseClient# Refresh TokenDefaultRefreshTokenTokenResponseClient
⑥ 定制 Access Token 请求
如果需要自定义
Token Request的预处理,可以自定义Converter<OAuth2AuthorizationCodeGrantRequest, RequestEntity<?>>,并通过DefaultAuthorizationCodeTokenResponseClient.setRequestEntityConverter()函数传入。Converter的默认实现OAuth2AuthorizationCodeGrantRequestEntityConverter,它构建标准 OAuth 2.0 访问令牌请求的RequestEntity。自定义转换器将允许您扩展标准令牌请求并添加自定义参数。
如果只自定义请求的参数,您可以为
OAuth2AuthorizationCodeGrantRequestEntityConverter.setParametersConverter()提供自定义Converter<OAuth2AuthorizationCodeGrantRequest, MultiValueMap<String, String>>以完全覆盖随请求发送的参数。这通常比直接构造RequestEntity更简单。
提示
- 如果您只想添加其他参数,您可以为
OAuth2AuthorizationCodeGrantRequestEntityConverter.addParametersConverter()提供一个自定义的Converter<OAuth2AuthorizationCodeGrantRequest, MultiValueMap<String, String>>,它构造了一个聚合转换器。- 自定义转换器必须返回 OAuth 2.0 访问令牌请求的有效
RequestEntity表示,该请求可由预期的 OAuth 2.0 提供者理解。
⑦ 定制 Access Token Response
您需要为 DefaultAuthorizationCodeTokenResponseClient.setRestOperations() 提供自定义配置的 RestOperations。默认的 RestOperations 配置如下:
RestTemplate restTemplate = new RestTemplate(Arrays.asList(new FormHttpMessageConverter(),new OAuth2AccessTokenResponseHttpMessageConverter()));restTemplate.setErrorHandler(new OAuth2ErrorResponseErrorHandler());
Spring MVC FormHttpMessageConverter是必需的,因为它在发送OAuth 2.0访问令牌请求时使用。OAuth2AccessTokenResponseHttpMessageConverter是一个HttpMessageConverter,主要用于OAuth 2.0 Access Token Response的转换 。您可以自定一个
Converter<Map<String, Object>, OAuth2AccessTokenResponse>,并通过OAuth2AccessTokenResponseHttpMessageConverter.setAccessTokenResponseConverter()函数设置。这个Converter用于将OAuth 2.0 Access Token Response参数转换为OAuth2AccessTokenResponse。OAuth2ErrorResponseErrorHandler是一个可以处理 OAuth 2.0 错误的ResponseErrorHandler,例如:400 错误请求。它使用OAuth2ErrorHttpMessageConverter将 OAuth 2.0 错误参数转换为OAuth2Error。无论您是自定义
DefaultAuthorizationCodeTokenResponseClient还是提供自己的OAuth2AccessTokenResponseClient实现,您都需要按照以下示例进行配置:
@EnableWebSecuritypublic class OAuth2ClientSecurityConfig extends WebSecurityConfigurerAdapter {@Overrideprotected void configure(HttpSecurity http) throws Exception {http.oauth2Client(oauth2 -> oauth2.authorizationCodeGrant(codeGrant -> codeGrant.accessTokenResponseClient(this.accessTokenResponseClient())...));}}
2.2.2 Refresh Token
获取Refresh Token默认的实现类是DefaultRefreshTokenTokenResponseClient,它是OAuth2AccessTokenResponseClient具体的实现类,它使用RestOperations(实际上restTemplate)来后去数据。 DefaultRefreshTokenTokenResponseClient这个类可以很方便的被定制化。
① 定制 Access Token Request
如果要扩展请求内容或添加参数,需要做以下步骤:
- 一、自定义一个
Converter<OAuth2RefreshTokenGrantRequest, RequestEntity<?>>,用来组件一个RequestEntity。 - 二、通过
DefaultRefreshTokenTokenResponseClient.setRequestEntityConverter()函数,来替换默认的OAuth2RefreshTokenGrantRequestEntityConverter转换器。
如果你就是为了配置参数,有更简单的方法
- 一、自定义一个
Converter<OAuth2RefreshTokenGrantRequest, MultiValueMap<String, String>>,这里与上面的不同是,上面的方法传递的参数是RequestEntity<?> - 二、通过
OAuth2RefreshTokenGrantRequestEntityConverter.setParametersConverter()函数,将自定义的Converter传递进去。
如果你是添加参数,那就更简单了
- 调用
OAuth2RefreshTokenGrantRequestEntityConverter.addParametersConverter()添加一个特定的Converter<OAuth2RefreshTokenGrantRequest, MultiValueMap<String, String>>
② 定制 Access Token Response
- 定义一个
RestOperations - 调用
DefaultRefreshTokenTokenResponseClient.setRestOperations()函数,将定义的RestOperations设置进去。
默认的RestOperations是这个样子的
RestTemplate restTemplate = new RestTemplate(Arrays.asList(new FormHttpMessageConverter(),new OAuth2AccessTokenResponseHttpMessageConverter()));restTemplate.setErrorHandler(new OAuth2ErrorResponseErrorHandler());this.restOperations = restTemplate;
上面的代码中,有一个类OAuth2AccessTokenResponseHttpMessageConverter,这个类是一个 HttpMessageConverter ,为了得到OAuth 2.0 Access Token Response。
- 定义转换器
- 可以定义一个
Converter<Map<String, Object>, OAuth2AccessTokenResponse>,将OAuth 2.0 Access Token Response的内容转换成OAuth2AccessTokenResponse。 - 然后通过
OAuth2AccessTokenResponseHttpMessageConverter.setAccessTokenResponseConverter(),将定制的Converter设置进去。
- 可以定义一个
- 定义错误处理
OAuth2ErrorResponseErrorHandler是一个可以处理OAuth 2.0错误的ResponseErrorHandler,它使用OAuth2ErrorHttpMessageConverter将OAuth 2.0错误参数转换为OAuth2Error。- 无论您是自定义
DefaultRefreshTokenTokenResponseClient类,还是重新实现自己的OAuth2AccessTokenResponseClient实现,您都需要按照以下示例进行配置:
// CustomizeOAuth2AccessTokenResponseClient<OAuth2RefreshTokenGrantRequest> refreshTokenTokenResponseClient = ...// 定义 authorizedClientProviderOAuth2AuthorizedClientProvider authorizedClientProvider =OAuth2AuthorizedClientProviderBuilder.builder().authorizationCode().refreshToken(configurer -> configurer.accessTokenResponseClient(refreshTokenTokenResponseClient)).build();...// 定义 authorizedClientManagerauthorizedClientManager.setAuthorizedClientProvider(authorizedClientProvider);
上面的代码说明
OAuth2AuthorizedClientProviderBuilder.builder (). RefreshToken ()配置一个RefreshTokenOAuth2AuthorizedClientProvider,它是一个用于Refresh Token授权的OAuth2AuthorizedClientProvider的实现。
OAuth2RefreshToken 可以选择在 authorization_code 和 password授权类型的访问令牌响应中返回。OAuth2AuthorizedClient.getRefreshToken() 可用且 OAuth2AuthorizedClient.getAccessToken() 已过期,它将由 RefreshTokenOAuth2AuthorizedClientProvider 【自动】刷新。
2.2.3 Client Credentials 不推荐
2.2.4 Resource Owner Password Credentials 不推荐
2.2.5 JWT Bearer
① Requesting an Access Token
DefaultJwtBearerTokenResponseClient是JWT Bearer授权模式中OAuth2AccessTokenResponseClient接口的具体实现。使用
RestOperations也就是RestTemplate来远程获取 Response 信息。可以对
DefaultJwtBearerTokenResponseClient进行定制。
② 定制 Access Token Request
方案 1:配置
RequestEntity,可以扩展 Request 中请求的内容与参数,就是稍微复杂点:- 自定义一个
Converter<JwtBearerGrantRequest, RequestEntity<?>>,返回一个RequestEntity。 - 然后通过
DefaultJwtBearerTokenResponseClient.setRequestEntityConverter(),将Converter配置进去。 - 默认的实现类是:
JwtBearerGrantRequestEntityConverter
- 自定义一个
方案 2:只配置参数
- 生成一个
Converter<JwtBearerGrantRequest, MultiValueMap<String, String>>对象,将参数放进去。 - 通过
JwtBearerGrantRequestEntityConverter.setParametersConverter()函数,把参数设置进去。
- 生成一个
方案 3:原先参数比变,只添加新参数
- 生成一个
Converter<JwtBearerGrantRequest, MultiValueMap<String, String>>对象,将参数放进去。 - 通过
JwtBearerGrantRequestEntityConverter.addParametersConverter()函数,把参数设置进去。
- 生成一个
③ 定制 Access Token Response
- 定义一个
RestOperations,就是一个RestTemplate - 调用
DefaultRefreshTokenTokenResponseClient.setRestOperations()函数,将定义的RestOperations设置进去。
默认的RestOperations是这个样子的
RestTemplate restTemplate = new RestTemplate(Arrays.asList(new FormHttpMessageConverter(),new OAuth2AccessTokenResponseHttpMessageConverter()));restTemplate.setErrorHandler(new OAuth2ErrorResponseErrorHandler());this.restOperations = restTemplate;
上面的代码中,有一个类OAuth2AccessTokenResponseHttpMessageConverter,这个类是一个 HttpMessageConverter ,为了得到OAuth 2.0 Access Token Response。
无论您是自定义 DefaultJwtBearerTokenResponseClient 还是提供您自己的 OAuth2AccessTokenResponseClient 实现,您都需要按照以下示例进行配置:
// CustomizeOAuth2AccessTokenResponseClient<JwtBearerGrantRequest> jwtBearerTokenResponseClient = ...JwtBearerOAuth2AuthorizedClientProvider jwtBearerAuthorizedClientProvider = new JwtBearerOAuth2AuthorizedClientProvider();jwtBearerAuthorizedClientProvider.setAccessTokenResponseClient(jwtBearerTokenResponseClient);OAuth2AuthorizedClientProvider authorizedClientProvider =OAuth2AuthorizedClientProviderBuilder.builder().provider(jwtBearerAuthorizedClientProvider).build();...authorizedClientManager.setAuthorizedClientProvider(authorizedClientProvider);
④ 使用 Access Token
进行配置
spring:security:oauth2:client:registration:okta:client-id: okta-client-idclient-secret: okta-client-secretauthorization-grant-type: urn:ietf:params:oauth:grant-type:jwt-bearerscope: readprovider:okta:token-uri: https://dev-1234.oktapreview.com/oauth2/v1/token
并且定义OAuth2AuthorizedClientManager
@Beanpublic OAuth2AuthorizedClientManager authorizedClientManager(ClientRegistrationRepository clientRegistrationRepository,OAuth2AuthorizedClientRepository authorizedClientRepository) {JwtBearerOAuth2AuthorizedClientProvider jwtBearerAuthorizedClientProvider =new JwtBearerOAuth2AuthorizedClientProvider();OAuth2AuthorizedClientProvider authorizedClientProvider =OAuth2AuthorizedClientProviderBuilder.builder().provider(jwtBearerAuthorizedClientProvider).build();DefaultOAuth2AuthorizedClientManager authorizedClientManager =new DefaultOAuth2AuthorizedClientManager(clientRegistrationRepository, authorizedClientRepository);authorizedClientManager.setAuthorizedClientProvider(authorizedClientProvider);return authorizedClientManager;}
这样就可以获得OAuth2AccessToken
@RestControllerpublic class OAuth2ResourceServerController {@Autowiredprivate OAuth2AuthorizedClientManager authorizedClientManager;@GetMapping("/resource")public String resource(JwtAuthenticationToken jwtAuthentication) {OAuth2AuthorizeRequest authorizeRequest = OAuth2AuthorizeRequest.withClientRegistrationId("okta").principal(jwtAuthentication).build();OAuth2AuthorizedClient authorizedClient = this.authorizedClientManager.authorize(authorizeRequest);OAuth2AccessToken accessToken = authorizedClient.getAccessToken();...}}
2.3 OAuth2 Client 认证
JWT Bearer Client Authentication 的默认实现是 NimbusJwtClientAuthenticationParametersConverter,这是一个转换器,它通过在 ``client_assertion参数中添加签名的JSON Web 令牌 (JWS`) 来自定义令牌请求参数。
用于签署 JWS 的 java.security.PrivateKey 或 javax.crypto.SecretKey 由与 NimbusJwtClientAuthenticationParametersConverter 关联的 com.nimbusds.jose.jwk.JWK 解析器提供。
① 使用 private_key_jwt 进行身份验证
spring:security:oauth2:client:registration:okta:client-id: okta-client-idclient-authentication-method: private_key_jwtauthorization-grant-type: authorization_code...
以下示例显示如何配置 DefaultAuthorizationCodeTokenResponseClient:
Function<ClientRegistration, JWK> jwkResolver = (clientRegistration) -> {if (clientRegistration.getClientAuthenticationMethod().equals(ClientAuthenticationMethod.PRIVATE_KEY_JWT)) {// Assuming RSA key typeRSAPublicKey publicKey = ...RSAPrivateKey privateKey = ...return new RSAKey.Builder(publicKey).privateKey(privateKey).keyID(UUID.randomUUID().toString()).build();}return null;};OAuth2AuthorizationCodeGrantRequestEntityConverter requestEntityConverter =new OAuth2AuthorizationCodeGrantRequestEntityConverter();// 调用NimbusJwtClientAuthenticationParametersConverter,传递进去jwkResolverrequestEntityConverter.addParametersConverter(new NimbusJwtClientAuthenticationParametersConverter<>(jwkResolver));DefaultAuthorizationCodeTokenResponseClient tokenResponseClient =new DefaultAuthorizationCodeTokenResponseClient();tokenResponseClient.setRequestEntityConverter(requestEntityConverter);
② 使用 client_secret_jwt 进行身份验证
使用了client-authentication-method: client_secret_jwt
spring:security:oauth2:client:registration:okta:client-id: okta-client-idclient-secret: okta-client-secretclient-authentication-method: client_secret_jwtauthorization-grant-type: client_credentials...
以下示例显示如何配置 DefaultAuthorizationCodeTokenResponseClient:
Function<ClientRegistration, JWK> jwkResolver = (clientRegistration) -> {if (clientRegistration.getClientAuthenticationMethod().equals(ClientAuthenticationMethod.CLIENT_SECRET_JWT)) {SecretKeySpec secretKey = new SecretKeySpec(clientRegistration.getClientSecret().getBytes(StandardCharsets.UTF_8),"HmacSHA256");return new OctetSequenceKey.Builder(secretKey).keyID(UUID.randomUUID().toString()).build();}return null;};OAuth2ClientCredentialsGrantRequestEntityConverter requestEntityConverter =new OAuth2ClientCredentialsGrantRequestEntityConverter();requestEntityConverter.addParametersConverter(new NimbusJwtClientAuthenticationParametersConverter<>(jwkResolver));DefaultClientCredentialsTokenResponseClient tokenResponseClient =new DefaultClientCredentialsTokenResponseClient();tokenResponseClient.setRequestEntityConverter(requestEntityConverter);
2.4 OAuth2 Client 授权
2.4.1 获取 Authorized Client
@RegisteredOAuth2AuthorizedClient 注释提供了将方法参数解析为 OAuth2AuthorizedClient 类型的参数值的能力。与使用 OAuth2AuthorizedClientManager 或 OAuth2AuthorizedClientService 访问 OAuth2AuthorizedClient 相比,这是一种方便的替代方法。
@Controllerpublic class OAuth2ClientController {@GetMapping("/")public String index(@RegisteredOAuth2AuthorizedClient("okta") OAuth2AuthorizedClient authorizedClient) {OAuth2AccessToken accessToken = authorizedClient.getAccessToken();...return "index";}}
@RegisteredOAuth2AuthorizedClient 注解由 OAuth2AuthorizedClientArgumentResolver 处理,它直接使用 OAuth2AuthorizedClientManager,因此继承了它的功能。
2.4.2 Servlet 环境的 WebClient 集成
① WebClient 说明
【WebClient】是从Spring WebFlux 5.0版本开始提供的一个非阻塞的基于响应式编程的进行 Http 请求的客户端工具。它的响应式编程的基于 Reactor 的。WebClient中提供了标准Http请求方式对应的get、post、put、delete等方法,可以用来发起相应的请求。
Spring 中的两种 web client 实现 - RestTemplate 和 WebClient。
Spring 很早就提供了 RestTemplate 作为 web 客户端的抽象。在底层,RestTemplate 使用了基于每个请求对应一个线程模型(thread-per-request model)的 Java Servlet API。这意味着客户端线程在收到服务器响应之前,将一直被阻塞。当访问大量响应速度较慢的服务时,数量众多的阻塞线程将占用大量的服务器资源,严重影响性能。
为了解决上述问题 ,在 Spring 5 中引入了 WebClient ,使用了 Spring Reactive 框架提供的异步、非阻塞解决方案。
② OAuth 2.0 客户端集成
OAuth 2.0 客户端支持使用 ExchangeFilterFunction 与 WebClient 集成。
ServletOAuth2AuthorizedClientExchangeFilterFunction 通过使用 OAuth2AuthorizedClient 并将关联的 OAuth2AccessToken 作为承载令牌包括在内,提供了一种简单的机制来请求受保护的资源。它直接使用 OAuth2AuthorizedClientManager,因此继承了以下功能:
- 如果客户端尚未获得授权,将请求
OAuth2AccessToken。authorization_code- 触发授权请求重定向以启动流程client_credentials- 访问令牌直接从令牌端点获取password- 访问令牌直接从令牌端点获取
- 如果
OAuth2AccessToken过期,如果OAuth2AuthorizedClientProvider可用于执行授权,它将被刷新(或更新)
以下代码显示了如何使用 OAuth 2.0 客户端支持配置 WebClient 的示例:
@BeanWebClient webClient(OAuth2AuthorizedClientManager authorizedClientManager) {ServletOAuth2AuthorizedClientExchangeFilterFunction oauth2Client =new ServletOAuth2AuthorizedClientExchangeFilterFunction(authorizedClientManager);return WebClient.builder().apply(oauth2Client.oauth2Configuration()).build();}
③ 提供授权 Client
ServletOAuth2AuthorizedClientExchangeFilterFunction 通过从 ClientRequest.attributes() (请求属性)解析 OAuth2AuthorizedClient 来确定要使用的客户端(用于请求)。
以下代码显示如何将 OAuth2AuthorizedClient 设置为请求属性:
@GetMapping("/")public String index(@RegisteredOAuth2AuthorizedClient("okta") OAuth2AuthorizedClient authorizedClient) {String resourceUri = ...String body = webClient.get().uri(resourceUri).attributes(oauth2AuthorizedClient(authorizedClient)).retrieve().bodyToMono(String.class).block();...return "index";}
上述代码中的oauth2AuthorizedClient() 是 ServletOAuth2AuthorizedClientExchangeFilterFunction 中的静态方法。
以下代码显示了如何将 ClientRegistration.getRegistrationId() 设置为请求属性:
@GetMapping("/")public String index() {String resourceUri = ...String body = webClient.get().uri(resourceUri).attributes(clientRegistrationId("okta")).retrieve().bodyToMono(String.class).block();...return "index";}
clientRegistrationId() 是 ServletOAuth2AuthorizedClientExchangeFilterFunction 中的静态方法。
④ 默认的 Authorized Client
如果 OAuth2AuthorizedClient 或 ClientRegistration.getRegistrationId()都没有作为请求属性提供,则 ServletOAuth2AuthorizedClientExchangeFilterFunction 可以根据其配置确定要使用的默认客户端。
如果配置了 setDefaultOAuth2AuthorizedClient(true) 并且用户已使用 HttpSecurity.oauth2Login() 进行身份验证,则使用与当前 OAuth2AuthenticationToken 关联的 OAuth2AccessToken。
下面的代码展示了具体的配置:
@BeanWebClient webClient(OAuth2AuthorizedClientManager authorizedClientManager) {ServletOAuth2AuthorizedClientExchangeFilterFunction oauth2Client =new ServletOAuth2AuthorizedClientExchangeFilterFunction(authorizedClientManager);oauth2Client.setDefaultOAuth2AuthorizedClient(true);return WebClient.builder().apply(oauth2Client.oauth2Configuration()).build();}
建议谨慎使用此功能,因为所有 HTTP 请求都会收到访问令牌。
或者,如果 setDefaultClientRegistrationId("okta") 配置了有效的 ClientRegistration,则使用与 OAuth2AuthorizedClient 关联的 OAuth2AccessToken。
@BeanWebClient webClient(OAuth2AuthorizedClientManager authorizedClientManager) {ServletOAuth2AuthorizedClientExchangeFilterFunction oauth2Client =new ServletOAuth2AuthorizedClientExchangeFilterFunction(authorizedClientManager);oauth2Client.setDefaultClientRegistrationId("okta");return WebClient.builder().apply(oauth2Client.oauth2Configuration()).build();}
建议谨慎使用此功能,因为所有 HTTP 请求都会收到访问令牌。
3. OAuth2 Resource Server
Spring Security 支持使用两种形式的 OAuth 2.0 Bearer Tokens 来保护端点:
- JWT
- 不透明
Tokens
应用程序将其权限管理委托给 authorization server (例如,Okta 或 Ping Identity)的情况下,resource servers很方便的通过authorization server来获得requests的授权请求。
官方的例子代码
- JWTs 与 Opaque Tokens 。按照代码中的提示,会很容易运行
让我们看看 Bearer Token Authentication 在 Spring Security 中是如何工作的。首先,我们看到,与 Basic Authentication一样, WWW-Authenticate header 被发送回未经身份验证的客户端。
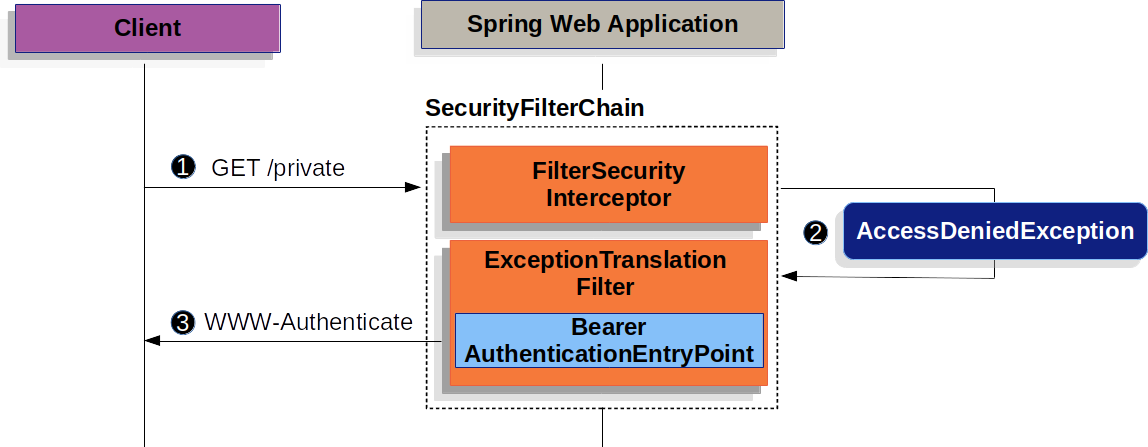
首先,用户向未授权的资源
/private发出unauthenticated request 。
Spring Security 的 FilterSecurityInterceptor 抛出 AccessDeniedException ,拒绝未经身份验证的请求。
由于用户未通过身份验证,
ExceptionTranslationFilter 启动开始认证。配置的 AuthenticationEntryPoint 是 BearerTokenAuthenticationEntryPoint 的一个实例,它发送 WWW-Authenticate header。RequestCache 通常是一个不保存请求的 NullRequestCache,因为客户端能够重放它最初请求的请求。
当客户端收到 WWW-Authenticate: Bearer header时,它知道它应该使用bearer token重试。以下是正在处理的bearer token的流程。
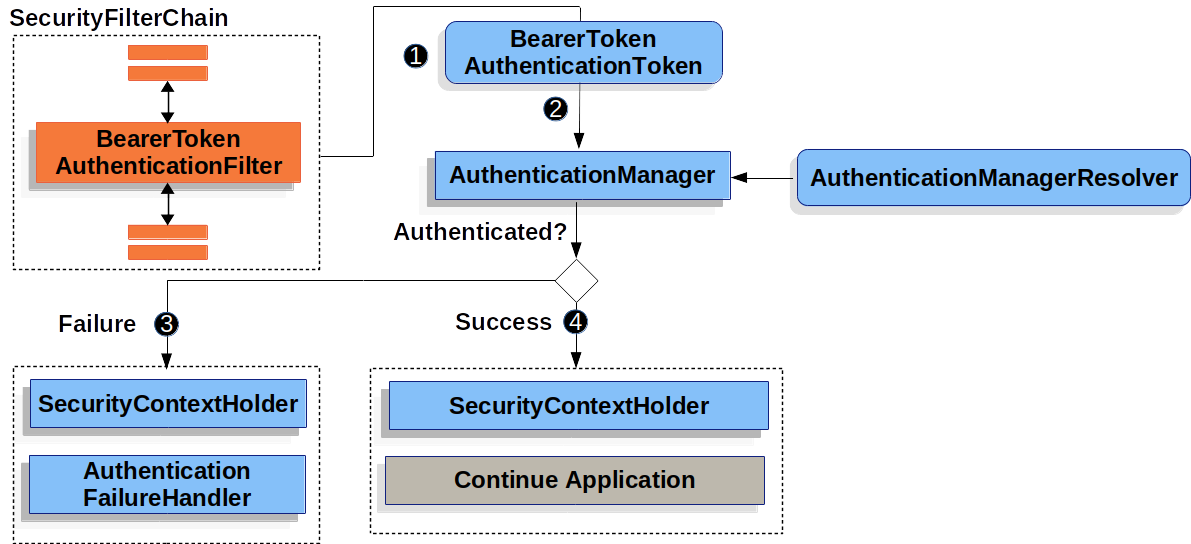
当用户提交他们的
bearer token时,BearerTokenAuthenticationFilter 通过从 HttpServletRequest 中提取令牌创建一个 BearerTokenAuthenticationToken,这是一种 Authentication。
接下来,
HttpServletRequest 被传递给 AuthenticationManagerResolver,它选择 AuthenticationManager。BearerTokenAuthenticationToken 被传入 AuthenticationManager 进行认证。AuthenticationManager 的详细信息取决于您是否配置了 JWT 或 opaque token。
如果身份验证失败,则失败
- SecurityContextHolder 被清除。
- 调用
AuthenticationEntryPoint以触发再次发送WWW-Authenticateheaders。
如果身份验证成功,则为 Success。
- Authentication 被设置
SecurityContextHolder中 。 BearerTokenAuthenticationFilter调用FilterChain.doFilter(request,response)以继续应用程序逻辑的其余部分。
3.1 JWT
3.1.1 JWT 的最小依赖
spring-security-oauth2-resource-server中已经包含了大多数依赖库 。但是,对解码和验证 JWT 支持的依赖在 spring-security-oauth2-jose 中,这意味着为了拥有一个支持JWT-encoded Bearer Tokens的resource server ,两者都是必要的。
spring-security-oauth2-resource-serverspring-security-oauth2-jose
3.1.2 JWT 的最低配置
使用 Spring Boot 时,将应用程序配置为 resource server 包括两个基本步骤。
- 首先,包含所需的依赖项
- 第二,指明授权服务器的位置。
① 指定授权服务器
spring:security:oauth2:resourceserver:jwt:issuer-uri: https://idp.example.com/issuer
其中 https://idp.example.com/issuer 是授权服务器将颁发的 JWT 令牌的 iss 声明中包含的值。资源服务器(Resource Server )将使用此属性进一步自我配置,发现授权服务器的公钥,并随后验证传入的 JWT。
备注
- 要使用
issuer-uri属性,https://idp.example.com/issuer/.well-known/openid-configuration,https://idp.example.com/.well-known/openid-configuration/issuer, orhttps://idp.example.com/.well-known/oauth-authorization-server/issuer中的一个是授权服务器支持的端点,这一点也必须是正确的。此端点称为Provider Configuration端点或 Authorization Server Metadata 端点。
② 启动过程
当配置项和依赖项都设置成功后,资源服务器将自动配置自己以验证JWT 编码的Bearer Tokens。
它通过固定的启动过程来实现这一点:
- 查询
jwks_url属性的Provider Configuration或Authorization Server Metadata endpoint。 - 查询
jwks_url端点以获取支持的算法 - 配置验证策略,其中会用到通过 jwks_url 以获取找到的算法的公钥。
- 配置验证策略,验证每个 JWT 的 iss claim,以针对 https://idp.example.com 。
此过程的结果是授权服务器必须启动并接收请求才能使资源服务器成功启动。
如果授权服务器在资源服务器查询时关闭(给定适当的超时),则启动将失败。
③ 运行过程
一旦应用程序启动,资源服务器将尝试处理任何包含 Authorization: Bearer header的请求:
GET / HTTP/1.1 Authorization: Bearer some-token-value # Resource Server willprocess this
只要指明了该方案,Resource Server 就会尝试根据 Bearer Token 规范处理请求。
给定一个格式良好的 JWT,资源服务器将:
- 根据启动期间从
jwks_url端点获取并与 JWT 匹配的public key验证其签名。 - 验证 JWT 的
exp和nbf时间戳以及 JWT 的iss声明,以及 - 将每个范围映射到前缀为
SCOPE_的权限。
备注
- 当授权服务器提供新密钥时,Spring Security 将自动轮换用于验证 JWT 的密钥。
默认情况下,生成的 Authentication#getPrincipal 是 Spring Security Jwt 对象,并且 Authentication#getName 映射到 JWT 的sub属性(如果存在)。
从这里,考虑跳到:
- How JWT Authentication Works
- How to Configure without tying Resource Server startup to an authorization server’s availability
- How to Configure without Spring Boot 这个不用看了
3.1.3 JWT 身份验证的工作原理
接下来,让我们看看 Spring Security 在基于 servlet 的应用程序中用于支持 JWT 身份验证的架构组件。
JwtAuthenticationProvider 是一个 AuthenticationProvider 实现,它利用 JwtDecoder 和 JwtAuthenticationConverter 对 JWT 进行身份验证。
让我们看看 JwtAuthenticationProvider 在 Spring Security 中是如何工作的。该图解释了Reading the Bearer Token 中的AuthenticationManager如何工作的细节。

读取Bearer Token 的认证过滤器将
BearerTokenAuthenticationToken 传递给由 ProviderManager 实现的 AuthenticationManager 。
ProviderManager 被配置为使用 JwtAuthenticationProvider 类型的 AuthenticationProvider 。
JwtAuthenticationProvider 使用 JwtDecoder 解码、验证和验证 Jwt 。
JwtAuthenticationProvider 然后使用 JwtAuthenticationConverter 将 Jwt 转换为授予权限的集合( Collection )。
身份验证成功后,返回的
Authentication 是 JwtAuthenticationToken 类型,并且具有一个主体(principal),即配置的 JwtDecoder 返回的 Jwt 。最终,返回的 JwtAuthenticationToken 将由身份验证过滤器设置在 SecurityContextHolder 上。
3.1.4 手工指定认证服务器上 JWK 设置的 URL 地址
如果授权服务器不支持任何配置端点,或者资源服务器必须独立于授权服务器启动,那么 jwk-set-uri 也可以提供:
spring:security:oauth2:resourceserver:jwt:issuer-uri: https://idp.example.comjwk-set-uri: https://idp.example.com/.well-known/jwks.json
备注:
- 如果 JWK Set uri 不是标准化的,但通常可以在授权服务器的文档中找到
因此,资源服务器在启动时不会 ping 授权服务器。我们仍然要指定 issuer-uri,以便资源服务器来验证传入 JWT 的 iss 声明。
3.1.5 重载或替换 SpringBoot 的配置项
在 SpringBoot 中,有两个 @Bean来配置Resource Server。
第一个是将应用程序配置为资源服务器的 WebSecurityConfigurerAdapter。当包含 spring-security-oauth2-jose 时,这个 WebSecurityConfigurerAdapter 看起来如下:
protected void configure(HttpSecurity http) {http.authorizeHttpRequests(authorize -> authorize.anyRequest().authenticated()).oauth2ResourceServer(OAuth2ResourceServerConfigurer::jwt);}
如果应用程序没有公开 WebSecurityConfigurerAdapter bean,那么 Spring Boot 将公开上述默认值。
替换它就像在应用程序中公开 bean 一样简单:
@EnableWebSecuritypublic class MyCustomSecurityConfiguration extends WebSecurityConfigurerAdapter {protected void configure(HttpSecurity http) {http.authorizeHttpRequests(authorize -> authorize.mvcMatchers("/messages/**").hasAuthority("SCOPE_message:read").anyRequest().authenticated()).oauth2ResourceServer(oauth2 -> oauth2.jwt(jwt -> jwt.jwtAuthenticationConverter(myConverter())));}}
- 以 /messages/ 开头的任何 URL,需要 message:read 的权限。
- oauth2ResourceServer DSL 上的方法也将覆盖或替换自动配置。
Spring Boot 创建的第二个 @Bean 是 JwtDecoder,它将 String 令牌解码为经过验证的 Jwt 实例:
@Beanpublic JwtDecoder jwtDecoder() {return JwtDecoders.fromIssuerLocation(issuerUri);}
备注:
- 调用
JwtDecoders#fromIssuerLocation会调用提供者配置或授权服务器元数据端点以便于生成 JWK 匹配的 Uri。
如果应用程序没有公开 JwtDecoder bean,那么 Spring Boot 将公开上述默认值。
它的配置可以使用 jwkSetUri() 覆盖或使用 decoder() 替换。
或者,如果您根本不使用 Spring Boot,那么这两个组件 - filter chain 和 JwtDecoder 都可以在 XML 中指定。
① 使用 jwkSetUri()
授权服务器的 JWK Set Uri 可以配置为配置属性,也可以在 DSL 中提供:
示例 6. JWK 设置 Uri 配置
@EnableWebSecuritypublic class DirectlyConfiguredJwkSetUri extends WebSecurityConfigurerAdapter {protected void configure(HttpSecurity http) {http.authorizeHttpRequests(authorize -> authorize.anyRequest().authenticated()).oauth2ResourceServer(oauth2 -> oauth2.jwt(jwt -> jwt.jwkSetUri("https://idp.example.com/.well-known/jwks.json")));}}
使用 jwkSetUri() 优先于任何配置属性。
② 使用解码器 decoder()
比 jwkSetUri() 更强大的是 decoder(),它将完全取代 JwtDecoder 的 Spring Boot 的配置:
@EnableWebSecuritypublic class DirectlyConfiguredJwtDecoder extends WebSecurityConfigurerAdapter {protected void configure(HttpSecurity http) {http.authorizeHttpRequests(authorize -> authorize.anyRequest().authenticated()).oauth2ResourceServer(oauth2 -> oauth2.jwt(jwt -> jwt.decoder(myCustomDecoder())));}}
当需要更深入的配置(如验证 validation、映射 mapping或请求超时 request timeouts)时,这很方便。
③ 暴露 JwtDecoder @Bean
如果感觉上面的比较麻烦,或者,暴露一个 JwtDecoder @Bean 和decoder() 效果一样:
@Beanpublic JwtDecoder jwtDecoder() {return NimbusJwtDecoder.withJwkSetUri(jwkSetUri).build();}
3.1.6 配置可信算法
默认情况下,NimbusJwtDecoder 和资源服务器将仅使用 RS256 信任和验证令牌。
我认为用默认的就挺好的。
① 通过 Spring Boot
设置算法的最简单方法如下:
spring:security:oauth2:resourceserver:jwt:jws-algorithm: RS512jwk-set-uri: https://idp.example.org/.well-known/jwks.json
② 使用生成器
但是,为了获得更大的功能,我们可以使用 NimbusJwtDecoder 附带的构建器:
@BeanJwtDecoder jwtDecoder() {return NimbusJwtDecoder.withJwkSetUri(this.jwkSetUri).jwsAlgorithm(RS512).build();}
多次调用 jwsAlgorithm 会将 NimbusJwtDecoder 配置为信任多个算法,如下所示:
@BeanJwtDecoder jwtDecoder() {return NimbusJwtDecoder.withJwkSetUri(this.jwkSetUri).jwsAlgorithm(RS512).jwsAlgorithm(ES512).build();}
或者,您可以调用 jwsAlgorithms:
@BeanJwtDecoder jwtDecoder() {return NimbusJwtDecoder.withJwkSetUri(this.jwkSetUri).jwsAlgorithms(algorithms -> {algorithms.add(RS512);algorithms.add(ES512);}).build();}
③ 通过 JWK Set response
由于 Spring Security 的 JWT 支持基于 Nimbus,因此您也可以使用它的所有出色功能。
例如,Nimbus 有一个 JWSKeySelector 实现,它将根据 JWK Set URI response选择一组算法。您可以使用它来生成 NimbusJwtDecoder,如下所示:
@Beanpublic JwtDecoder jwtDecoder() {// makes a request to the JWK Set endpointJWSKeySelector<SecurityContext> jwsKeySelector =JWSAlgorithmFamilyJWSKeySelector.fromJWKSetURL(this.jwkSetUrl);DefaultJWTProcessor<SecurityContext> jwtProcessor =new DefaultJWTProcessor<>();jwtProcessor.setJWSKeySelector(jwsKeySelector);return new NimbusJwtDecoder(jwtProcessor);}
这样做的好处呢? 当授权服务器的配置文件发生变化时,资源服务器会自动识别出新的算法,不用修改代码。 但是估计要重启一下资源服务器。
3.1.7 信任单个非对称密钥
Trusting a Single Asymmetric Key,比使用 JWK Set 端点支持资源服务器更简单的是硬编码 RSA 公钥。可以通过 Spring Boot 或使用 Builder 提供公钥。
① 通过 Spring Boot
通过 Spring Boot 指定密钥非常简单。可以像这样指定密钥的位置:
spring:security:oauth2:resourceserver:jwt:public-key-location: classpath:my-key.pub
或者,为了进行更复杂的查找,您可以对 RsaKeyConversionServicePostProcessor 进行后处理:
@BeanBeanFactoryPostProcessor conversionServiceCustomizer() {return beanFactory ->beanFactory.getBean(RsaKeyConversionServicePostProcessor.class).setResourceLoader(new CustomResourceLoader());}
指定密钥的位置:
key.location: hfds://my-key.pub
然后自动装配值:
@Value("${key.location}")RSAPublicKey key;
② 使用生成器
要直接连接 RSAPublicKey,您可以简单地使用适当的 NimbusJwtDecoder 构建器,如下所示:
@Beanpublic JwtDecoder jwtDecoder() {return NimbusJwtDecoder.withPublicKey(this.key).build();}
3.1.8 信任单个对称密钥(不推荐)
使用单个对称密钥也很简单。您可以简单地加载您的 SecretKey 并使用适当的 NimbusJwtDecoder 构建器,如下所示:
@Beanpublic JwtDecoder jwtDecoder() {return NimbusJwtDecoder.withSecretKey(this.key).build();}
3.1.9 配置授权
从 OAuth 2.0 授权服务器发出的 JWT 通常具有 scope 或 scp 属性,表明它被授予的范围(或权限),例如:
{ …, "scope" : "messages contacts"}
在这种情况下,资源服务器将尝试将这些范围强制转换为已授予权限的列表,并在每个范围前加上字符串“SCOPE_”。
这意味着要保护具有从 JWT 派生的范围的端点或方法,相应的表达式应包含以下前缀:
@EnableWebSecuritypublic class DirectlyConfiguredJwkSetUri extends WebSecurityConfigurerAdapter {protected void configure(HttpSecurity http) {http.authorizeHttpRequests(authorize -> authorize.mvcMatchers("/contacts/**").hasAuthority("SCOPE_contacts").mvcMatchers("/messages/**").hasAuthority("SCOPE_messages").anyRequest().authenticated()).oauth2ResourceServer(OAuth2ResourceServerConfigurer::jwt);}}
方法的安全防护
@PreAuthorize("hasAuthority('SCOPE_messages')")public List<Message> getMessages(...) {}
① 手动提取权限
但是,在许多情况下,此默认设置是不够的。例如,一些授权服务器不使用范围属性,而是有自己的自定义属性。或者,在其他时候,资源服务器可能需要将属性或属性组合调整为内部可以识别的权限。
为此,Spring Security 附带了 JwtAuthenticationConverter,它负责将Jwt 转换为 Authentication。默认情况下,Spring Security 会将 JwtAuthenticationProvider 与 JwtAuthenticationConverter 的默认实例连接起来。
作为配置 JwtAuthenticationConverter 的一部分,您可以提供一个辅助转换器,将 Jwt 转到授予权限的集合。
假设您的授权服务器将权限的自定义成 authorities。在这种情况下,您可以配置 JwtAuthenticationConverter 应检查的声明,如下所示:
@Beanpublic JwtAuthenticationConverter jwtAuthenticationConverter() {JwtGrantedAuthoritiesConverter grantedAuthoritiesConverter = new JwtGrantedAuthoritiesConverter();grantedAuthoritiesConverter.setAuthoritiesClaimName("authorities");JwtAuthenticationConverter jwtAuthenticationConverter = new JwtAuthenticationConverter();jwtAuthenticationConverter.setJwtGrantedAuthoritiesConverter(grantedAuthoritiesConverter);return jwtAuthenticationConverter;}
您也可以将权限前缀配置为不同。您可以将其更改为 ROLE_,而不是使用 SCOPE_ 作为每个权限的前缀,如下所示:
@Beanpublic JwtAuthenticationConverter jwtAuthenticationConverter() {JwtGrantedAuthoritiesConverter grantedAuthoritiesConverter = new JwtGrantedAuthoritiesConverter();grantedAuthoritiesConverter.setAuthorityPrefix("ROLE_");JwtAuthenticationConverter jwtAuthenticationConverter = new JwtAuthenticationConverter();jwtAuthenticationConverter.setJwtGrantedAuthoritiesConverter(grantedAuthoritiesConverter);return jwtAuthenticationConverter;}
或者,您可以通过调用 JwtGrantedAuthoritiesConverter#setAuthorityPrefix("") 来完全删除前缀。
为了更灵活,DSL 支持用任何实现 Converter<Jwt, AbstractAuthenticationToken> 的类完全替换转换器:
static class CustomAuthenticationConverter implements Converter<Jwt, AbstractAuthenticationToken> {public AbstractAuthenticationToken convert(Jwt jwt) {return new CustomAuthenticationToken(jwt);}}// ...@EnableWebSecuritypublic class CustomAuthenticationConverterConfig extends WebSecurityConfigurerAdapter {protected void configure(HttpSecurity http) {http.authorizeHttpRequests(authorize -> authorize.anyRequest().authenticated()).oauth2ResourceServer(oauth2 -> oauth2.jwt(jwt -> jwt.jwtAuthenticationConverter(new CustomAuthenticationConverter())));}}
3.1.10 配置验证
使用最简的 Spring Boot 配置,表明了authorization server的issuer uri,默认情况下,Resource Server将验证 iss 的属性值以及 exp 和 nbf 时间戳的属性值。
在需要自定义验证的情况下,Resource Server 附带两个标准验证器,并且还接受自定义 OAuth2TokenValidator 实例。
① 自定义时间戳验证-缓解时钟偏差
JWT 通常有一个有效期窗口,开始时间在 nbf 属性值中,结束时间在 exp 属性值中。
但是,每台服务器都可能会遇到时钟漂移,这可能导致令牌在一台服务器上看起来已过期,而在另一台服务器上则不会。随着分布式系统中协作服务器数量的增加,这可能会导致一些实现方面的问题。
Resource Server 使用 JwtTimestampValidator 来验证令牌的有效性窗口,并且可以配置一个 clockSkew 来缓解上述问题:
@BeanJwtDecoder jwtDecoder() {NimbusJwtDecoder jwtDecoder = (NimbusJwtDecoder)JwtDecoders.fromIssuerLocation(issuerUri);OAuth2TokenValidator<Jwt> withClockSkew = new DelegatingOAuth2TokenValidator<>(new JwtTimestampValidator(Duration.ofSeconds(60)),new JwtIssuerValidator(issuerUri));jwtDecoder.setJwtValidator(withClockSkew);return jwtDecoder;}
默认情况下,资源服务器配置 60 秒的时钟偏差。
② 配置自定义验证器
使用 OAuth2TokenValidator API 添加对 aud 属性值的检查很简单:
OAuth2TokenValidator<Jwt> audienceValidator() {return new JwtClaimValidator<List<String>>(AUD, aud -> aud.contains("messaging"));}
OAuth2TokenValidator 接口有多个实现的类,可以实现不同的校验需求
- DelegatingOAuth2TokenValidator , 一个代理类,可以实现多个验证类的验证 JwtClaimValidator JwtIssuerValidator JwtTimestampValidator OidcIdTokenValidator
或者,为了获得更多控制权,您可以实现自己的 OAuth2TokenValidator:
static class AudienceValidator implements OAuth2TokenValidator<Jwt> {OAuth2Error error = new OAuth2Error("custom_code", "Custom error message", null);@Overridepublic OAuth2TokenValidatorResult validate(Jwt jwt) {if (jwt.getAudience().contains("messaging")) {return OAuth2TokenValidatorResult.success();} else {return OAuth2TokenValidatorResult.failure(error);}}}// ...OAuth2TokenValidator<Jwt> audienceValidator() {return new AudienceValidator();}
③ 将验证添加到resource server
然后,要添加到resource server中,只需指定 JwtDecoder 实例:
@BeanJwtDecoder jwtDecoder() {NimbusJwtDecoder jwtDecoder = (NimbusJwtDecoder)JwtDecoders.fromIssuerLocation(issuerUri);OAuth2TokenValidator<Jwt> audienceValidator = audienceValidator();OAuth2TokenValidator<Jwt> withIssuer = JwtValidators.createDefaultWithIssuer(issuerUri);OAuth2TokenValidator<Jwt> withAudience = new DelegatingOAuth2TokenValidator<>(withIssuer, audienceValidator);jwtDecoder.setJwtValidator(withAudience);return jwtDecoder;}
3.1.11 配置属性值集合映射
Configuring Claim Set Mapping
Spring Security 使用 Nimbus 库来解析 JWT 并验证其签名。因此,Spring Security 受制于 Nimbus 对每个字段值的解释以及如何将每个字段强制转换为 Java 类型。
例如,由于 Nimbus 仍然与 Java 7 兼容,它不使用 Instant 来表示时间戳字段。并且完全可以使用不同的库或用于 JWT 处理,这可能会做出需要调整的自己的强制决策。或者,很简单,资源服务器可能出于特定领域的原因想要从 JWT 添加或删除属性。
出于这些目的,资源服务器支持使用 MappedJwtClaimSetConverter映射 JWT 声明集。
① 自定义单个 Claim 的转换
默认情况下, MappedJwtClaimSetConverter 将尝试将声明强制转换为以下类型:
| Claim | Java Type |
|---|---|
aud | Collection<String> 接收该 jwt 的一方 |
exp | Instant token 的失效时间 |
iat | Instant jwt 发布时间 |
iss | String token 的发行者 |
jti | String jwt 唯一标识,防止重复使用 |
nbf | Instant 在此时间段之前,不会被处理 |
sub | String 该 jwt 所面向的用户 |
可以使用 MappedJwtClaimSetConverter.withDefaults 配置单个声明的转换策略:
@BeanJwtDecoder jwtDecoder() {NimbusJwtDecoder jwtDecoder = NimbusJwtDecoder.withJwkSetUri(jwkSetUri).build();MappedJwtClaimSetConverter converter = MappedJwtClaimSetConverter.withDefaults(Collections.singletonMap("sub", this::lookupUserIdBySub));jwtDecoder.setClaimSetConverter(converter);return jwtDecoder;}
这将保留所有默认值,除了它将覆盖 sub 的默认声明转换器。 看例子代码的名字this::lookupUserIdBySub,大概是根据名字得到 ID。
② 添加一个 Claim
MappedJwtClaimSetConverter 也可用于添加自定义声明,例如,以适应现有系统:
MappedJwtClaimSetConverter.withDefaults(Collections.singletonMap("custom", custom -> "value"));
③ 移除一个 Claim
删除声明也很简单,使用相同的 API:
MappedJwtClaimSetConverter.withDefaults(Collections.singletonMap("legacyclaim", legacy -> null));
④ 重命名一个 Claim
在更复杂的场景中,例如一次查询多个声明或重命名声明,资源服务器可以通过实现自定的 Converter<Map<String, Object>, Map<String,Object>> 类来实现:
public class UsernameSubClaimAdapter implements Converter<Map<String, Object>, Map<String, Object>> {private final MappedJwtClaimSetConverter delegate =MappedJwtClaimSetConverter.withDefaults(Collections.emptyMap());public Map<String, Object> convert(Map<String, Object> claims) {Map<String, Object> convertedClaims = this.delegate.convert(claims);String username = (String) convertedClaims.get("user_name");convertedClaims.put("sub", username);return convertedClaims;}}
然后,可以像往常一样提供实例:
@BeanJwtDecoder jwtDecoder() {NimbusJwtDecoder jwtDecoder = NimbusJwtDecoder.withJwkSetUri(jwkSetUri).build();jwtDecoder.setClaimSetConverter(new UsernameSubClaimAdapter());return jwtDecoder;}
3.1.12 配置超时
默认情况下,资源服务器使用 30 秒的连接和套接字超时来与授权服务器进行协调。在某些情况下,这可能太短了。此外,它没有考虑更复杂的模式,如退避和发现。
为了调整 Resource Server 连接到授权服务器的方式,NimbusJwtDecoder 接受一个 RestOperations 实例:
@Beanpublic JwtDecoder jwtDecoder(RestTemplateBuilder builder) {RestOperations rest = builder.setConnectTimeout(Duration.ofSeconds(60)).setReadTimeout(Duration.ofSeconds(60)).build();NimbusJwtDecoder jwtDecoder = NimbusJwtDecoder.withJwkSetUri(jwkSetUri).restOperations(rest).build();return jwtDecoder;}
同样默认情况下,资源服务器将授权服务器的 JWK 设置缓存在内存中 5 分钟,您可能需要对其进行调整。此外,它没有考虑更复杂的缓存模式,例如驱逐或使用共享缓存。
为了调整 Resource Server 缓存 JWK 集的方式,NimbusJwtDecoder 接受一个 Cache 实例:
@Beanpublic JwtDecoder jwtDecoder(CacheManager cacheManager) {return NimbusJwtDecoder.withJwkSetUri(jwkSetUri).cache(cacheManager.getCache("jwks")).build();}
当给定缓存时,资源服务器将使用 JWK Set Uri 作为键,使用 JWK Set JSON 作为值。
CacheManager 说明
- 通常使用的时候都是使用注解一把梭,比如
@Cacheable之类,但有时候还是需要手动灵活操作的。spring提供了CacheManager接口方便大家的操作,比如我这边用的redis缓存中间件,那么实现类会变成redisCacheManager.使用cacheManager.getCache获取的是 redis 中的 key,这个 key 可能存在也可能不存在. 详细可以参考
Spring 不是缓存提供程序,因此您需要确保包含适当的依赖项,例如 spring-boot-starter-cache 和您最喜欢的缓存提供程序。
无论是套接字超时还是缓存超时,您都可能希望直接使用 Nimbus。为此,请记住 NimbusJwtDecoder 附带一个构造函数,该构造函数采用 Nimbus 的 JWTProcessor。
3.2 不透明 Token
感觉 JWT 挺好的,为啥还要引入不透明 Token? 不同名 Token 在授权服务器段进行验证,对于有撤销授权这种需求会很方便,但是每次验证会消耗授权服务器的性能。
3.2.1 最小依赖
如 JWT 的最小依赖项中所述,大多数资源服务器支持都包含在 spring-security-oauth2-resource-server 中。但是,除非提供自定义 OpaqueTokenIntrospector,否则资源服务器将回退到 NimbusOpaqueTokenIntrospector。这意味着 spring-security-oauth2-resource-server 和 oauth2-oidc-sdk 都是必要的,以便拥有一个支持不透明承载令牌的工作最小资源服务器。请参考 spring-security-oauth2-resource-server 以确定 oauth2-oidc-sdk 的正确版本。
spring-security-oauth2-resource-serveroauth2-oidc-sdk
引用 oauth2-oidc-sdk
这里面有个奇怪的事情,如果在定义中使用标准的 application.yml
spring:security:oauth2:resourceserver:opaquetoken:client-secret: secretclient-id: messaging-clientintrospection-uri: http://localhost:9000/oauth2/introspect
这时候启动程序,会提示com.nimbusds.oauth2.sdk.http.HTTPResponse 找不到。
Caused by: java.lang.ClassNotFoundException: com.nimbusds.oauth2.sdk.http.HTTPResponseat java.base/jdk.internal.loader.BuiltinClassLoader.loadClass(BuiltinClassLoader.java:581) ~[na:na]at java.base/jdk.internal.loader.ClassLoaders$AppClassLoader.loadClass(ClassLoaders.java:178) ~[na:na]
可以看到没有依赖oauth2-oidc-sdk,所以要添加依赖:
# 官方例子中,用的是下面的引用。//implementation 'com.nimbusds:oauth2-oidc-sdk'# 实际中,gradle找不到,提示错误,所以可以使用下面的引用。//runtimeOnly group: 'com.nimbusds', name: 'oauth2-oidc-sdk', version: '9.37.2'
不引用 oauth2-oidc-sdk
按照官方的例子,也可以不引用 oauth2-oidc-sdk,具体做法如下,不使用标准的配置:
spring:security:oauth2:resourceserver:opaque:introspection-uri: http://localhost:9000/oauth2/introspectintrospection-client-id: messaging-clientintrospection-client-secret: secret
代码是这么来写的
@Value("${spring.security.oauth2.resourceserver.opaque.introspection-uri}")String introspectionUri;@Value("${spring.security.oauth2.resourceserver.opaque.introspection-client-id}")String clientId;@Value("${spring.security.oauth2.resourceserver.opaque.introspection-client-secret}")String clientSecret;@Beanpublic SecurityFilterChain securityFilterChain(HttpSecurity http) throws Exception{http.authorizeRequests(request->request.antMatchers(HttpMethod.GET,"/message/**").hasAuthority("SCOPE_message.read").anyRequest().authenticated());http.oauth2ResourceServer(oauth2->oauth2.opaqueToken(opaque->opaque.introspectionUri(this.introspectionUri).introspectionClientCredentials(this.clientId,this.clientSecret)));//http.oauth2ResourceServer().opaqueToken();return http.build();}
3.2.2 最低配置
通常,可以通过authorization server托管的 OAuth 2.0 Introspection Endpoint验证不透明令牌。当需要撤销时,这会很方便。
使用 Spring Boot 时,将应用程序配置为使用自省的资源服务器包括两个基本步骤。
- 首先,包含所需的依赖项
- 其次,指明
the introspection endpoint的详细信息。
① 指定授权服务器
要指定自省端点的位置,只需执行以下操作:
security:oauth2:resourceserver:opaque-token:introspection-uri: https://idp.example.com/introspectclient-id: clientclient-secret: secret
其中 https://idp.example.com/introspect 是您的授权服务器托管的自省端点,client-id和 client-secret 是访问该端点所需的凭据。
资源服务器将使用这些属性进一步自我配置并随后验证传入的 Token。
备注:
- 使用自省时,授权服务器的话就是法律。如果授权服务器响应令牌有效,则它是有效的。
② 启动过程
当配置好授权服务器属性和依赖项时,资源服务器将自动配置,并且验证Opaque Bearer Tokens。
这个启动过程比 JWT 简单得多,因为不需要发现端点,也不需要添加额外的验证规则。
③ 运行过程
一旦应用程序启动,资源服务器将尝试处理任何包含 Authorization: Bearer header的请求:
GET / HTTP/1.1Authorization: Bearer some-token-value # Resource Server will process this
只要指明了该方案,Resource Server 就会尝试根据 Bearer Token 规范处理请求。
给定一个不透明的令牌,资源服务器将:
- 使用提供的凭据和令牌,查询授权服务器的
the introspection endpoint - 检查
response中是否包含{ 'active' : true }属性 - 将每个 scope 映射到具有前缀 SCOPE_ 的权限
默认情况下,生成的 Authentication#getPrincipal 是 Spring Security OAuth2AuthenticatedPrincipal 对象,并且 Authentication#getName映射到令牌的 sub属性(如果存在)。
3.2.3 不透明令牌身份验证的工作原理
OpaqueTokenAuthenticationProvider 是一个 AuthenticationProvider 实现,它利用 OpaqueTokenIntrospector 对不透明令牌进行身份验证。
让我们看看 OpaqueTokenAuthenticationProvider 在 Spring Security 中是如何工作的。该图解释了 Reading the Bearer Token 中的AuthenticationManager 如何工作的细节。
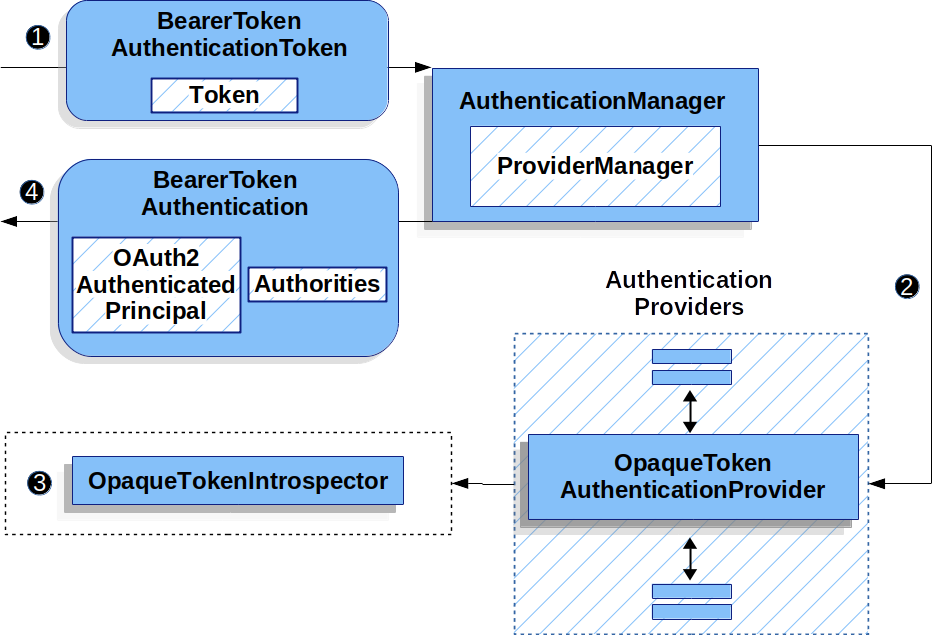
读取 Reading the Bearer Token 的认证
Filter 将 BearerTokenAuthenticationToken 传递给由 ProviderManager 实现的 AuthenticationManager。
ProviderManager 被配置为使用 OpaqueTokenAuthenticationProvider 类型的 AuthenticationProvider。
OpaqueTokenAuthenticationProvider 校验不透明令牌并使用 OpaqueTokenIntrospector 添加授予的权限。身份验证成功后,返回 BearerTokenAuthentication 类型对象,并且具有一个主体,即配置的 OpaqueTokenIntrospector 返回的 OAuth2AuthenticatedPrincipal。最终,返回的 BearerTokenAuthentication 将由身份验证过滤器在 SecurityContextHolder 上设置。
3.2.4 验证后查找属性
一旦令牌通过身份验证,就会在 SecurityContext 中设置 BearerTokenAuthentication 的实例。
这意味着在您的配置中使用 @EnableWebMvc 时,它在 @Controller 方法中可用:
@GetMapping("/foo")public String foo(BearerTokenAuthentication authentication) {return authentication.getTokenAttributes().get("sub") + " is the subject";}
由于 BearerTokenAuthentication 持有 OAuth2AuthenticatedPrincipal,这也意味着它也可用于控制器方法:
@GetMapping("/foo")public String foo(@AuthenticationPrincipal OAuth2AuthenticatedPrincipal principal) {return principal.getAttribute("sub") + " is the subject";}
① 通过 SpEL 查找属性
当然,这也意味着可以通过 SpEL 访问属性。
例如,如果使用 @EnableGlobalMethodSecurity 以便您可以使用 @PreAuthorize 注释,您可以执行以下操作:
@PreAuthorize("principal?.attributes['sub'] == 'foo'")public String forFoosEyesOnly() {return "foo";}
3.2.5 覆盖或替换自动配置
在 SpringBoot 中,有两个 @Bean来配置Resource Server。
第一个是将应用程序配置为资源服务器的 WebSecurityConfigurerAdapter。使用 Opaque Token 时,此 WebSecurityConfigurerAdapter 如下所示:
protected void configure(HttpSecurity http) {http.authorizeHttpRequests(authorize -> authorize.anyRequest().authenticated()).oauth2ResourceServer(OAuth2ResourceServerConfigurer::opaqueToken);}
如果应用程序没有公开 WebSecurityConfigurerAdapter bean,那么 Spring Boot 将公开上述默认值。
替换它就像在应用程序中公开 bean 一样简单:
@EnableWebSecuritypublic class MyCustomSecurityConfiguration extends WebSecurityConfigurerAdapter {protected void configure(HttpSecurity http) {http.authorizeHttpRequests(authorize -> authorize.mvcMatchers("/messages/**").hasAuthority("SCOPE_message:read").anyRequest().authenticated()).oauth2ResourceServer(oauth2 -> oauth2.opaqueToken(opaqueToken -> opaqueToken.introspector(myIntrospector())));}}
上面需要 message:read 的权限范围,以获取以 /messages/ 开头的任何 URL。
oauth2ResourceServer DSL 上的方法也将覆盖或替换自动配置。
例如,Spring Boot 创建的第二个 @Bean 是一个 OpaqueTokenIntrospector,它将字符串令牌解码为经过验证的 OAuth2AuthenticatedPrincipal 实例:
@Beanpublic OpaqueTokenIntrospector introspector() {return new NimbusOpaqueTokenIntrospector(introspectionUri, clientId, clientSecret);}
如果应用程序没有公开 OpaqueTokenIntrospector bean,那么 Spring Boot 将公开上述默认值。
并且可以使用introspectionUri()和 introspectionClientCredentials() 覆盖它的配置,或者使用 introspector() 替换它的配置。
① 使用 introspectionUri()
授权服务器的Introspection Uri可以配置为配置属性,也可以在 DSL 中提供:
@EnableWebSecuritypublic class DirectlyConfiguredIntrospectionUri extends WebSecurityConfigurerAdapter {protected void configure(HttpSecurity http) {http.authorizeHttpRequests(authorize -> authorize.anyRequest().authenticated()).oauth2ResourceServer(oauth2 -> oauth2.opaqueToken(opaqueToken -> opaqueToken.introspectionUri("https://idp.example.com/introspect").introspectionClientCredentials("client", "secret")));}}
② 使用 introspector()
比 introspectionUri() 更强大的是 introspector(),它将完全取代 OpaqueTokenIntrospector的任何配置:
@EnableWebSecuritypublic class DirectlyConfiguredIntrospector extends WebSecurityConfigurerAdapter {protected void configure(HttpSecurity http) {http.authorizeHttpRequests(authorize -> authorize.anyRequest().authenticated()).oauth2ResourceServer(oauth2 -> oauth2.opaqueToken(opaqueToken -> opaqueToken.introspector(myCustomIntrospector())));}}
当需要更深入的配置(如权限映射、JWT 撤销或请求超时)时,这很方便。
③ 暴露 OpaqueTokenIntrospector @Bean
或者,暴露 OpaqueTokenIntrospector @Bean 与 introspector() 效果相同:
@Beanpublic OpaqueTokenIntrospector introspector() {return new NimbusOpaqueTokenIntrospector(introspectionUri, clientId, clientSecret);}
3.2.6 配置授权
OAuth 2.0 Introspection 端点通常会返回一个范围属性,指示它被授予的范围(或权限),例如:
{ …, "scope" : "messages contacts"}
在这种情况下,资源服务器将尝试将这些范围强制转换为已授予权限的列表,并在每个范围前加上字符串“SCOPE_”。
这意味着要保护具有从不透明令牌派生的范围的端点或方法,相应的表达式应包含此前缀.
@EnableWebSecuritypublic class MappedAuthorities extends WebSecurityConfigurerAdapter {protected void configure(HttpSecurity http) {http.authorizeHttpRequests(authorizeRequests -> authorizeRequests.mvcMatchers("/contacts/**").hasAuthority("SCOPE_contacts").mvcMatchers("/messages/**").hasAuthority("SCOPE_messages").anyRequest().authenticated()).oauth2ResourceServer(OAuth2ResourceServerConfigurer::opaqueToken);}}
或者与方法安全性类似:
@PreAuthorize("hasAuthority('SCOPE_messages')")public List<Message> getMessages(...) {}
① 手动提取权限
默认情况下,Opaque Token支持将从introspection response中提取范围声明,并将其解析为单个 GrantedAuthority 实例。
{"active": true,"scope": "message:read message:write"}
然后Resource Server将生成具有两个权限的身份验证,一个 message:read ,另一个 message:write。
当然,这可以使用自定义的 OpaqueTokenIntrospector 进行自定义,该 OpaqueTokenIntrospector 查看属性集并以自己的方式进行转换:
public class CustomAuthoritiesOpaqueTokenIntrospector implements OpaqueTokenIntrospector {private OpaqueTokenIntrospector delegate =new NimbusOpaqueTokenIntrospector("https://idp.example.org/introspect", "client", "secret");public OAuth2AuthenticatedPrincipal introspect(String token) {OAuth2AuthenticatedPrincipal principal = this.delegate.introspect(token);return new DefaultOAuth2AuthenticatedPrincipal(principal.getName(), principal.getAttributes(), extractAuthorities(principal));}private Collection<GrantedAuthority> extractAuthorities(OAuth2AuthenticatedPrincipal principal) {List<String> scopes = principal.getAttribute(OAuth2IntrospectionClaimNames.SCOPE);return scopes.stream().map(SimpleGrantedAuthority::new).collect(Collectors.toList());}}
此后,可以简单地通过将其公开为 @Bean 来配置此自定义 introspector:
@Beanpublic OpaqueTokenIntrospector introspector() {return new CustomAuthoritiesOpaqueTokenIntrospector();}
3.2.7 配置超时
默认情况下,资源服务器使用 30 秒的连接和套接字超时来与授权服务器进行协调。
在某些情况下,这可能太短了。此外,它没有考虑更复杂的模式,如退避和发现。
为了调整 Resource Server 连接到授权服务器的方式,NimbusOpaqueTokenIntrospector 接受一个 RestOperations 实例:
@Beanpublic OpaqueTokenIntrospector introspector(RestTemplateBuilder builder, OAuth2ResourceServerProperties properties) {RestOperations rest = builder.basicAuthentication(properties.getOpaquetoken().getClientId(), properties.getOpaquetoken().getClientSecret()).setConnectTimeout(Duration.ofSeconds(60)).setReadTimeout(Duration.ofSeconds(60)).build();return new NimbusOpaqueTokenIntrospector(introspectionUri, rest);}
3.2.8 将 Introspection 与 JWT 结合使用
一个常见的问题是Introspection是否与 JWT 兼容。Spring Security 的 Opaque Token 支持被设计为不关心令牌的格式 — 它很乐意将任何令牌传递给提供的自省端点。
因此,假设您有一个要求,要求您检查每个请求的授权服务器,以防 JWT 已被撤销。
即使您使用 JWT 格式的令牌,您的验证方法是自省,这意味着您想要这样做:
spring:security:oauth2:resourceserver:opaque-token:introspection-uri: https://idp.example.org/introspectionclient-id: clientclient-secret: secret
在这种情况下,生成的身份验证将是 BearerTokenAuthentication。相应的 OAuth2AuthenticatedPrincipal 中的任何属性都将是 introspection端点返回的任何内容。
但是,让我们说,奇怪的是,自省端点只返回令牌是否处于活动状态。怎么办?
在这种情况下,您可以创建一个自定义的 OpaqueTokenIntrospector,它仍然会访问授权服务器端点,但随后会更新返回的principal以将 JWTs claims作为属性:
public class JwtOpaqueTokenIntrospector implements OpaqueTokenIntrospector {private OpaqueTokenIntrospector delegate =new NimbusOpaqueTokenIntrospector("https://idp.example.org/introspect", "client", "secret");private JwtDecoder jwtDecoder = new NimbusJwtDecoder(new ParseOnlyJWTProcessor());public OAuth2AuthenticatedPrincipal introspect(String token) {OAuth2AuthenticatedPrincipal principal = this.delegate.introspect(token);try {Jwt jwt = this.jwtDecoder.decode(token);return new DefaultOAuth2AuthenticatedPrincipal(jwt.getClaims(), NO_AUTHORITIES);} catch (JwtException ex) {throw new OAuth2IntrospectionException(ex);}}private static class ParseOnlyJWTProcessor extends DefaultJWTProcessor<SecurityContext> {JWTClaimsSet process(SignedJWT jwt, SecurityContext context)throws JOSEException {return jwt.getJWTClaimsSet();}}}
此后,可以简单地通过将其公开为 @Bean 来配置此自定义 introspector:
@Beanpublic OpaqueTokenIntrospector introspector() {return new JwtOpaqueTokenIntrospector();}
3.2.9 调用 /userinfo 端点
一般来说,资源服务器不关心底层用户,而是关心已授予的权限。
也就是说,有时将授权声明与用户联系起来可能很有价值。
如果应用程序也在使用 spring-security-oauth2-client,并设置了适当的 ClientRegistrationRepository,那么使用自定义 OpaqueTokenIntrospector 就很简单了。下面的例子实现做了三件事:
- 委托到
introspection端点,以确认令牌的有效性 - 查找与
/userinfo端点关联的适当client registration - 从
/userinfo端点调用并返回response
public class UserInfoOpaqueTokenIntrospector implements OpaqueTokenIntrospector {private final OpaqueTokenIntrospector delegate =new NimbusOpaqueTokenIntrospector("https://idp.example.org/introspect", "client", "secret");private final OAuth2UserService oauth2UserService = new DefaultOAuth2UserService();private final ClientRegistrationRepository repository;// ... constructor@Overridepublic OAuth2AuthenticatedPrincipal introspect(String token) {OAuth2AuthenticatedPrincipal authorized = this.delegate.introspect(token);Instant issuedAt = authorized.getAttribute(ISSUED_AT);Instant expiresAt = authorized.getAttribute(EXPIRES_AT);ClientRegistration clientRegistration = this.repository.findByRegistrationId("registration-id");OAuth2AccessToken token = new OAuth2AccessToken(BEARER, token, issuedAt, expiresAt);OAuth2UserRequest oauth2UserRequest = new OAuth2UserRequest(clientRegistration, token);return this.oauth2UserService.loadUser(oauth2UserRequest);}}
如果你不使用 spring-security-oauth2-client,它仍然很简单。您只需要使用您自己的 WebClient 实例调用 /userinfo:
public class UserInfoOpaqueTokenIntrospector implements OpaqueTokenIntrospector {private final OpaqueTokenIntrospector delegate =new NimbusOpaqueTokenIntrospector("https://idp.example.org/introspect", "client", "secret");private final WebClient rest = WebClient.create();@Overridepublic OAuth2AuthenticatedPrincipal introspect(String token) {OAuth2AuthenticatedPrincipal authorized = this.delegate.introspect(token);return makeUserInfoRequest(authorized);}}
无论哪种方式,在创建了 OpaqueTokenIntrospector 之后,您都应该将其发布为 @Bean 以覆盖默认值:
@BeanOpaqueTokenIntrospector introspector() {return new UserInfoOpaqueTokenIntrospector(...);}
3.3 多租户
3.3.1 同时支持 JWT 和 Opaque Token
在某些情况下,您可能需要访问这两种令牌。例如,您可能支持多个租户,其中一个租户发布 JWT,另一个发布 opaque tokens。
如果必须在请求时做出此决定,那么您可以使用 AuthenticationManagerResolver 来实现它,如下所示:
@BeanAuthenticationManagerResolver<HttpServletRequest> tokenAuthenticationManagerResolver(JwtDecoder jwtDecoder, OpaqueTokenIntrospector opaqueTokenIntrospector) {AuthenticationManager jwt = new ProviderManager(new JwtAuthenticationProvider(jwtDecoder));AuthenticationManager opaqueToken = new ProviderManager(new OpaqueTokenAuthenticationProvider(opaqueTokenIntrospector));return (request) -> useJwt(request) ? jwt : opaqueToken;}
备注
- useJwt(HttpServletRequest) 的可以根据 request 中的 path 等特殊标记,来判断使用那个。
然后在 DSL 中指定这个 AuthenticationManagerResolver:
http.authorizeHttpRequests(authorize -> authorize.anyRequest().authenticated()).oauth2ResourceServer(oauth2 -> oauth2.authenticationManagerResolver(this.tokenAuthenticationManagerResolver));
3.3.2 多租户
当有多种策略用于验证承载令牌(由某个租户标识符作为密钥)时,资源服务器被认为是多租户的。
例如,您的资源服务器可能会接受来自两个不同授权服务器的 bearer tokens。或者,您的授权服务器可能有多个发行者。
在每种情况下,都需要做两件事,并与您选择如何做相关的权衡取舍:
- 处理租户
- 传播租户
① 通过 Claim 处理租户
区分租户的一种方法是通过issuer claim。由于issuer claim伴随签名的 JWT,这可以使用 JwtIssuerAuthenticationManagerResolver 完成,如下所示:
JwtIssuerAuthenticationManagerResolver authenticationManagerResolver = new JwtIssuerAuthenticationManagerResolver("https://idp.example.org/issuerOne", "https://idp.example.org/issuerTwo");http.authorizeHttpRequests(authorize -> authorize.anyRequest().authenticated()).oauth2ResourceServer(oauth2 -> oauth2.authenticationManagerResolver(authenticationManagerResolver));
这很好,因为issuer endpoints 是延迟加载的。实际上,对应的 JwtAuthenticationProvider 仅在发送给对应颁发者的第一个请求时才被实例化。这允许应用程序启动独立于那些启动和可用的授权服务器。也就是说不用授权服务器,就可以将资源服务器给启动起来。
② 动态租户
当然,您可能不想在每次添加新租户时都重新启动应用程序。在这种情况下,您可以使用 AuthenticationManager 实例的存储库,来配置 JwtIssuerAuthenticationManagerResolver,您可以在运行时对其进行编辑,如下所示:
private void addManager(Map<String, AuthenticationManager> authenticationManagers, String issuer) {JwtAuthenticationProvider authenticationProvider = new JwtAuthenticationProvider(JwtDecoders.fromIssuerLocation(issuer));authenticationManagers.put(issuer, authenticationProvider::authenticate);}// ...JwtIssuerAuthenticationManagerResolver authenticationManagerResolver =new JwtIssuerAuthenticationManagerResolver(authenticationManagers::get);http.authorizeHttpRequests(authorize -> authorize.anyRequest().authenticated()).oauth2ResourceServer(oauth2 -> oauth2.authenticationManagerResolver(authenticationManagerResolver));
在这种情况下,您构造 JwtIssuerAuthenticationManagerResolver 并使用一种策略来获取给定颁发者的 AuthenticationManager。
这种方法允许我们在运行时从存储库中添加和删除元素(在代码片段中显示为 Map)。
备注:
- 简单地获取任何颁发者并从中构造一个 AuthenticationManager 是不安全的。发行者应该是代码可以从受信任的来源(例如允许的发行者列表)验证的发行者。
3.3.3 仅解析一次 Claim
您可能已经观察到,这种策略虽然简单,但需要权衡 JWT 在请求中由 AuthenticationManagerResolver 解析一次,然后由 JwtDecoder 再次解析。
这种额外的解析可以通过直接使用 Nimbus 的 JWTClaimsSetAwareJWSKeySelector 配置 JwtDecoder 来缓解:
@Componentpublic class TenantJWSKeySelectorimplements JWTClaimsSetAwareJWSKeySelector<SecurityContext> {private final TenantRepository tenants; // ①private final Map<String, JWSKeySelector<SecurityContext>> selectors = new ConcurrentHashMap<>(); //②public TenantJWSKeySelector(TenantRepository tenants) {this.tenants = tenants;}@Overridepublic List<? extends Key> selectKeys(JWSHeader jwsHeader, JWTClaimsSet jwtClaimsSet, SecurityContext securityContext)throws KeySourceException {return this.selectors.computeIfAbsent(toTenant(jwtClaimsSet), this::fromTenant).selectJWSKeys(jwsHeader, securityContext);}private String toTenant(JWTClaimsSet claimSet) {return (String) claimSet.getClaim("iss");}private JWSKeySelector<SecurityContext> fromTenant(String tenant) {return Optional.ofNullable(this.tenantRepository.findById(tenant))//③.map(t -> t.getAttrbute("jwks_uri")).map(this::fromUri).orElseThrow(() -> new IllegalArgumentException("unknown tenant"));}private JWSKeySelector<SecurityContext> fromUri(String uri) {try {return JWSAlgorithmFamilyJWSKeySelector.fromJWKSetURL(new URL(uri));//④} catch (Exception ex) {throw new IllegalArgumentException(ex);}}}
租户信息的假设来源
JWKKeySelector的缓存,key=租户 identifier
查找租户比简单地即时计算 JWK Set 端点更安全 - 查找充当允许租户的列表
通过从 JWK Set 端点返回的密钥类型创建 JWSKeySelector - 这里的惰性查找意味着您不需要在启动时配置所有租户
上面的键选择器是许多键选择器的组合。它根据 JWT 中的 iss 声明选择要使用的键选择器。
备注
- 要使用此方法,请确保将授权服务器配置为将声明集包含为令牌签名的一部分。没有这个,你不能保证发行者没有被坏人改变。
接下来,我们可以构造一个 JWTProcessor:
@BeanJWTProcessor jwtProcessor(JWTClaimSetJWSKeySelector keySelector) {ConfigurableJWTProcessor<SecurityContext> jwtProcessor =new DefaultJWTProcessor();jwtProcessor.setJWTClaimsSetAwareJWSKeySelector(keySelector);return jwtProcessor;}
正如您已经看到的,将租户意识降低到此级别的权衡是更多的配置。我们还有一点。
接下来,我们仍然要确保您正在验证颁发者。但是,由于每个 JWT 的颁发者可能不同,因此您还需要一个可感知租户的验证器:
@Componentpublic class TenantJwtIssuerValidator implements OAuth2TokenValidator<Jwt> {private final TenantRepository tenants;private final Map<String, JwtIssuerValidator> validators = new ConcurrentHashMap<>();public TenantJwtIssuerValidator(TenantRepository tenants) {this.tenants = tenants;}@Overridepublic OAuth2TokenValidatorResult validate(Jwt token) {return this.validators.computeIfAbsent(toTenant(token), this::fromTenant).validate(token);}private String toTenant(Jwt jwt) {return jwt.getIssuer();}private JwtIssuerValidator fromTenant(String tenant) {return Optional.ofNullable(this.tenants.findById(tenant)).map(t -> t.getAttribute("issuer")).map(JwtIssuerValidator::new).orElseThrow(() -> new IllegalArgumentException("unknown tenant"));}}
现在我们有了一个可感知租户的处理器和一个可感知租户的验证器,我们可以继续创建 JwtDecoder:
@BeanJwtDecoder jwtDecoder(JWTProcessor jwtProcessor, OAuth2TokenValidator<Jwt> jwtValidator) {NimbusJwtDecoder decoder = new NimbusJwtDecoder(jwtProcessor);OAuth2TokenValidator<Jwt> validator = new DelegatingOAuth2TokenValidator<>(JwtValidators.createDefault(), jwtValidator);decoder.setJwtValidator(validator);return decoder;}
我们已经完成了解决租户的讨论。
如果您选择通过 JWT 声明以外的方式解析租户,那么您需要确保以相同的方式处理下游资源服务器。例如,如果您通过子域解析它,您可能需要使用相同的子域来寻址下游资源服务器。
但是,如果您通过 bearer token 中的 claim 来解决它,继续阅读以了解 Spring Security’s support for bearer token propagation
3.4 解析 Bearer Token
默认情况下,资源服务器在 Authorization 标头中查找不记名令牌。然而,也可以通过几种方式进行定制。
3.4.1 从自定义标头中读取 Bearer Token
例如,您可能需要从自定义标头中读取不记名令牌。为此,您可以将 DefaultBearerTokenResolver 公开为 bean,或将实例连接到 DSL,如以下示例所示:
@BeanBearerTokenResolver bearerTokenResolver() {DefaultBearerTokenResolver bearerTokenResolver = new DefaultBearerTokenResolver();bearerTokenResolver.setBearerTokenHeaderName(HttpHeaders.PROXY_AUTHORIZATION);return bearerTokenResolver;}
或者,在provider同时使用自定义标头和值的情况下,您可以改用 HeaderBearerTokenResolver。
3.4.2 从表单参数中读取 Bearer Token
或者,您可能希望从表单参数中读取令牌,您可以通过配置 DefaultBearerTokenResolver 来完成,如下所示:
DefaultBearerTokenResolver resolver = new DefaultBearerTokenResolver();resolver.setAllowFormEncodedBodyParameter(true);http.oauth2ResourceServer(oauth2 -> oauth2.bearerTokenResolver(resolver));
3.4.3 Bearer Token 传播
前面令牌都不是在默认配置中,现在通过ServletBearerExchangeFilterFunction将令牌设置到默认的配置,这样后续的程序就可以正常读取了。
① WebClient 模式
现在您的资源服务器已经验证了令牌,将其传递给下游服务可能会很方便。这使用 ServletBearerExchangeFilterFunction 非常简单,您可以在以下示例中看到:
@Beanpublic WebClient rest() {return WebClient.builder().filter(new ServletBearerExchangeFilterFunction()).build();}
当上面的 WebClient 用于执行请求时,Spring Security 会查找当前的 Authentication 并提取任何 AbstractOAuth2Token 凭证。然后,它将在 Authorization header 中传播该令牌。
this.rest.get().uri("https://other-service.example.com/endpoint").retrieve().bodyToMono(String.class).block()
将调用 https://other-service.example.com/endpoint,为您添加bearer token Authorization header。
在需要覆盖此行为的地方,只需自己提供标头即可,如下所示:
this.rest.get().uri("https://other-service.example.com/endpoint").headers(headers -> headers.setBearerAuth(overridingToken)).retrieve().bodyToMono(String.class).block()
在这种情况下,过滤器将退回并简单地将请求转发到 Web 过滤器链的其余部分。
备注:
- 与 OAuth 2.0 客户端过滤器功能不同,此过滤器功能不会尝试更新令牌,如果它已过期。要获得此级别的支持,请使用 OAuth 2.0 客户端过滤器。
② RestTemplate 模式
RestTemplate好像不再推荐了,现在Spring主推WebClient
目前没有与 ServletBearerExchangeFilterFunction 等效的 RestTemplate,但您可以使用自己的拦截器,非常简单地传播request的bearer token:
@BeanRestTemplate rest() {RestTemplate rest = new RestTemplate();rest.getInterceptors().add((request, body, execution) -> {Authentication authentication = SecurityContextHolder.getContext().getAuthentication();if (authentication == null) {return execution.execute(request, body);}if (!(authentication.getCredentials() instanceof AbstractOAuth2Token)) {return execution.execute(request, body);}AbstractOAuth2Token token = (AbstractOAuth2Token) authentication.getCredentials();request.getHeaders().setBearerAuth(token.getTokenValue());return execution.execute(request, body);});return rest;}
备注:
- 与 OAuth 2.0 客户端过滤器功能不同,此过滤器功能不会尝试更新令牌,如果它已过期。要获得此级别的支持,请使用 OAuth 2.0 Authorized Client Manager 创建拦截器。
3.4.4 Bearer Token 失败
bearer token可能由于多种原因而无效。例如,令牌可能不再处于活动状态。
在这些情况下,资源服务器会引发 InvalidBearerTokenException。与其他异常一样,这会导致 OAuth 2.0 Bearer Token 错误响应:
HTTP/1.1 401 Unauthorized WWW-Authenticate: Bearer error_code="invalid_token",error_description="Unsupported algorithm of none",error_uri="https://tools.ietf.org/html/rfc6750#section-3.1"
此外,它作为 AuthenticationFailureBadCredentialsEvent 发布,您可以在应用程序中监听它,如下所示:
@Componentpublic class FailureEvents {@EventListenerpublic void onFailure(AuthenticationFailureBadCredentialsEvent badCredentials) {if (badCredentials.getAuthentication() instanceof BearerTokenAuthenticationToken) {// ... handle}}}