- 1. 前期准备
- 1.1 参考网址
- 1.2 模拟环境
- 2. 授权方式
- 2.1 基本概念
- 2.2 准备程序
- 2.3 授权模式
- 2.4 客户端模式
- 3. 客户端验证方法
- 3.1 配置认证方式
- 3.2 POST 认证
- 3.3 BASIC 认证
- 4. React 客户端
- 4.1 cors 改造
- 4.2 启动 csrf
- 4.3 前端开发
- 5. 定制化界面
- 5.1 定制化确认界面
- 5.2 定制登录页面
- 6. 代码解决
- 7.1 获取 token
快速入门
spring-authorization-server 是 Spring 新推出的认证服务器。当前主要支持的目标是 Oauth 与 OpenId
以下场景可以考虑引入 Oauth 2.0 认证:
- 系统敏感资源服务进行安全认证及资源保护工作
- 多个服务的统一登录认证中心、内部系统之间受保护资源请求
- 将受保护的用户资源授权给第三方信任用户
- 以后要做开发平台,类似百度开放平台,腾讯开放平台
①②③④⑤⑥⑦⑧⑨⑩⑪⑫⑬⑭⑮⑯⑰⑱⑲⑳✕✓✔✖
今后有这么两项
- junit
- mock
1. 前期准备
1.1 参考网址
Spring 官方
讨论组
OAuth2 官方文档
参考网址
1.2 模拟环境
启动官方的例子代码,其中包含三个应用程序
- Authz Server 9000 端口
- Source Server 8980 端口
- Client 8080 端口
逻辑是用户输入:http://127.0.0.1:8080,跳转到 9000 登录,登录后通过 code 得到 Token,然后拿 token 到resource server中得到数据。
2. 授权方式
2.1 基本概念
OAuth 2.0 定义了四种授权方式
- 密码模式(resource owner password credentials) --OAuth2.1 删除了该模式
- 授权码模式(authorization code)
- 简化模式(implicit)--OAuth2.1 删除了该模式
- 客户端模式(client credentials)
其中【简化模式】不推荐了,所以在今后的文档中不再描述。
Spring 内置了下面的模式,可以通过AuthorizationGrantType查看相关的代码。但是现在 Spring 只支持一部分,见Spring 的说明。
| 名称 | 说明 | 备注 |
|---|---|---|
| AUTHORIZATION_CODE | 授权码模式 | |
| IMPLICIT | 简化模式 | 不推荐,当前不支持 |
| REFRESH_TOKEN | 刷新 Token | |
| CLIENT_CREDENTIALS | 客户端模式 | 直接根据 client 的 id 和密钥即可获取 token,当前支持 |
| PASSWORD | 密码模式 | 通过用户名与密码直接得到 Token,当前不支持 |
| JWT_BEARER | jwt 模式 |
client_credentials
如果想深入了解,可以参考这些网址
2.2 准备程序
① 配置认证服务器
将要测试的授权模式,都添加到程序中,然后启动。
RegisteredClient registeredClient = RegisteredClient.withId(UUID.randomUUID().toString()).clientId("messaging-client").clientSecret("{noop}secret")//授权模式.authorizationGrantType(AuthorizationGrantType.AUTHORIZATION_CODE).authorizationGrantType(AuthorizationGrantType.REFRESH_TOKEN).authorizationGrantType(AuthorizationGrantType.CLIENT_CREDENTIALS).authorizationGrantType(AuthorizationGrantType.PASSWORD).authorizationGrantType(AuthorizationGrantType.JWT_BEARER)
② 修改资源服务器
这里为简化测试,不需要用户去确认scope,就添加了SCOPE_openid的test/*
@EnableWebSecuritypublic class ResourceServerConfig {// @formatter:off@BeanSecurityFilterChain securityFilterChain(HttpSecurity http) throws Exception {http.mvcMatcher("/messages/**").authorizeRequests().mvcMatchers("/messages/**").access("hasAuthority('SCOPE_message.read')").mvcMatchers("/test/**").access("hasAuthority('SCOPE_openid')").and().oauth2ResourceServer().jwt();return http.build();}// @formatter:on}
添加 controller
@GetMapping("/test")public String[] test() {return new String[] {"test 1", "test 2", "test 3"};}
2.3 授权模式
① 得到 code
第一步:浏览器中输入下面 URL
http://127.0.0.1:9000/oauth2/authorize?response_type=code&client_id=messaging-client&scope=openid message.read message.write&state=some-state&redirect_uri=http://127.0.0.1:8080/login/oauth2/code/messaging-client-oidc
第二步: 在登录页面,输入用户名与密码
第三部:在跳转到的链接中,将 code 复制过来
② 得到 access_token
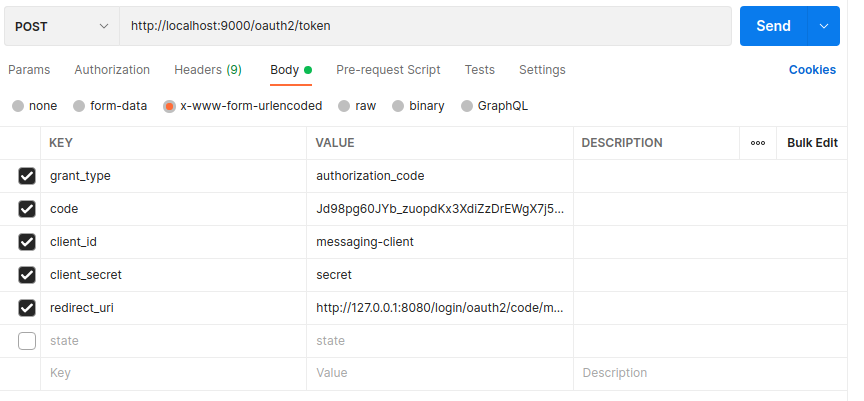
在 poostman 中输入下面的项目。

其中:redirect_url 可以指定多个,但是这里一定要与得到 Code 时指定的 url 一样,不然会出现错误。
返回的内容如下:
{"access_token": "eyJraWQiOiI5ZDVmOTA3OS0wMDg0LTRmNzAtYmNmNC1hMTc2YTI0OWM2ZTYiLCJhbGciOiJSUzI1NiJ9.eyJzdWIiOiJ1c2VyMSIsImF1ZCI6Im1lc3NhZ2luZy1jbGllbnQiLCJuYmYiOjE2Mzc0OTkyNTIsInNjb3BlIjpbIm9wZW5pZCJdLCJpc3MiOiJodHRwOlwvXC9sb2NhbGhvc3Q6OTAwMCIsImV4cCI6MTYzNzQ5OTU1MiwiaWF0IjoxNjM3NDk5MjUyfQ.ExBF3PfwZ9dv8GwrFutw9ZjLWjW6nj6q32AuDmTNA5fbq7SBx_igLZC1DlULmnoqTS5PTYwN0oTMHSyy2BJX70PMQ3jhFpVzaAeayuuWEiFf0g60pn565HpaxUzvDfH3FjUnNh1JiF8nOpzW9lZinpPSkVuZvGuU6Uw6_ZgBvLsdiuzJ0MugTh3Qkg6P79XSydUrjksk-Ja2EKvn08k3kIckqSTRDoDZGKvMVfnEbq8trtXX8D2OQh6pe32JMZ-vqxz6wDJr8fS3SSDSh_U7fce32hZl5dP2b-FmFNSO5W1JXGQ0veRh-7Z2bN7kSVtlXjm4_J3-0NTI2iHCz5jstQ","refresh_token": "PYqVy7ek-5u0nlFDoaeh2H1OfPDadcvQ3-AYnE1Cd5xOsSUTdGJof1K6Nr4dpVSosEiDNNawGmrii0i1eISN2SiLKHkPbAiUoofksaY314o382jal5apH24D-Z9lbord","scope": "openid","id_token": "eyJraWQiOiI5ZDVmOTA3OS0wMDg0LTRmNzAtYmNmNC1hMTc2YTI0OWM2ZTYiLCJhbGciOiJSUzI1NiJ9.eyJzdWIiOiJ1c2VyMSIsImF1ZCI6Im1lc3NhZ2luZy1jbGllbnQiLCJhenAiOiJtZXNzYWdpbmctY2xpZW50IiwiaXNzIjoiaHR0cDpcL1wvbG9jYWxob3N0OjkwMDAiLCJleHAiOjE2Mzc1MDEwNTIsImlhdCI6MTYzNzQ5OTI1Mn0.JdL0dKEqDMPaTBnpVypIvGZNBc1AFoOIKUglvD4PaRRpgDL6ikXLcgCuLALfBjd-f6F_Y2VqRfzdSsN39aOSpAkGU59-gWJ2B0qApKuEgFKW113TuCIECgjsvD5psEcCVr68EMXnjS19vPZ9Yv675KXs9WSq7q5YyWCrJy8vO1hu0K2QdxwDS-YiIe9t7wi5jGkXwfY4mldR5kz3cr0KGoMcZUNftMexRI2j57wrFpCHm68zUg6gupWxU6TPtVBjswIduAaYSfkIi_Hji0SdihQWAcvv5Er4Ki3b_A4NE66rhJDwWJS4Xuzqiw6OG86EVEhOZF_2_r7Ztl3H48Erag","token_type": "Bearer","expires_in": 300}
③ 访问资源服务器
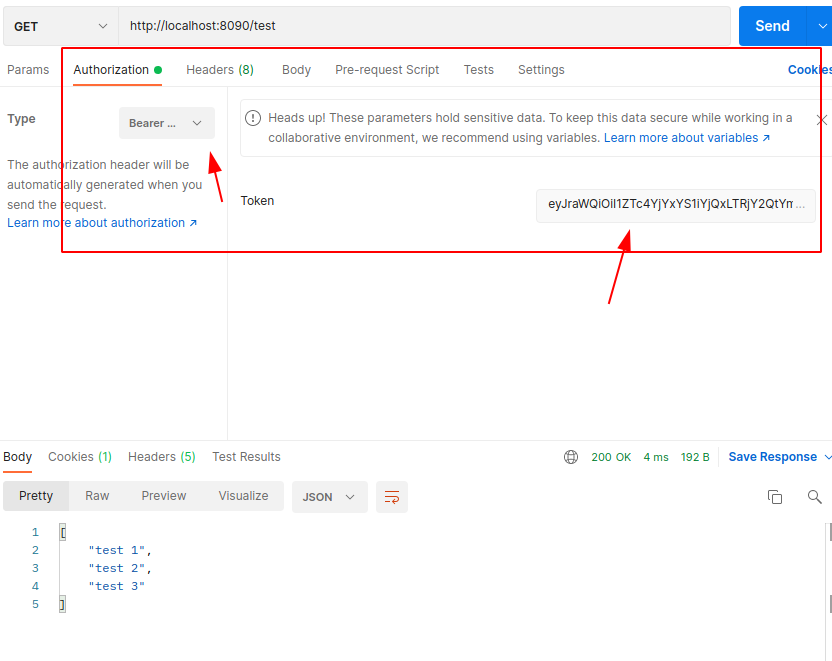
使用 postman 来访问http://localhost:8090/test

实际上就是在 Headers 中添加
Authorization=Bearer eyJraWQiOiI1ZTc4YjYxYS1iYjQxLTRjY2QtYmZkZC1lNjE1Yzg4NjNjMGIiLCJhbGciOiJSUzI1NiJ9.eyJzdWIiOiJ1c2VyMSIsImF1ZCI6Im1lc3NhZ2luZy1jbGllbnQiLCJuYmYiOjE2Mzc1MDMwMTUsInNjb3BlIjpbIm9wZW5pZCIsIm1lc3NhZ2UucmVhZCJdLCJpc3MiOiJodHRwOlwvXC9sb2NhbGhvc3Q6OTAwMCIsImV4cCI6MTYzNzUwMzMxNSwiaWF0IjoxNjM3NTAzMDE1fQ.purpxamZpOyhj9VNgnKgPV9L-At0wsAJbonfzxgAv6ItJaXpfZfbBvnfyGNcggIq_wATr0FTBs4Gm1EuHo1VOSRK1yHjkqzFRTWvAr1xY3IAoGq-4QG2yPPh_gbOtgB76wZgkUPb0ulPkipb1RCCUC5UYzVsP6uRE3tyUpI98WP97tZoa7RbgypcoNyFrvM0jpELrl0X2RNKYR8rrCSndySk5AK-865VHrpbBX52F9pToLg8XPf-IGNEem-K__bHnLNvaFY_VDfqlPaC0qcHP8skTbpUbXUMSU2b9mFWZthWrTfMekO0SVYPKwA9to60Ea5U891mG_O8vfQyqVN8kA
思考:
- 输入 id_token 能访问吗? 可以
- 等 5 分钟,token 失效后,显示什么内容呢
2.4 客户端模式
直接根据 client 的 id 和密钥即可获取 token,在 PostMan 中使用 Post
http://localhost:9000/oauth2/token?grant_type=client_credentials&client_id=messaging-client&client_secret=secret
然后就得到数据了
{"access_token": "eyJraWQiOiI3YzYwZmY5OC0zNDBjLTRkNDEtOTE2Mi1lZjEzNjQyYzk0OTkiLCJhbGciOiJSUzI1NiJ9.eyJzdWIiOiJtZXNzYWdpbmctY2xpZW50IiwiYXVkIjoibWVzc2FnaW5nLWNsaWVudCIsIm5iZiI6MTYzNzU1MTU5OSwic2NvcGUiOlsib3BlbmlkIiwibWVzc2FnZS5yZWFkIiwibWVzc2FnZS53cml0ZSJdLCJpc3MiOiJodHRwOlwvXC9sb2NhbGhvc3Q6OTAwMCIsImV4cCI6MTYzNzU1MTg5OSwiaWF0IjoxNjM3NTUxNTk5fQ.i_joxPJo92ardIdtmLftougiTEOTMf9Q1fYEfFhD_DEZZn-A5n3mySq46qcxA78hgKAvDjOs5PFnSAjViLA5pqMCirl-CyOkWBfx14rQ9xNAAPvb1qlKVh0jwKH090mgJ0LdytwoT6Ci-FBidzeIaU7teYEH1tnLt3zvUFVmVh4dQCbBB0enPEGqsBYyi2hVXnHF_8xOK9-tc-hWI8yxQoxYJ3bpOcv3db_hzibe1QpBHUfdXPJuVhsnIP4HtWw_Wo-ow5aYO78mRVuYzdoVh-CmhHhJsNGnbBWRbAMgYdGvfO3W5jTFEhImZ6KFGNsbFBBTRkyySQQ9vKSszIJx1Q","scope": "openid message.read message.write","token_type": "Bearer","expires_in": 300}
3. 客户端验证方法
客户端获取 code 后,需要去服务器将 code 换成 token,这时候用到了客户端验证的方法。
- Client Authentication
- HTTP Basic
- HTTP POST
3.1 配置认证方式
在认证服务器上配置认证方式
//客户端认证方式.clientAuthenticationMethod(ClientAuthenticationMethod.CLIENT_SECRET_BASIC).clientAuthenticationMethod(ClientAuthenticationMethod.CLIENT_SECRET_POST)
3.2 POST 认证
也就是将客户端用户名与密码,放到 POST 参数中。
例如下面的方式
http://localhost:9000/oauth2/token?grant_type=authorization_code&client_id=messaging-client&client_secret=secret&redirect_uri=http://127.0.0.1:8080/login/oauth2/code/messaging-client-oidc&code=R-X4cYeDPoUYx0nzlZRIO3Zwr_x_FesUUYnwtZYQeAOjdeeWdScngZT2wa3cKqJkDQ0GWzhCqpmhM7kUz2LYAVptGp1NPZxAJjq4ETfqE0FQfOsTzj1olRtd5wVNnBkR
3.3 BASIC 认证
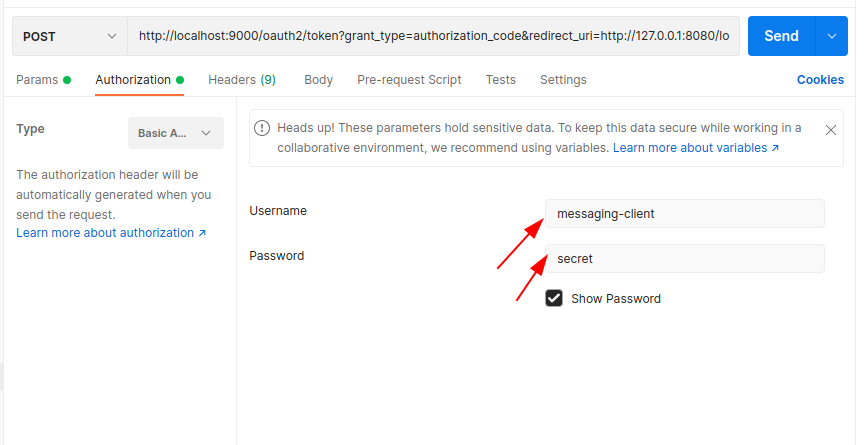
这时候需要将 client_id 与 client_secret 的内容,设置到http basic中。

③ 得到 code
登录完毕后,在地址栏中输入/oauth2/authorize得到响应的 code
测试输入正确的密码
- 输入:http://localhost:9000/
- 输入:user1 password
- 跳转到:http://localhost:9000/ ,显示 404 页面
- 浏览器中输入:/oauth2/authorize?response_type=code&client_id=messaging-client&scope=openid&state=state&redirect_uri=http://127.0.0.1:8080/login/oauth2/code/messaging-client-oidc
- 跳转到失败链接
http://127.0.0.1:8080/login/oauth2/code/messaging-client-oidc?code=DeEOyLOKLiUPykkoPuYsmEJ2GOcOc_4NMgF7uzFqofdZmXi4OyvWgARjwE13hVFsercSHyf-drgSKfQ5szfblN3BMAs9xK1kr66NB_XVt6MC4dTGLjfkXVd9IZ1AvqVz&state=state
4. React 客户端
4.1 cors 改造
由于 React 要远程调用获取 Token,需要进行跨域 cors 改造,这里有几点注意事项。
改造都在服务器端进行。
① 那些网址可以跨域
下面是一个简单的,今后可以根据 client 来配置那些可以跨域。
public class RegisteredClientCorsConfigurationSource implements CorsConfigurationSource {@Overridepublic CorsConfiguration getCorsConfiguration(HttpServletRequest request) {CorsConfiguration config = new CorsConfiguration();config.setAllowCredentials(true);config.setAllowedOriginPatterns(Arrays.asList("/**"));config.setAllowedOrigins(Arrays.asList("http://127.0.0.1:8000"));config.setAllowedMethods(Arrays.asList("*"));config.setAllowedHeaders(Arrays.asList("*"));//自定义的输出头,这样客户端就可以读取到了//config.setExposedHeaders(Arrays.asList("/**"));// 根据client_id得到client的return url 这段代码省略了return config;}}
② 注册 Filter
bean.setOrder(Ordered.HIGHEST_PRECEDENCE); 非常重要,不然会得不到 Token。但是这样会引发一个严重的问题,因为所有的路径,包含静态图片调用,都会运行一下这个过滤器。
@Configurationpublic class FiltersConfiguration {@Configurationpublic static class FiltersCorsConfiguration {@Bean@ConditionalOnMissingBean(name = "corsConfigurationSource")public CorsConfigurationSource corsConfigurationSource(){return new RegisteredClientCorsConfigurationSource();}@Beanpublic FilterRegistrationBean<CorsFilter> casCorsFilter(@Qualifier("corsConfigurationSource")final CorsConfigurationSource corsConfigurationSource){FilterRegistrationBean bean = new FilterRegistrationBean<>(new CorsFilter(corsConfigurationSource));bean.setName("sasCorsFilter");bean.setAsyncSupported(true);bean.setOrder(Ordered.HIGHEST_PRECEDENCE);return bean;}}}
③ 放开OPTIONS操作
在进行跨域操作之前,浏览器会发送一个OPTIONS请求,看看服务器是否允许跨域操作,所以关于这个操作,要放开。不然不能跨域。
.antMatchers(HttpMethod.OPTIONS, "/**").permitAll()
④ 注销 csrf 限制
CSRF一般指跨站请求伪造。 跨站请求伪造。如果要启动这个功能,需要单独启动。
.csrf().disable()
如果不限制这个,就算在 postman 中,用 post 来调用一个 API 接口,也会出现错误。
4.2 启动 csrf
怎么启动这个功能呢? 在前后台分离的情况下,如何启用这个功能呢?不启动这个功能,会是一个隐患。
4.3 前端开发
以 AntDesign 的代码为例子。主要实现的功能如下:
- 当没有登录,跳转到 oauth2 页面进行登录成功后跳转回来
- 可以记着以前的网址
- 关闭页面后,提示是否自动退出
- 可以进行 logout 页面
① 流程说明
- 没有登录的情况下,跳转到:
http://127.0.0.1:9000/oauth2/authorize,这个页面会出发login进行登录。 - 登录成功后,会将 code,返回到
http://127.0.0.1:8000/oauth2/authorized页面。这个页面相当于以前的 login,但是一个自动登录的页面。- 会用
code,通过post去访问http://127.0.0.1:9000/oauth2/token获得token - 然后通过 token 去获得当前登录的用户情况
- 然后跳转到应该登录的页面。
- 会用
② 主要改造的代码
app.tsx- 修改
getInitialState函数,如果没有得到当前登录的用户,就跳转到OAuth2登录页面。 - 实际上也可以判断,当前的 token 没有,就表示没有登录,这个 token 可以像
antDesignPro一样放到useModel('@@initialState')中,也可以放到 token 中。
- 修改
- 添加一个路由:
/oauth2/authorized用来收到 code,并且得到 token- 根据 code 去得到 token
- 然后去得到用户信息
- 然后根据
state跳转到页面
5. 定制化界面
5.1 定制化确认界面
官网的例子有
① 配置定制页面
@Bean@Order(Ordered.HIGHEST_PRECEDENCE)public SecurityFilterChain authorizationServerSecurityFilterChain(HttpSecurity http) throws Exception {OAuth2AuthorizationServerConfigurer<HttpSecurity> authorizationServerConfigurer =new OAuth2AuthorizationServerConfigurer<>();authorizationServerConfigurer.authorizationEndpoint(authorizationEndpoint ->authorizationEndpoint.consentPage(CUSTOM_CONSENT_PAGE_URI));RequestMatcher endpointsMatcher = authorizationServerConfigurer.getEndpointsMatcher();http.requestMatcher(endpointsMatcher).authorizeRequests(authorizeRequests ->authorizeRequests.anyRequest().authenticated()).csrf(csrf -> csrf.ignoringRequestMatchers(endpointsMatcher)).apply(authorizationServerConfigurer);return http.formLogin(Customizer.withDefaults()).build();}
② 生成 Controller 类
从系统中得到两个类,分别是:registeredClientRepository与authorizationConsentService用来得到注册用户信息与当前已经确认过的信息。
@GetMapping(value = "/oauth2/consent")public String consent(Principal principal, Model model,@RequestParam(OAuth2ParameterNames.CLIENT_ID) String clientId,@RequestParam(OAuth2ParameterNames.SCOPE) String scope,@RequestParam(OAuth2ParameterNames.STATE) String state) {// Remove scopes that were already approvedSet<String> scopesToApprove = new HashSet<>();Set<String> previouslyApprovedScopes = new HashSet<>();RegisteredClient registeredClient = this.registeredClientRepository.findByClientId(clientId);OAuth2AuthorizationConsent currentAuthorizationConsent =this.authorizationConsentService.findById(registeredClient.getId(), principal.getName());Set<String> authorizedScopes;if (currentAuthorizationConsent != null) {authorizedScopes = currentAuthorizationConsent.getScopes();} else {authorizedScopes = Collections.emptySet();}for (String requestedScope : StringUtils.delimitedListToStringArray(scope, " ")) {if (authorizedScopes.contains(requestedScope)) {previouslyApprovedScopes.add(requestedScope);} else {scopesToApprove.add(requestedScope);}}model.addAttribute("clientId", clientId);model.addAttribute("state", state);model.addAttribute("scopes", withDescription(scopesToApprove));model.addAttribute("previouslyApprovedScopes", withDescription(previouslyApprovedScopes));model.addAttribute("principalName", principal.getName());return "consent";}
③ 生成页面
使用了bootstrap 4.5.2与默认的模板引擎。
今后可以使用 tailwind.css。
不用自己写 css,不用 bootstrap,写样式有 tailwindcss 就足够了
5.2 定制登录页面
6. 代码解决
7.1 获取 token
OAuth2ClientAuthenticationFilter extends OncePerRequestFilter 遇到 /oauth2/token
调用ProviderManager中的 authenticate 函数,根据多个provider中的OAuth2ClientAuthenticationProvider得到[authenticationResult]。
得到[authenticationResult]结果后干什么呢?
调用另外一个认证OAuth2AuthorizationCodeAuthenticationProvider
OAuth2TokenEndpointFilter extends OncePerRequestFilter 这个调用啥东东
Http11Processor
Error parsing HTTP request header
Error state [CLOSE_CONNECTION_NOW] reported while processing request
NioEndpoint
URLClassLoaderorg.apache.tomcat.util.buf.UDecoder$1org.h2.value.ValueLob